**The Dashboard screen provides a quick glance view of the schedules for the day.**
#### **Features in Dashboard**| **Employees - Clock-in / Clock out:** This section provides information about employee attendance, including their clock-in and clock-out times. It helps monitor and manage employee working hours, ensuring proper attendance and time management. | [](https://support.myezcare.com/uploads/images/gallery/2023-10/01Bimage.png) |
| **Employees Overtime:** The employees' overtime section displays the number of employees who have accumulated overtime hours in the last seven days. It helps organizations track and manage overtime effectively, ensuring compliance with labor regulations and managing workload distribution. | [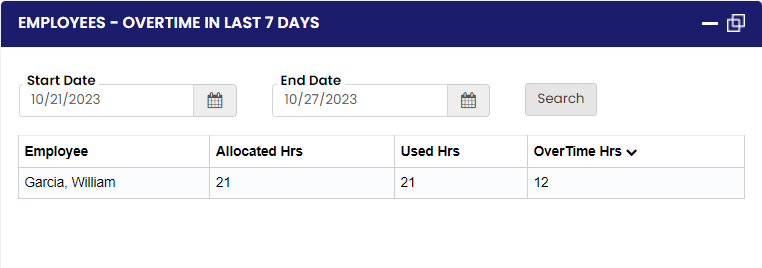](https://support.myezcare.com/uploads/images/gallery/2023-11/o8ximage.png) |
| **Upcoming Birthday:** This section presents information about upcoming birthdays of both patients and employees. It serves as a reminder to celebrate and acknowledge birthdays, fostering a positive work environment and patient care experience. | [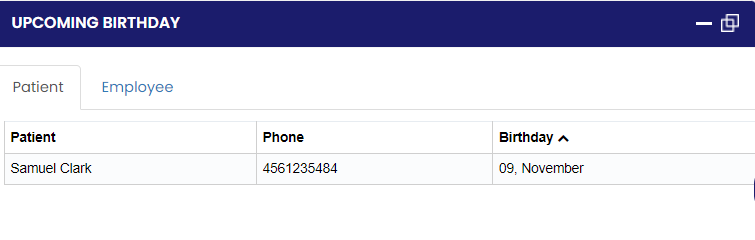](https://support.myezcare.com/uploads/images/gallery/2023-11/pm5image.png) |
| **Patient - New:** The new patient section provides information about recently admitted or registered patients. It allows staff to stay informed about new arrivals and helps initiate the necessary procedures and documentation for these patients. | [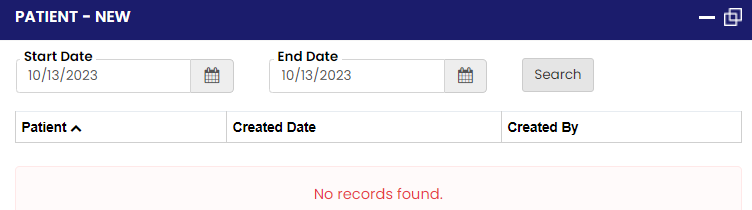](https://support.myezcare.com/uploads/images/gallery/2023-10/oKgimage.png) |
| **Patient - Fully not scheduled:** This section highlights patients who are not yet fully scheduled for the next seven days. It alerts staff to ensure proper scheduling and avoid any gaps in patient care or appointments. | [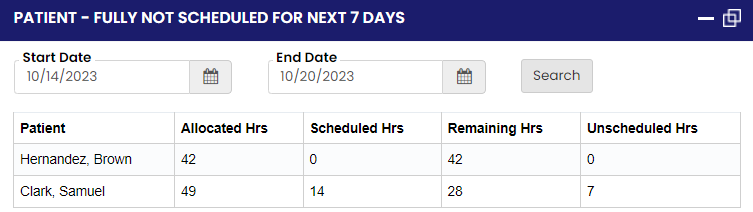](https://support.myezcare.com/uploads/images/gallery/2023-10/MKjimage.png) |
| **Patient - Pending:** The pending patient section displays information about patients whose status is pending. It helps staff stay updated on patients whose cases are awaiting further actions or approvals, ensuring timely follow-up and resolution. | [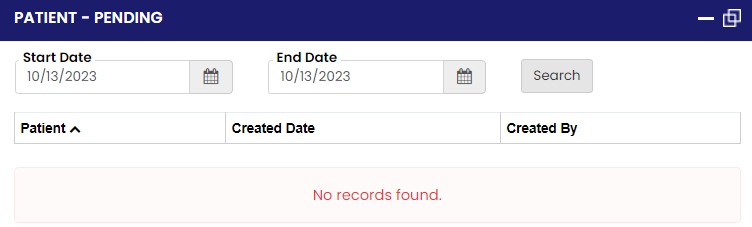](https://support.myezcare.com/uploads/images/gallery/2023-10/Oq5image.png) |
| **Patient - Discharged:** This section provides information about patients who have been discharged from the organization's care. It helps track the number of discharged patients and their relevant details for record-keeping and reporting purposes. | [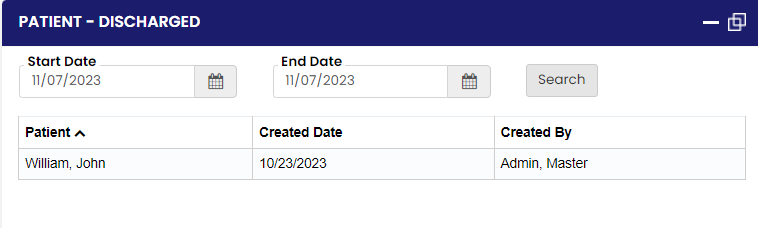](https://support.myezcare.com/uploads/images/gallery/2023-11/SCgimage.png) |
| **Patient - Transfer:** The patient transfer section provides information about patients who have been transferred to another location or facility. It enables seamless coordination between different departments or facilities involved in the patient's care. | [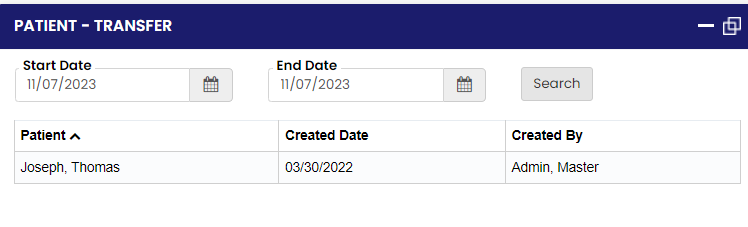](https://support.myezcare.com/uploads/images/gallery/2023-11/xm5image.png) |
| **Patient - On Hold:** This section displays information about patients who are currently on hold, indicating that their cases are temporarily paused or pending certain conditions or decisions. It helps staff track and manage patients whose care plans are on hold. | [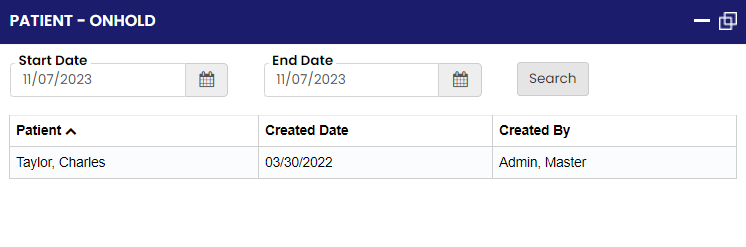](https://support.myezcare.com/uploads/images/gallery/2023-11/yFcimage.png) |
| **Prior Auth Expiring:** This section highlights the expiration dates of prior authorizations. It enables staff to proactively manage the authorization process, ensuring that necessary authorizations are renewed or extended in a timely manner to avoid disruption in patient care and billing. | [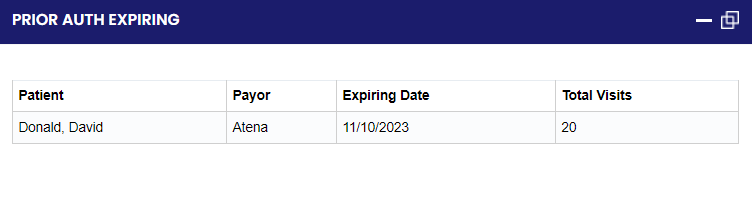](https://support.myezcare.com/uploads/images/gallery/2023-11/whoimage.png) |
| **Prior Auth Expired:** The prior authorization expired section provides information about authorizations that have expired. It helps staff identify cases where authorization needs to be reestablished to continue patient care and billing processes smoothly. | [](https://support.myezcare.com/uploads/images/gallery/2023-11/Nbbimage.png) |
Note: All Fields marked with \* are mandatory and must be filled out, otherwise the system will generate an error indicating that the required information is missing.
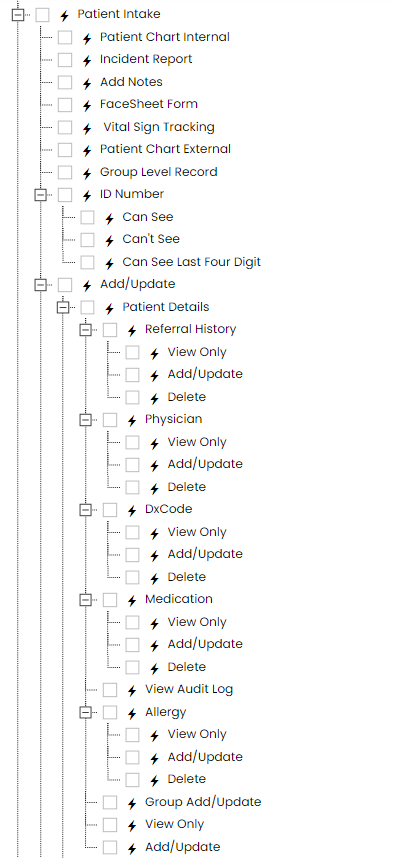
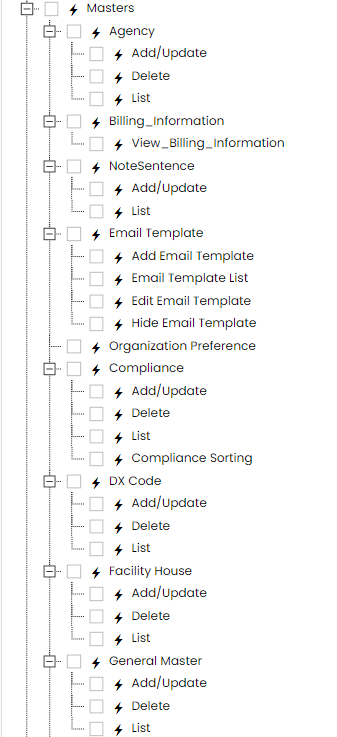
### User Login The User Login on the top right corner of the software contains the following features: - **My Profiles** - **Roles and Permissions** - **Organization Settings** - **Billing** - **Log Out** [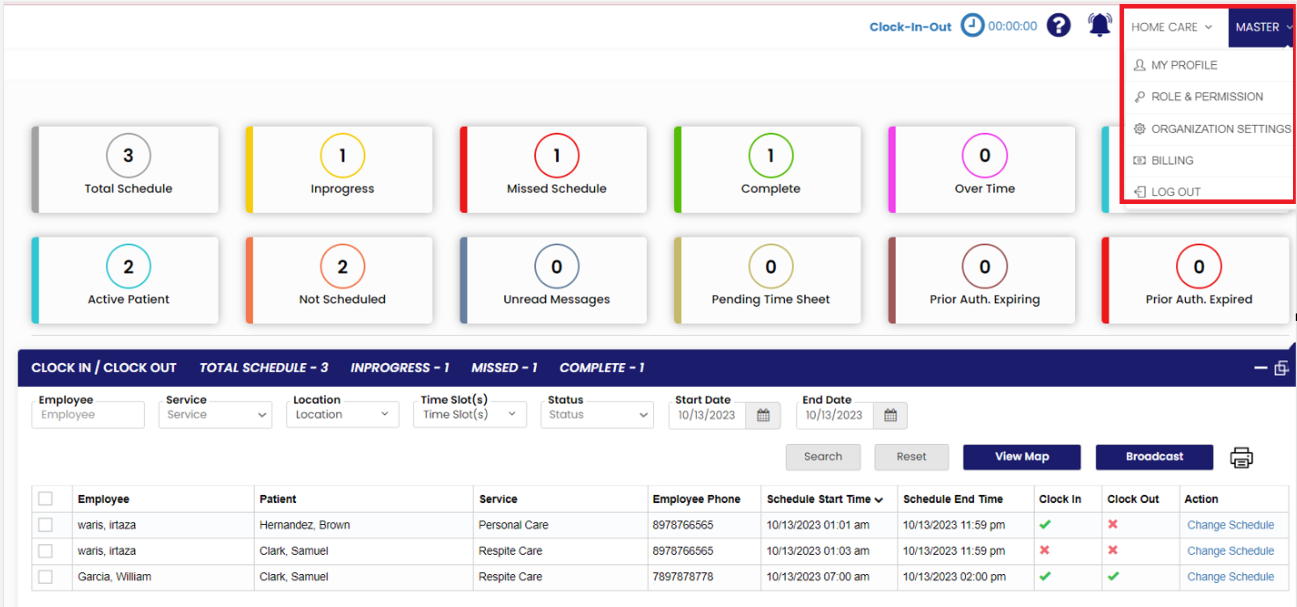](https://support.myezcare.com/uploads/images/gallery/2023-10/Emqimage.png) ##### My Profiles The user can update the Profile information under My Profiles option. Update the required fields, upload the Profile image and click Save option. [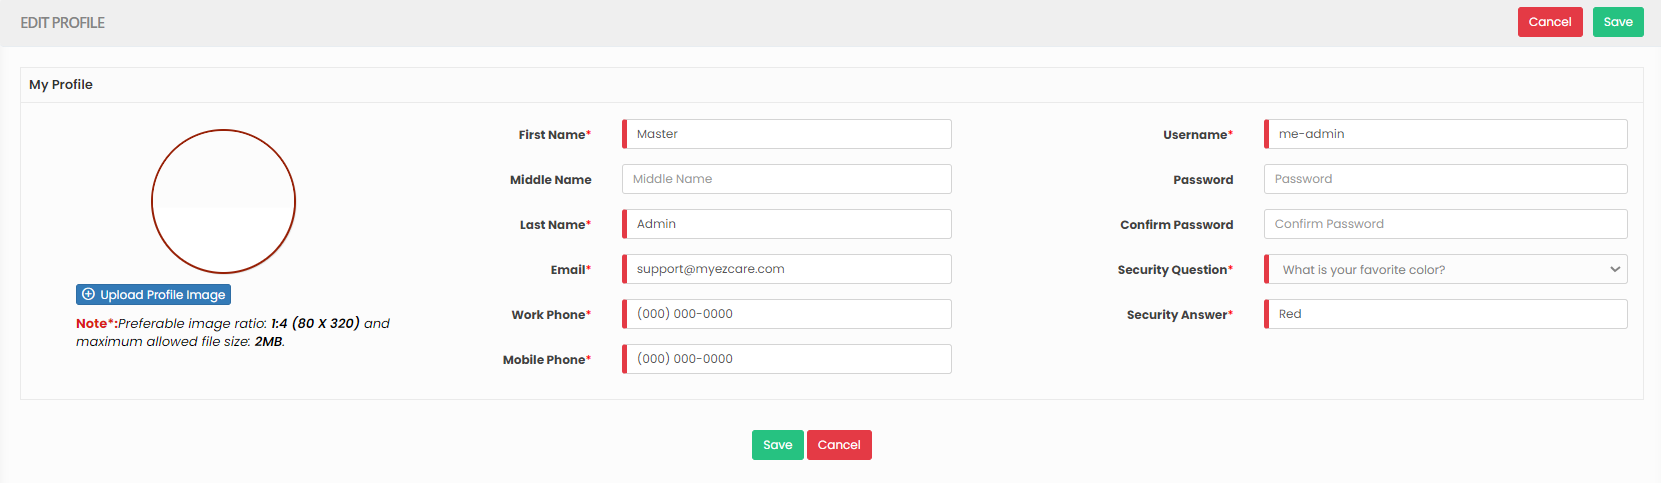](https://support.myezcare.com/uploads/images/gallery/2023-10/IQhimage.png) ##### Roles & Permissions The user can give permissions to the respective Role of the Employee. Select and Role and choose the permission to be given for the Role. - **Mobile App Permissions** - **Web Permissions** - **Report Permissions** [](https://support.myezcare.com/uploads/images/gallery/2023-10/98Uimage.png) #### Editing the Role The Role of the Employee can also be edited by using the option Edit in the Selected Role. Please find the list of permissions for all the features in the application. Click on the + button to view all the permission for each Tab. [](https://support.myezcare.com/uploads/images/gallery/2024-02/MOSimage.png) [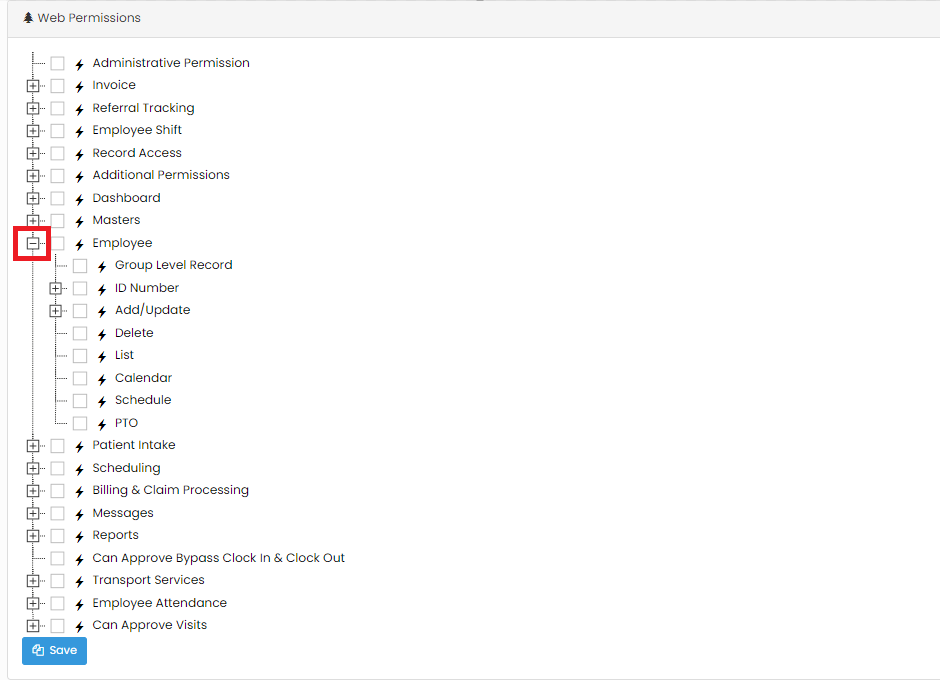](https://support.myezcare.com/uploads/images/gallery/2024-02/USqimage.png) **Dashboard** The Dashboard Permissions can be given to the employee by using the option Dashboard under Roles and Permissions. Mark the Permissions to be given to the employee and Click Save option. [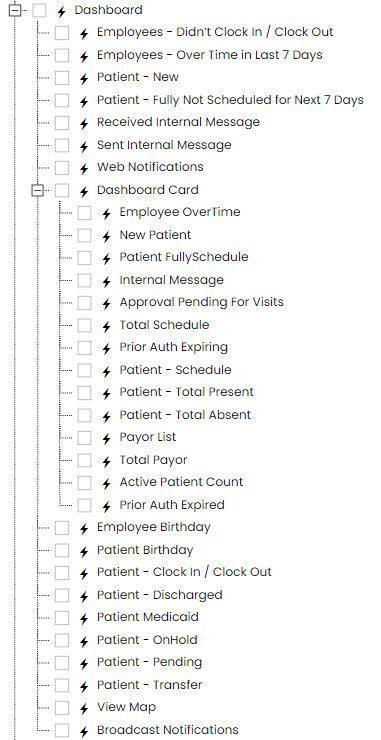](https://support.myezcare.com/uploads/images/gallery/2024-02/cRNimage.png) **Employee** The Permissions for the Employee to access the application can be given under the Employee option in Roles and Permissions. The user can select the checkbox to give access to only view, Add/Update the information in the application and also to Delete the records for the Employees.| [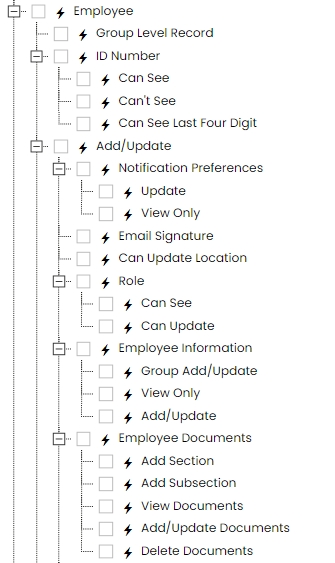](https://support.myezcare.com/uploads/images/gallery/2024-02/PsUimage.png) | [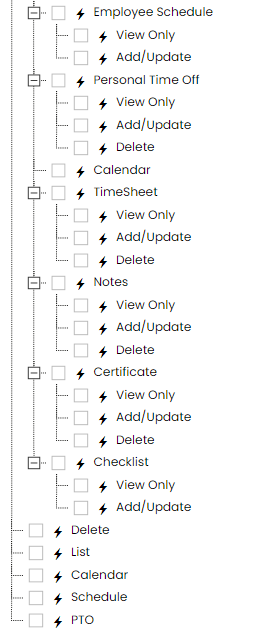](https://support.myezcare.com/uploads/images/gallery/2024-02/TBTimage.png) |
| [](https://support.myezcare.com/uploads/images/gallery/2024-02/kvrimage.png) | [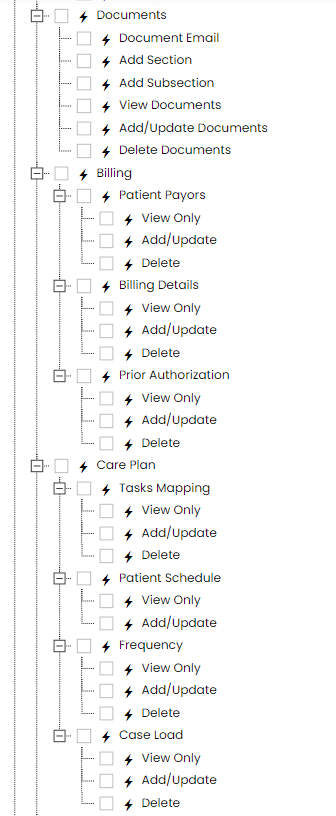](https://support.myezcare.com/uploads/images/gallery/2024-02/HUrimage.png) | [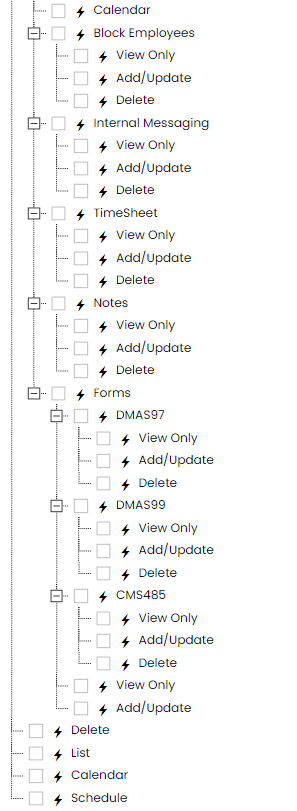](https://support.myezcare.com/uploads/images/gallery/2024-02/fPuimage.png) |
| [](https://support.myezcare.com/uploads/images/gallery/2024-02/u84image.png) | [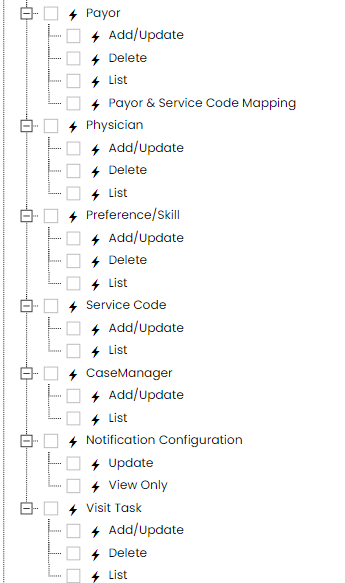](https://support.myezcare.com/uploads/images/gallery/2024-02/oLoimage.png) |
Note: All Fields marked with **\*** are mandatory and must be filled out, otherwise the system will generate an error indicating that the required information is missing.
**Settings >> Agency >> +Add option**
The Referral Agency names can be added in the system using the option Agency under Settings. The healthcare providers can efficiently coordinate care plans, medication schedules, and treatment protocols across different disciplines and locations. The healthcare professionals such as nurses, therapists, aides and other caregivers who deliver medical care, assistance with daily activities and emotional support to patients who may be recovering from illness, managing chronic conditions or in need of long-term care. Locate the +Add option under Agency Tab. [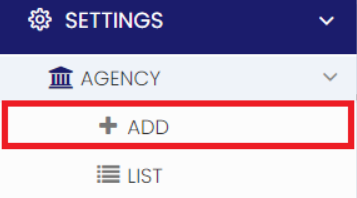](https://support.myezcare.com/uploads/images/gallery/2023-10/50simage.png) Now, update the required information in Agency Details and Click Save option. [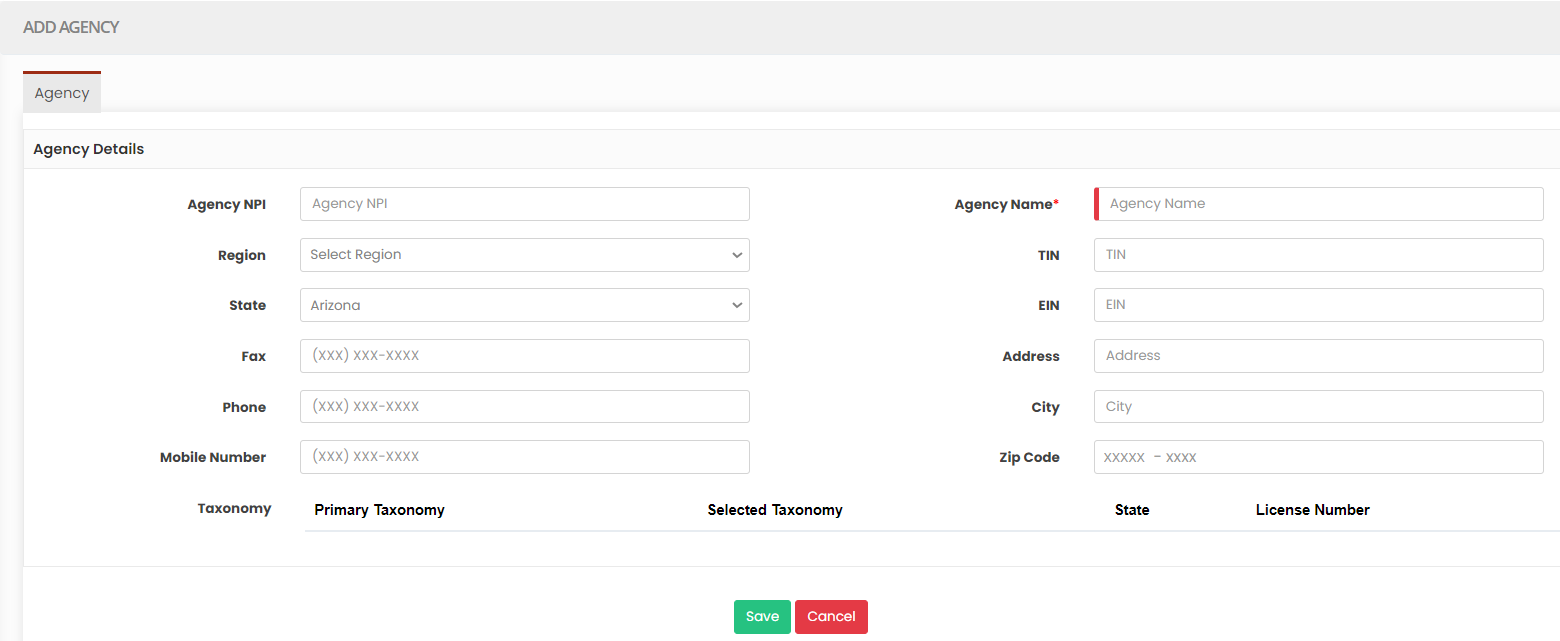](https://support.myezcare.com/uploads/images/gallery/2023-10/4x9image.png) ### Editing Agency**Settings >> Agency >> List**
Locate list option under Agency Tab. [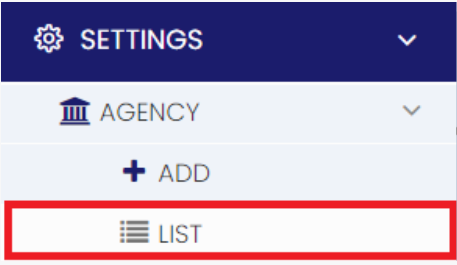](https://support.myezcare.com/uploads/images/gallery/2023-10/t3gimage.png) Select the Agency from List and Click Edit option on the right side of the screen. [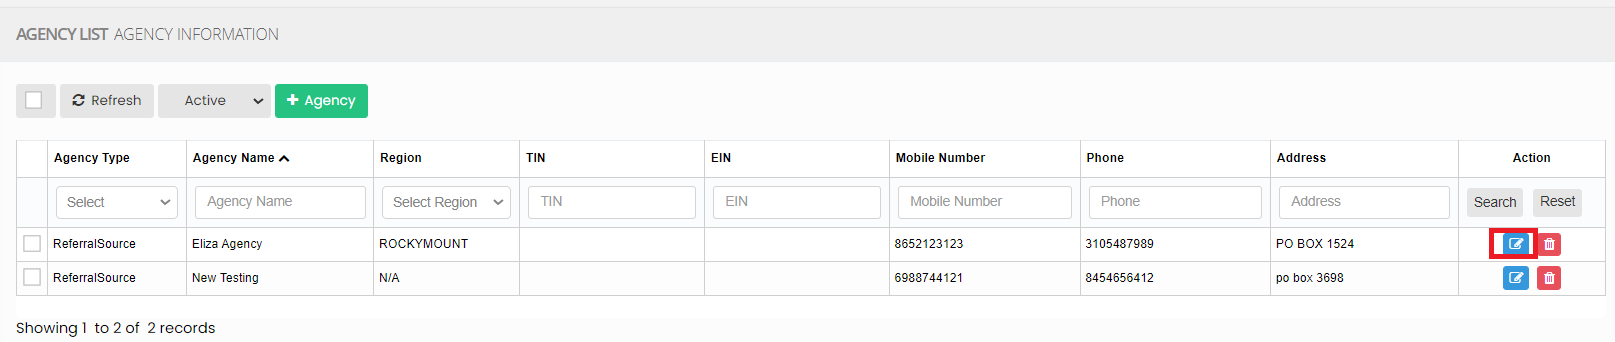](https://support.myezcare.com/uploads/images/gallery/2023-10/8ykimage.png) Now Edit the required information and Click Update option. [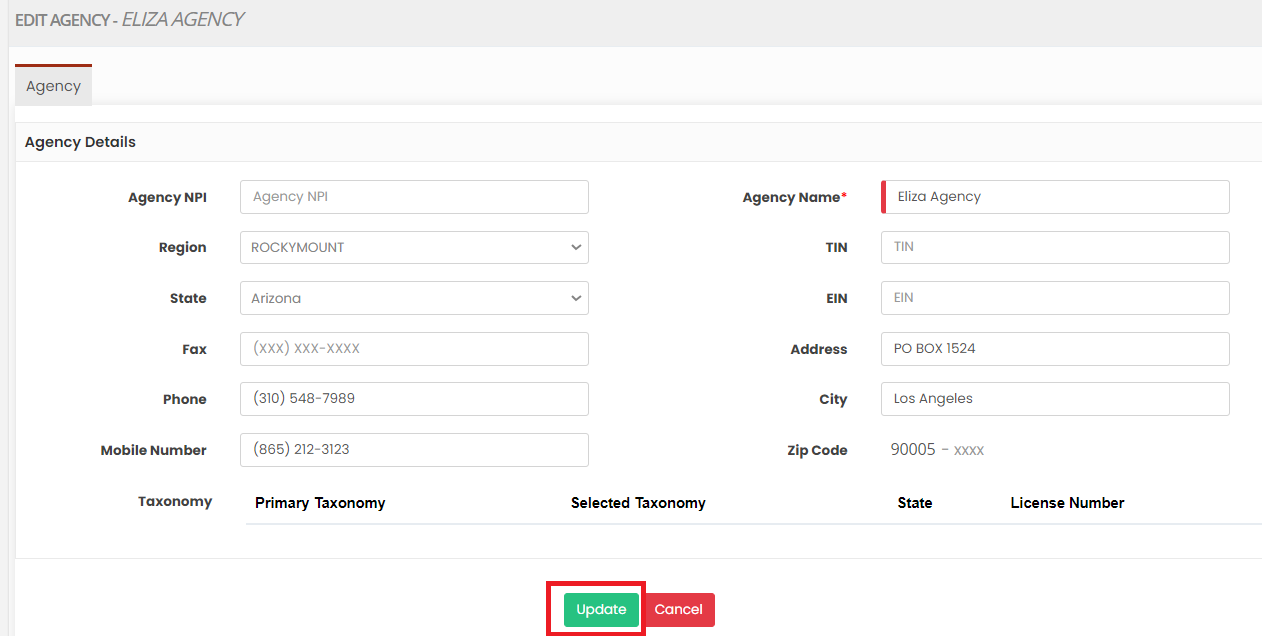](https://support.myezcare.com/uploads/images/gallery/2023-10/W7Dimage.png) ### Delete Agency**Settings >> Agency >> List**
Select the Agency from the list using the check box and click Delete or Disable Selection option on the screen. [](https://support.myezcare.com/uploads/images/gallery/2023-10/FQSimage.png) Now, the Agency gets deleted and we can view the Agency under Deleted list. [](https://support.myezcare.com/uploads/images/gallery/2023-10/Phkimage.png) The user can also Restore the deleted Agency by using the option Active on the right side of the screen. [](https://support.myezcare.com/uploads/images/gallery/2023-10/epOimage.png) # Case Manager A case manager plays a crucial role in coordinating and managing the care of patients in their own homes. They assess the patient's needs, create care plans, coordinate with healthcare providers, ensure necessary services are provided, and monitor the patient's progress, all while focusing on maintaining the patient's comfort and well-being in a home setting. ### Adding Case ManagerNote: All Fields marked with \* are mandatory and must be filled out, otherwise the system will generate an error indicating that the required information is missing.
**Settings >> Case Manager >> +Add option**
The Case Manager serves as the central point of contact for all involved parties, including the patient, family members, caregivers, physicians, therapists and other healthcare professionals. The Case Manager maintains accurate and up-to-date documentation of the patient's care. By documenting the Case Manager details in the software, the entire care team can easily identify and communicate with the designated case manager, streamlining the coordination process. Case Manager play a role in determining the level of care required for patients and involved in the billing and reimbursement process. The Case Manager details can be added in the system under Settings >> Case Manager >> +Add option. [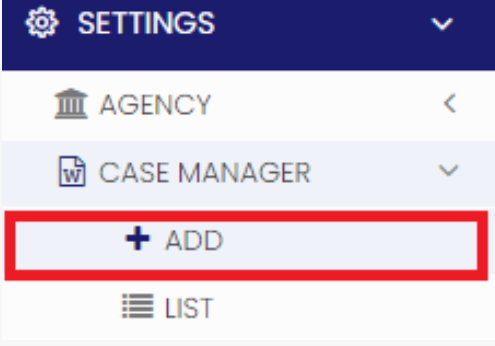](https://support.myezcare.com/uploads/images/gallery/2023-10/mMiimage.png) Update the required fields in Case Manager details option and Click Save. [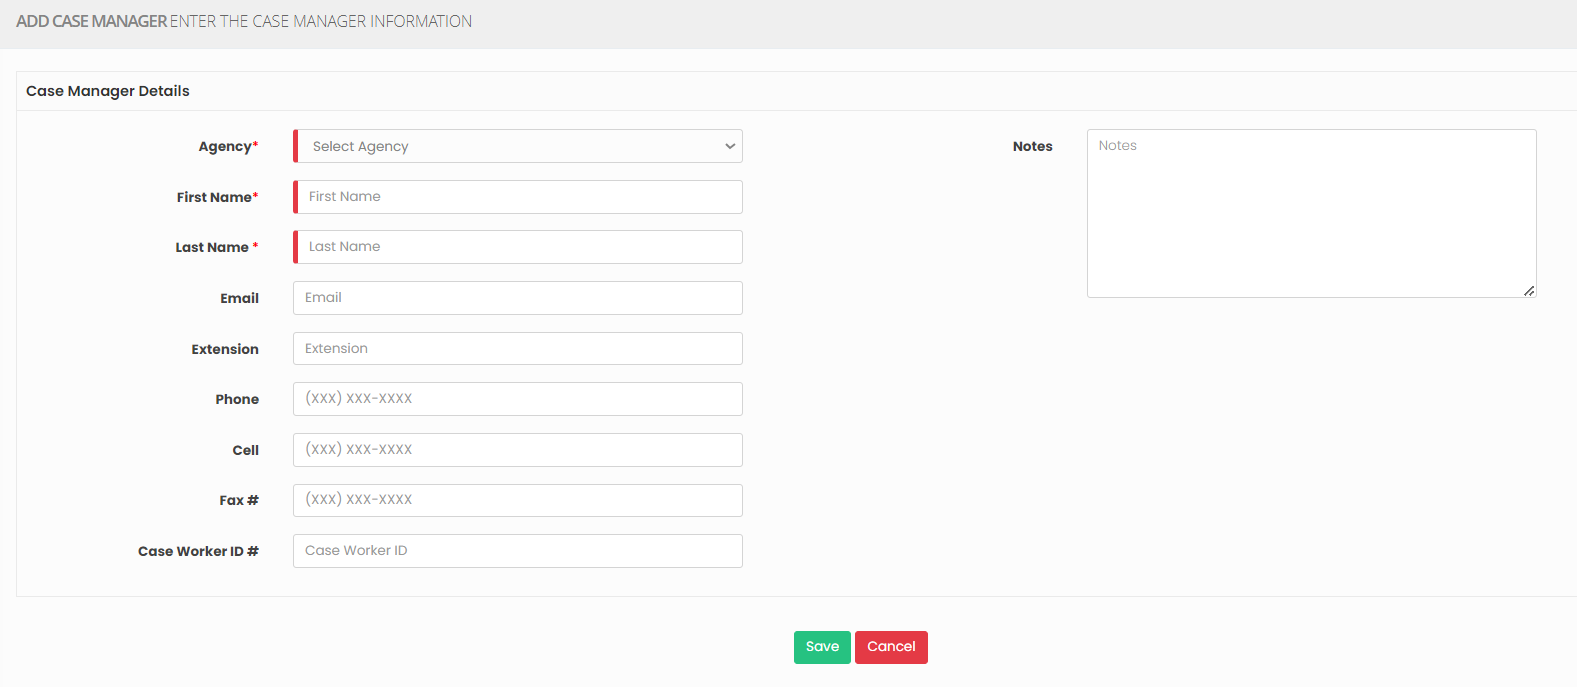](https://support.myezcare.com/uploads/images/gallery/2023-10/YEWimage.png) ### Editing Case Manager For Editing the Case Manager information, follow these steps:**Settings >> Case Manager >> List**
[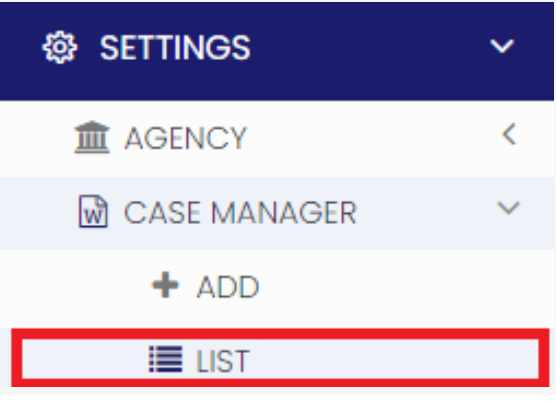](https://support.myezcare.com/uploads/images/gallery/2023-10/60iimage.png) Select the Case Manager from List and Click Edit option on the right side of the screen. [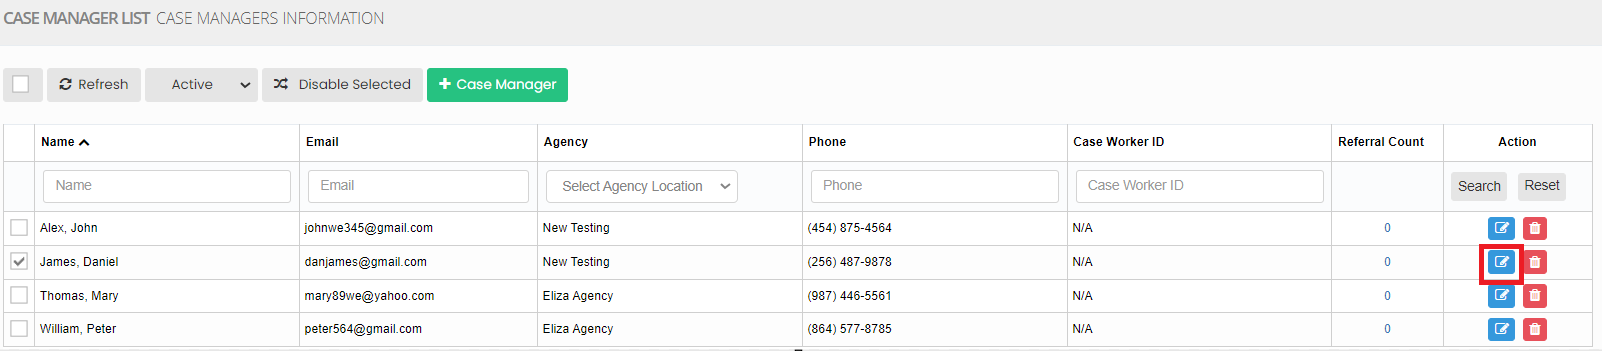](https://support.myezcare.com/uploads/images/gallery/2023-11/7Fsimage.png) Now, edit the required information and click update option. [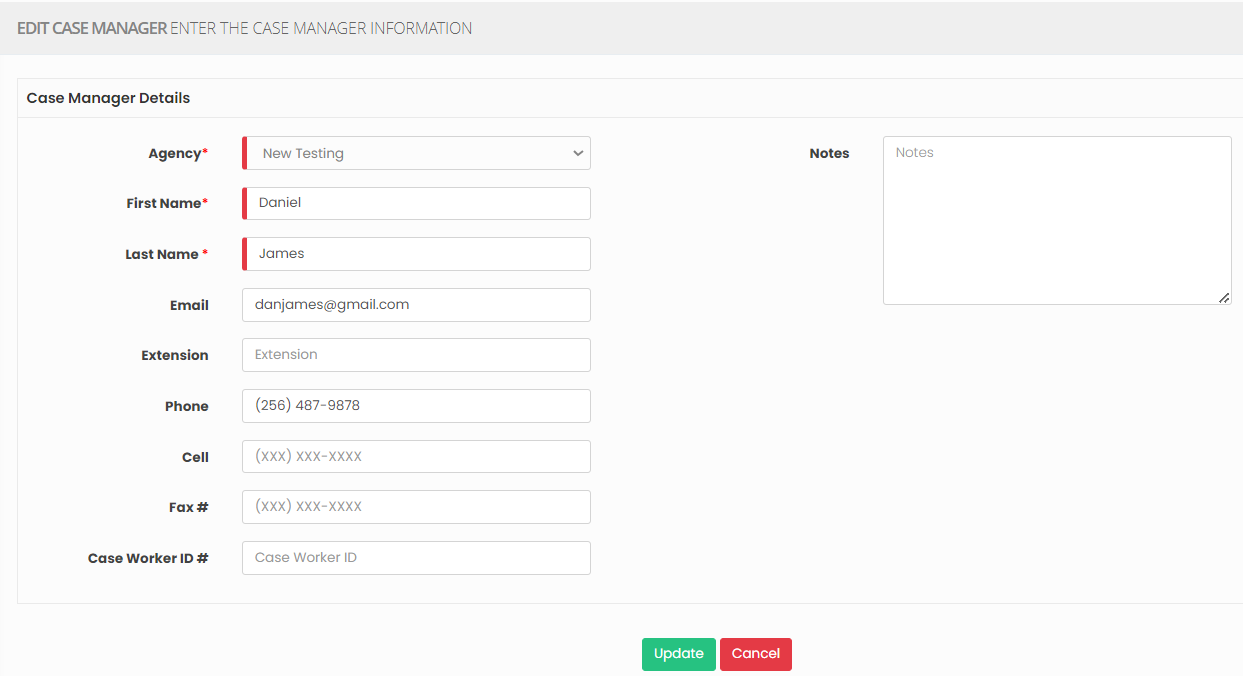](https://support.myezcare.com/uploads/images/gallery/2023-11/XTvimage.png) ### Delete Case Manager**Settings >> Case Manager >> List**
Select the Case Manager from the list using the check box and click Delete or Disable Selection option on the screen. [](https://support.myezcare.com/uploads/images/gallery/2023-10/lYYimage.png) Now, the Case Manager details gets deleted and we can view the Case Manager under Deleted list. [](https://support.myezcare.com/uploads/images/gallery/2023-10/AMCimage.png) The user can also Restore the deleted Case Manager details by using the option Active on the right side of the screen. [](https://support.myezcare.com/uploads/images/gallery/2023-10/sjwimage.png) # Facility House A facility house in home care refers to a residential care setting for individuals requiring assistance with daily living. It offers a safe environment with support for activities, medical services, and social interaction.Note: All Fields marked with \* are mandatory and must be filled out, otherwise the system will generate an error indicating that the required information is missing.
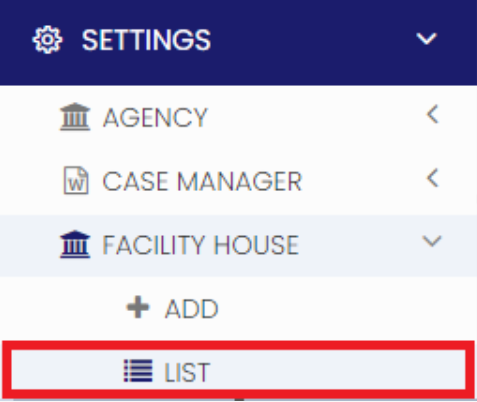
### Adding Facility House The Facility house can be added in the system under the feature Settings.**Settings >> Facility House >> +Add option**
The Facility house provide round the clock support to ensure that the residents have access to assistance and care whenever they need it. This may include staff members available on-site at all times to respond to emergencies or provide assistance with activities of daily living. The Caregivers in the Facility house provide companionship and emotional support to residents, helping them with social interaction and recreational activities. For Adding the Facility Name in the system, click the option + Add under Settings. [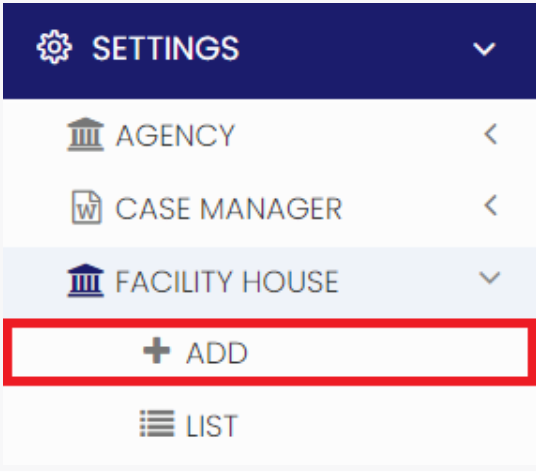](https://support.myezcare.com/uploads/images/gallery/2023-10/JmYimage.png) Update the Facility House Details in the required fields and Click Save option. [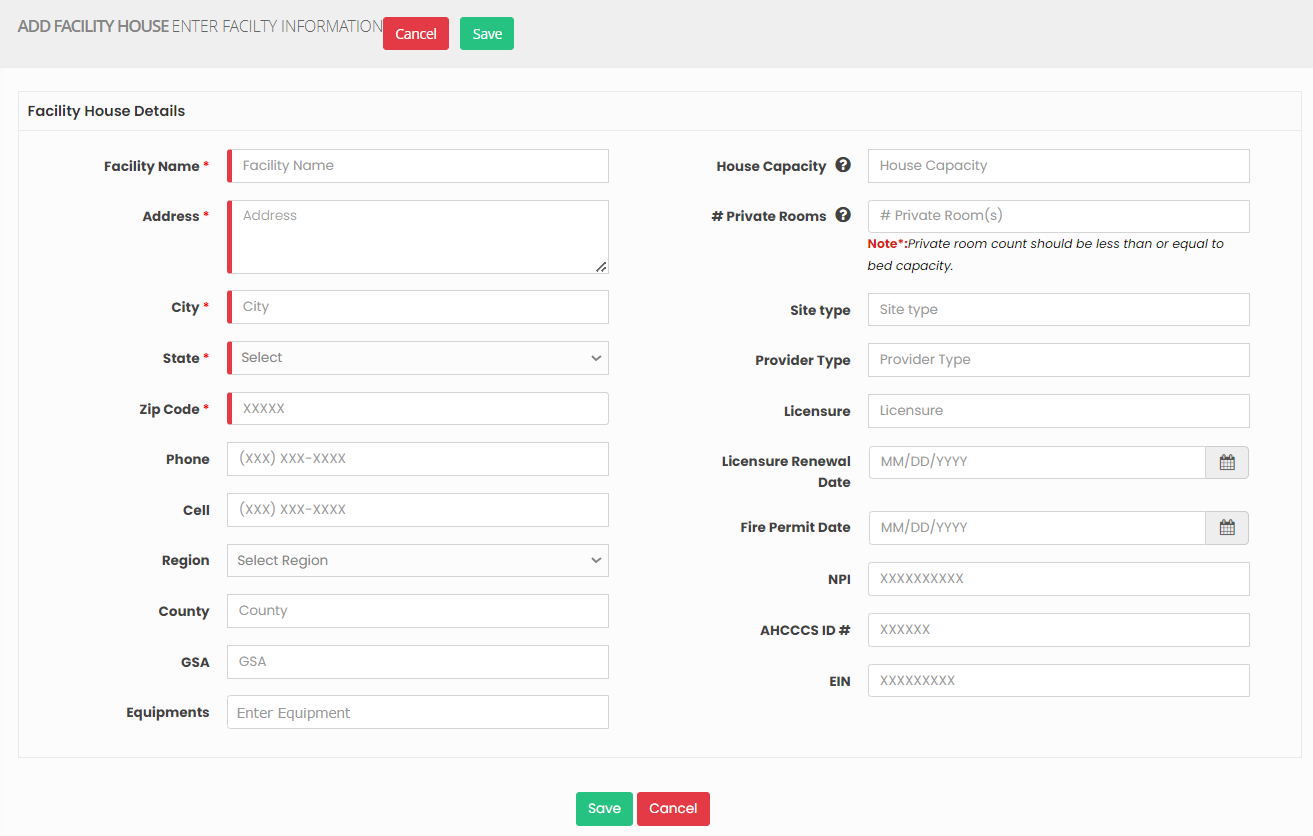](https://support.myezcare.com/uploads/images/gallery/2023-10/4cyimage.png) ### Editing Facility House The facility house details can be edited by using the option Edit on the right side of the screen in Facility House List.**Settings >> Facility House >> List**
[](https://support.myezcare.com/uploads/images/gallery/2023-10/ZfIimage.png) The user can edit the required information in the Facility House Details and Click Update option. [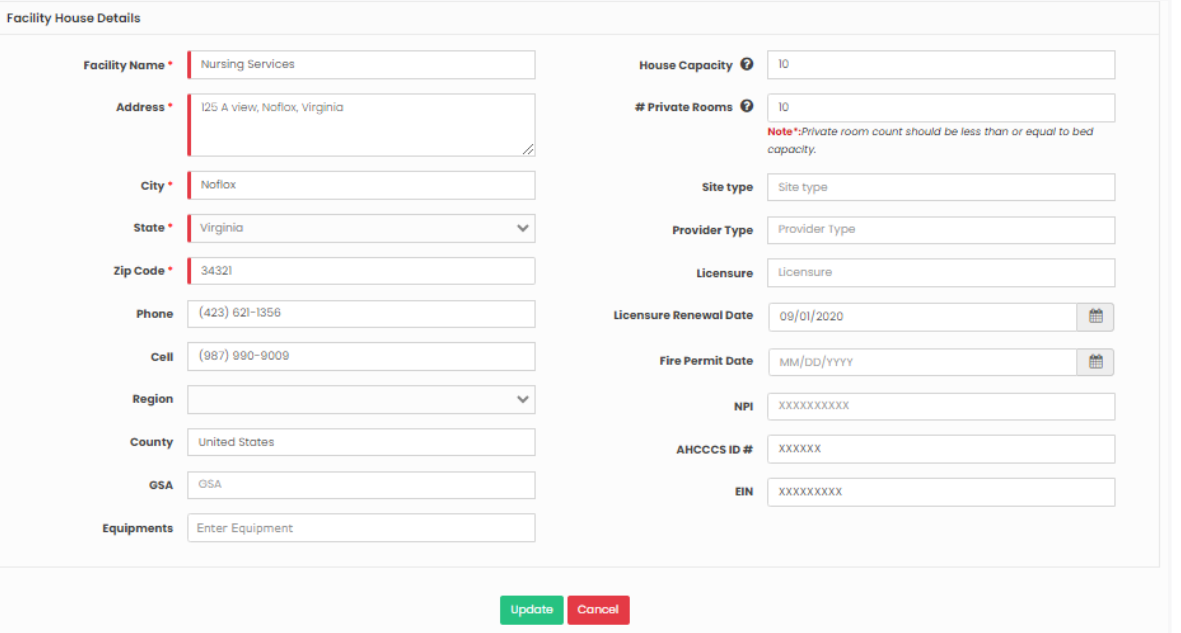](https://support.myezcare.com/uploads/images/gallery/2023-10/lZBimage.png) ### Delete Facility House**Settings >> Facility House >> List**
Select the Facility House from the list using the check box and click Delete or Disable Selection option on the screen. [](https://support.myezcare.com/uploads/images/gallery/2023-10/ZWximage.png) Now, the Facility House gets deleted and we can view the Facility House details under Deleted list. [](https://support.myezcare.com/uploads/images/gallery/2023-10/7Yeimage.png) The user can also Restore the deleted Facility House details by using the option Active on the right side of the screen. [](https://support.myezcare.com/uploads/images/gallery/2023-10/RMuimage.png) # Document Management Document management in home health care involves efficiently organizing and storing patient records, treatment plans, and related documents to ensure high-quality care.Note: All Fields marked with \* are mandatory and must be filled out, otherwise the system will generate an error indicating that the required information is missing.
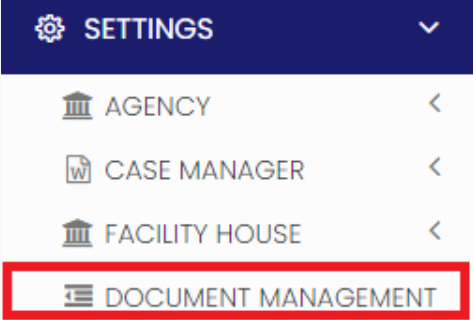
### Adding New Folder To navigate through the process of adding Document Management, follow these steps:**Settings >> Document Management**
[](https://support.myezcare.com/uploads/images/gallery/2023-10/aRZimage.png) For Adding new Folder, select the User type Referral/ Employee and update the required information in Edit Document management screen and click the option Show To All - Yes/No. When the user select the option Yes, then the Folder will be added to all the Client / Employee in the system. If the user select No option, then the Folder will be added only to the particular Client / Employee selected under the Assignee field. [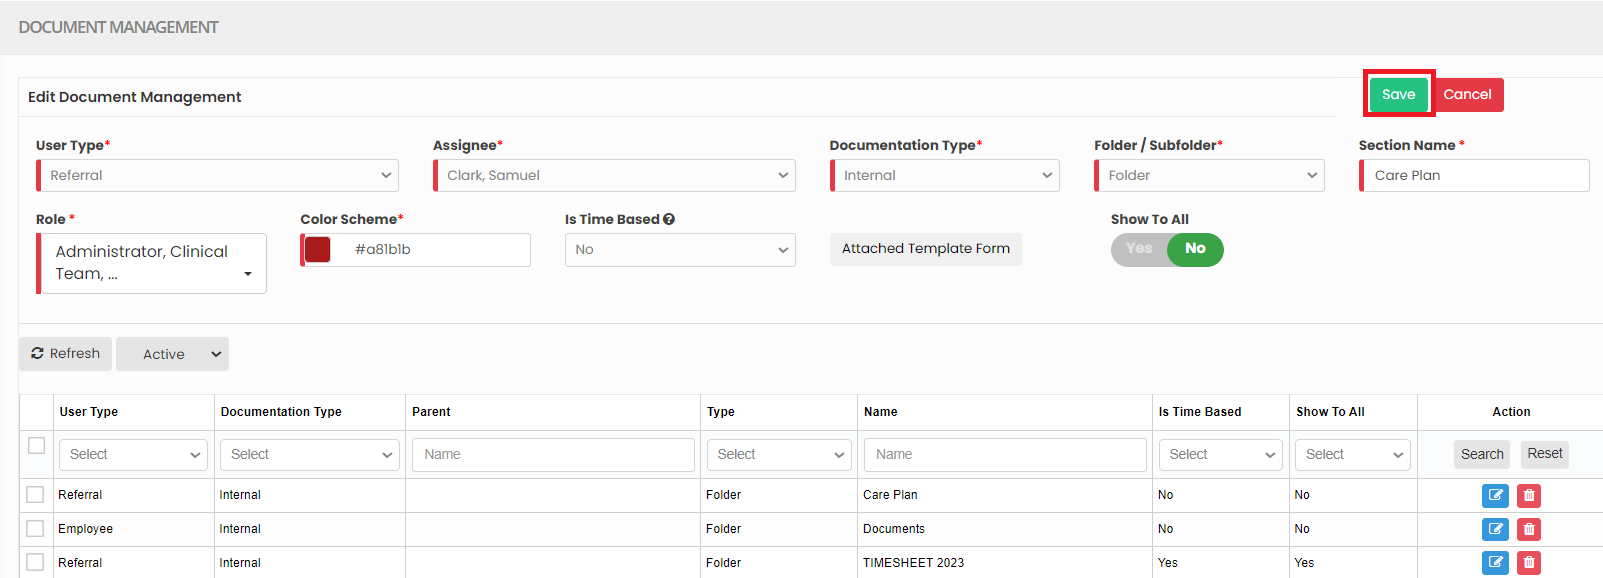](https://support.myezcare.com/uploads/images/gallery/2023-10/RBpimage.png) ### Editing Folder**Settings >> Document Management**
Select the Folder from List and click Edit option on the right side of the screen. [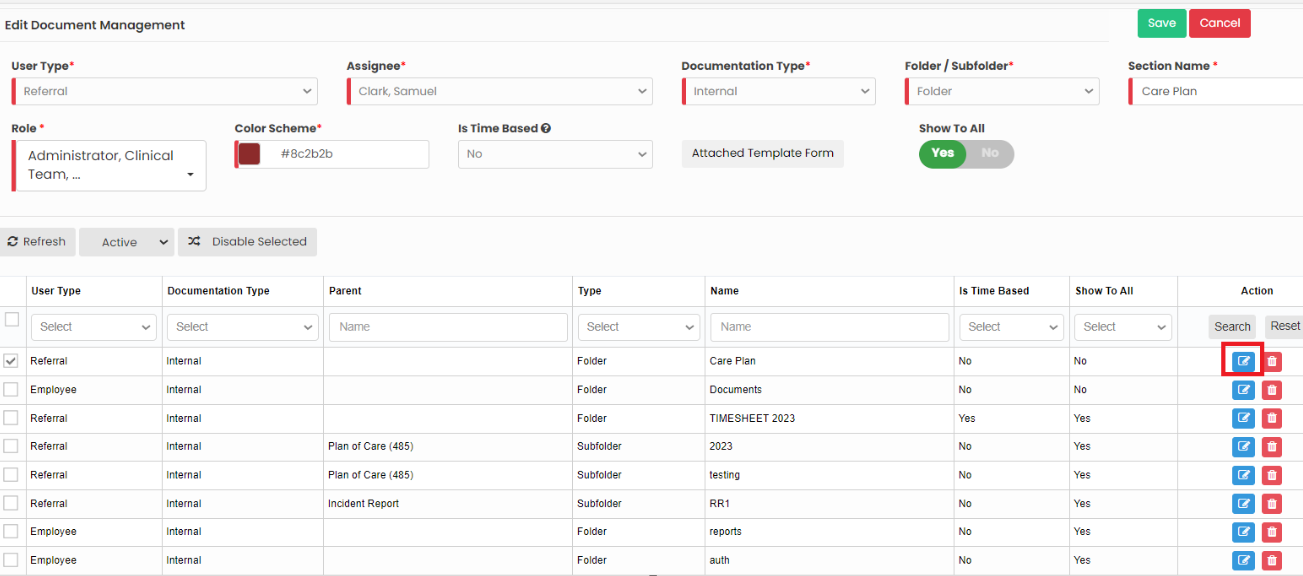](https://support.myezcare.com/uploads/images/gallery/2023-10/bMsimage.png) Edit the required information and click Save option. [](https://support.myezcare.com/uploads/images/gallery/2023-10/heLimage.png) ### Adding New Sub-Folder To navigate through the process of adding Document Management, follow these steps:**Settings >> Document Management**
[](https://support.myezcare.com/uploads/images/gallery/2023-10/IUWimage.png) For Adding new Sub-Folder, select the user type Referral/ Employee, select the Folder name in which the sub folder has to be added and update the required information in Edit Document management screen and click the option Show To All - Yes/No. When the user select the option Yes, then the Folder will be added to all the Client / Employee in the system. If the user select No option, then the Folder will be added only to the particular Client / Employee selected under the Assignee field. [](https://support.myezcare.com/uploads/images/gallery/2023-10/astimage.png) ### Editing Sub-Folder**Settings >> Document Management**
Select the Sub-Folder from List and click Edit option on the right side of the screen. [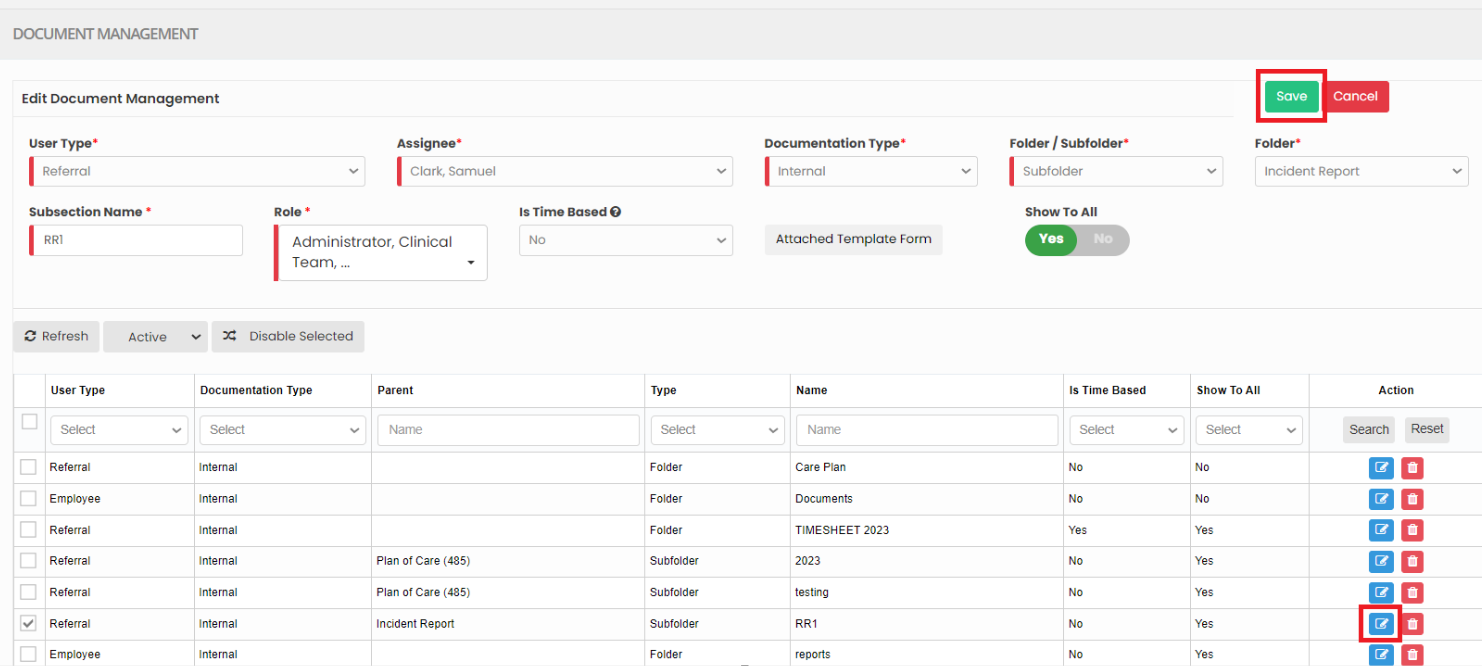](https://support.myezcare.com/uploads/images/gallery/2023-10/qCGimage.png) Edit the required information and click Save option. [](https://support.myezcare.com/uploads/images/gallery/2023-10/aGUimage.png) ### Deleting Folder / Sub-Folder**Settings >> Document Management**
For deleting Folder / Sub-Folder in Document Management screen, select the Folder / Sub-folder from List by using the check box of the Folder / Sub-Folder and click Delete option or Disable Selected option on the screen. [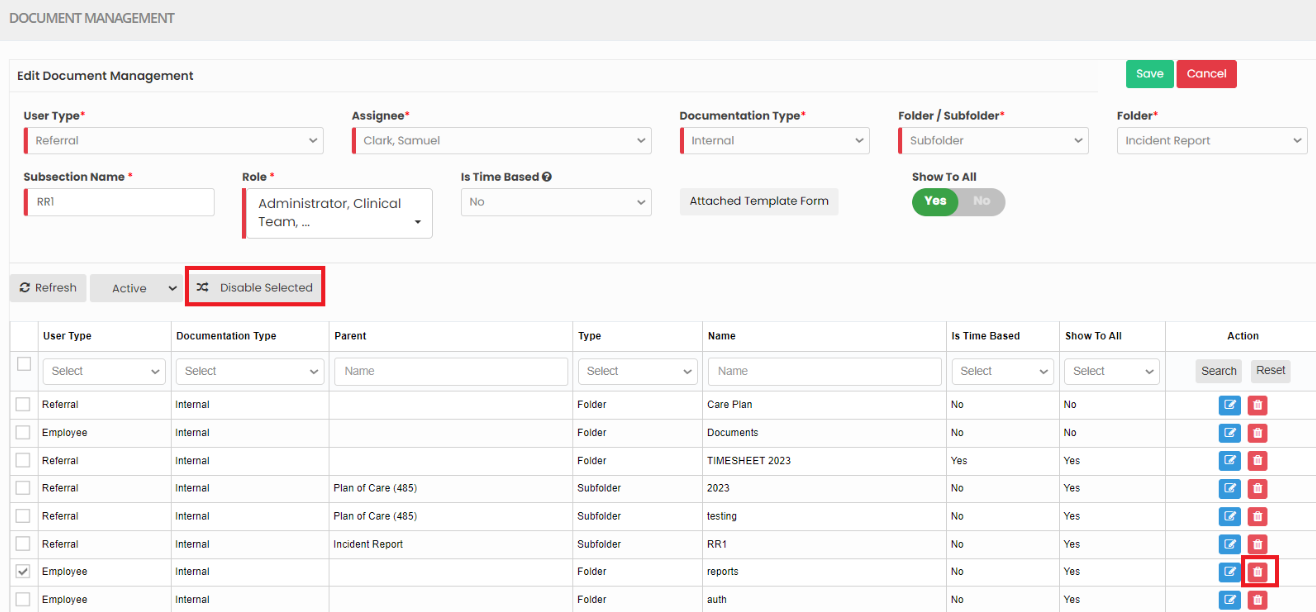](https://support.myezcare.com/uploads/images/gallery/2023-10/ZNyimage.png) ### Restore Deleted Folder / Sub-Folder**Settings >> Document Management**
The Deleted folder can be viewed by using the dropdown option Deleted after the Refresh option in the screen. [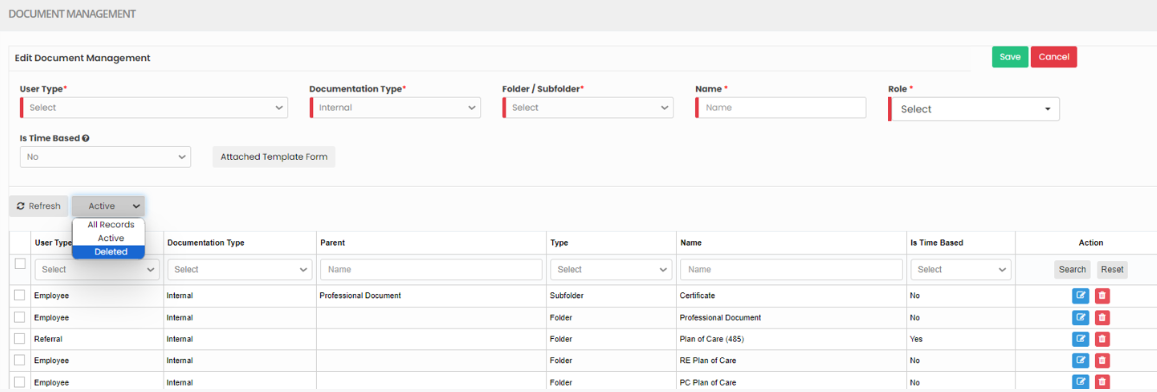](https://support.myezcare.com/uploads/images/gallery/2023-10/Lq3image.png) Now the Deleted folder can also be restored by using the option Active on the right side of the screen. [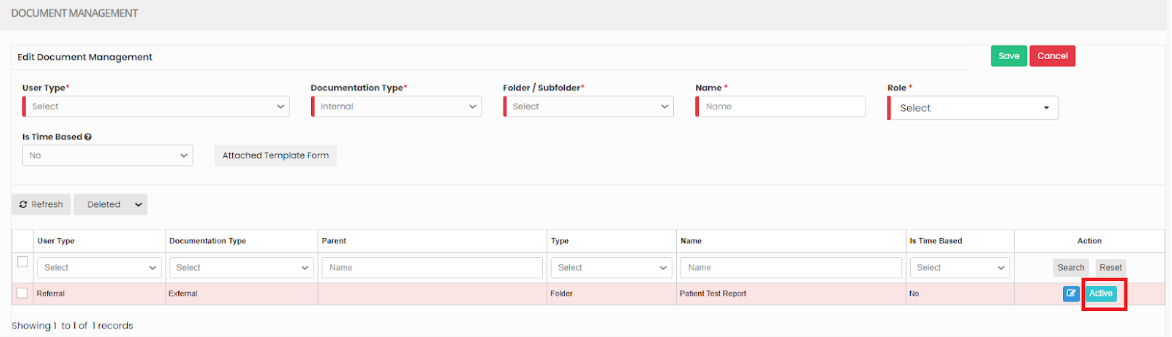](https://support.myezcare.com/uploads/images/gallery/2023-10/FOzimage.png) # Dx Code Diagnosis codes (Dx Code), typically using the ICD-10 system, are vital in home health care for billing, care planning, communication, and quality reporting. They ensure accurate reimbursement, guide treatment plans, facilitate information sharing among healthcare providers, and help monitor patient outcomes, improving the overall quality of home health services.Note: All Fields marked with \* are mandatory and must be filled out, otherwise the system will generate an error indicating that the required information is missing.
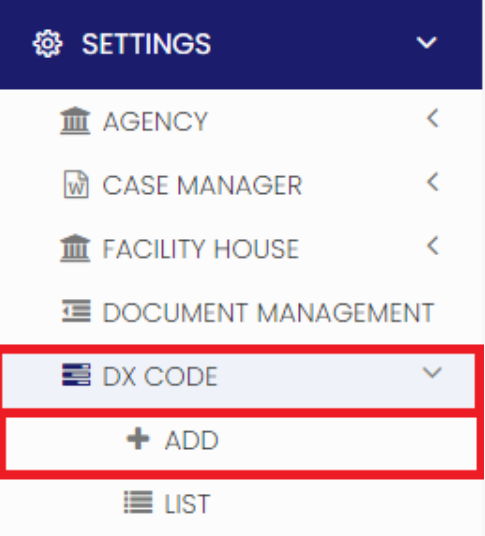
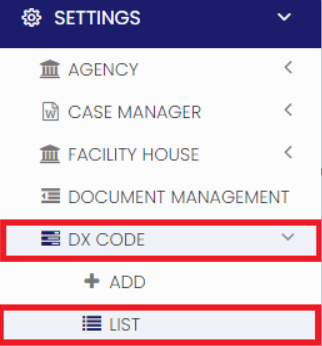
### Adding Dx Code**Settings >> DX Code >> + Add option**
[](https://support.myezcare.com/uploads/images/gallery/2023-10/lfHimage.png) Update the required information in DX Code details and Click Save [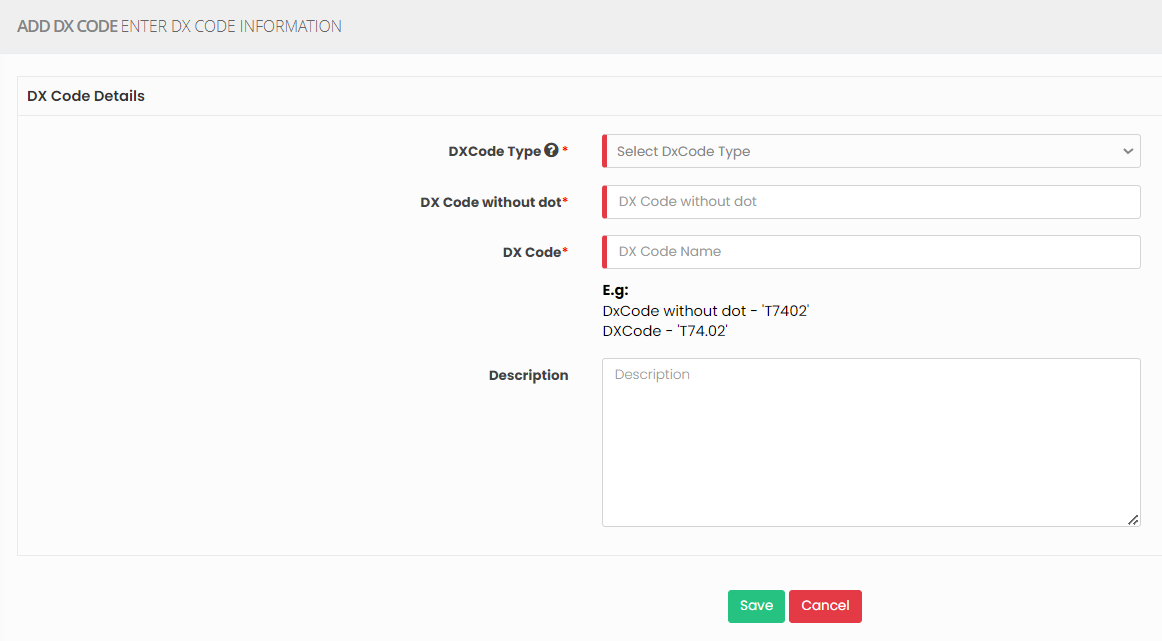](https://support.myezcare.com/uploads/images/gallery/2023-10/jBKimage.png) ### View Dx code List The list of Dx code can be viewed by using the option List under Dx code.**Settings >> DX Code >> List**
[](https://support.myezcare.com/uploads/images/gallery/2023-10/gY6image.png) Enter the Dx code and click search option to view the required DX code in the system. [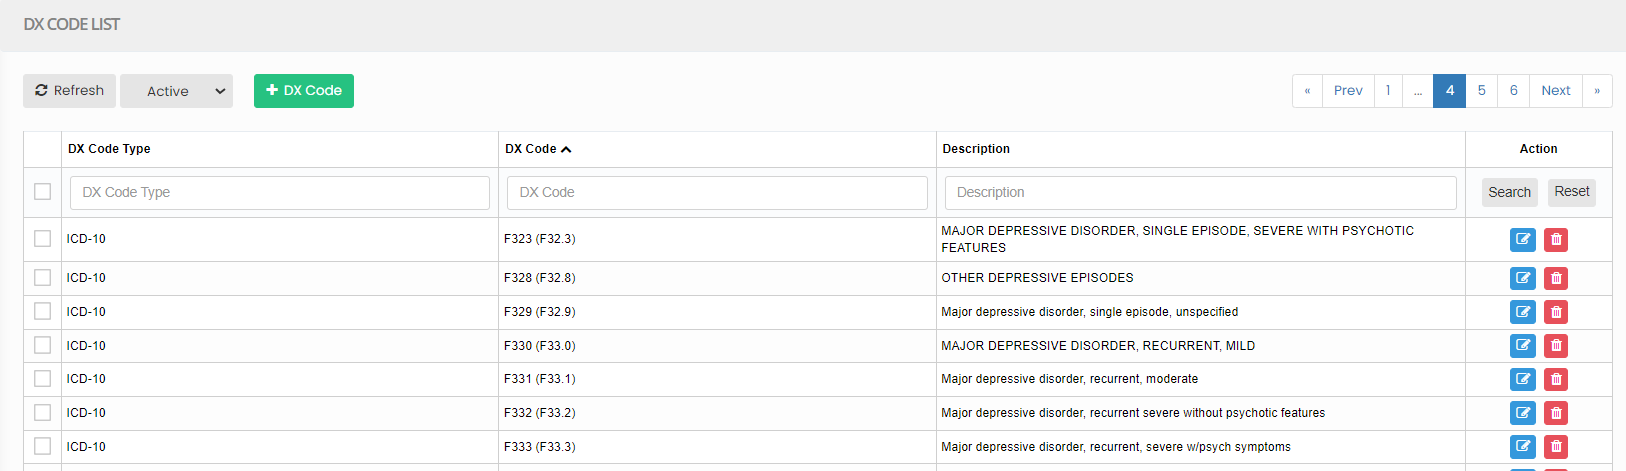](https://support.myezcare.com/uploads/images/gallery/2023-10/Wmdimage.png) # Dropdown Editor A "drop-down editor" typically refers to a tools for creating and editing dropdown lists. It allows users to specify options within a dropdown menu, often used for user input or selection within web applications. ### Adding Title**Settings >> Dropdown Editor**
Select the Item Type for which the Title is to be added and Click Save option. [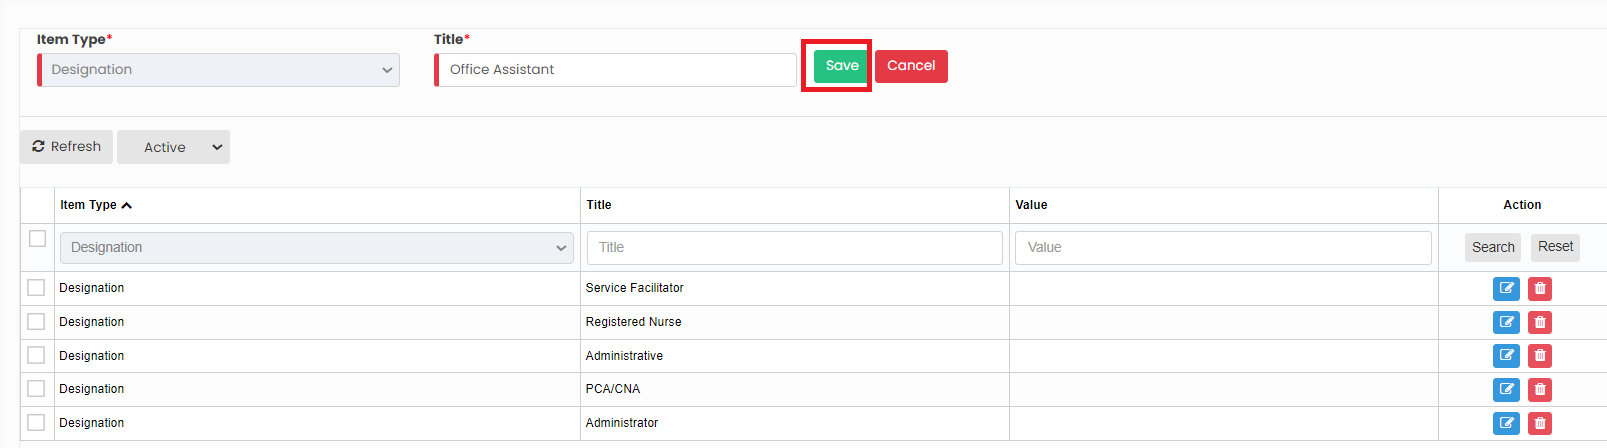](https://support.myezcare.com/uploads/images/gallery/2023-10/dfcimage.png) Now, the required information is added under Item type Designation. Similarly we can add the Title for the required Item Type. [](https://support.myezcare.com/uploads/images/gallery/2023-10/ub9image.png) ### Editing Title**Settings >> Dropdown Editor**
Select the Item Type and Click Edit option on the right side of the screen. [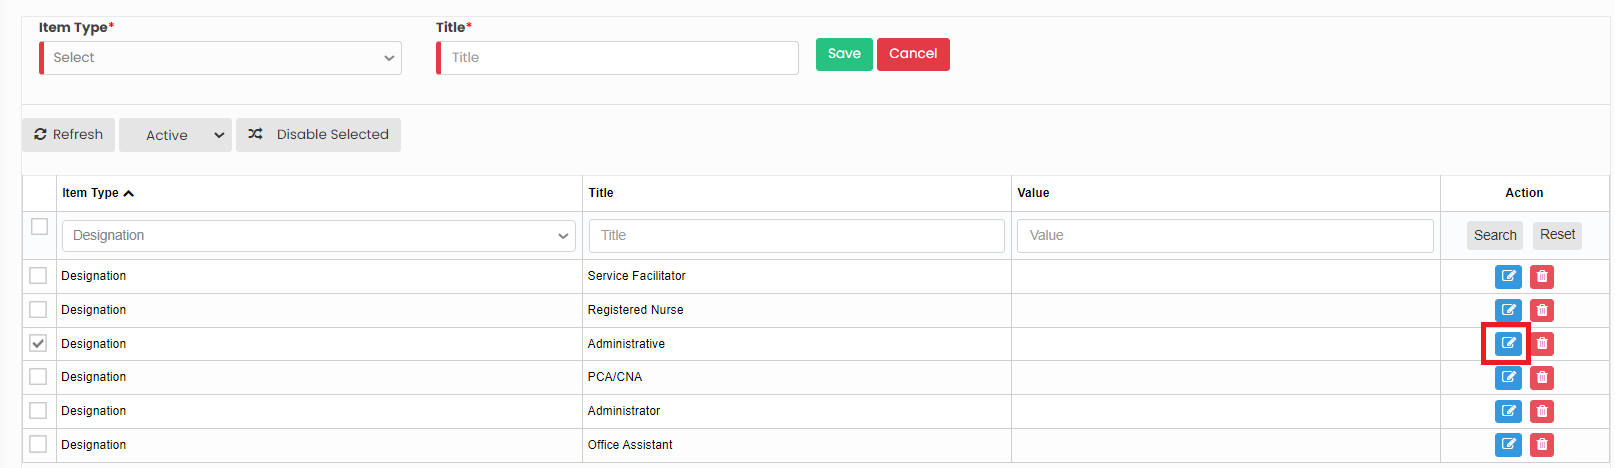](https://support.myezcare.com/uploads/images/gallery/2023-10/2hcimage.png) Now, after editing the Title for the required Item type, Click Save option. Similarly we can edit the Title information for all the Item type in the system. [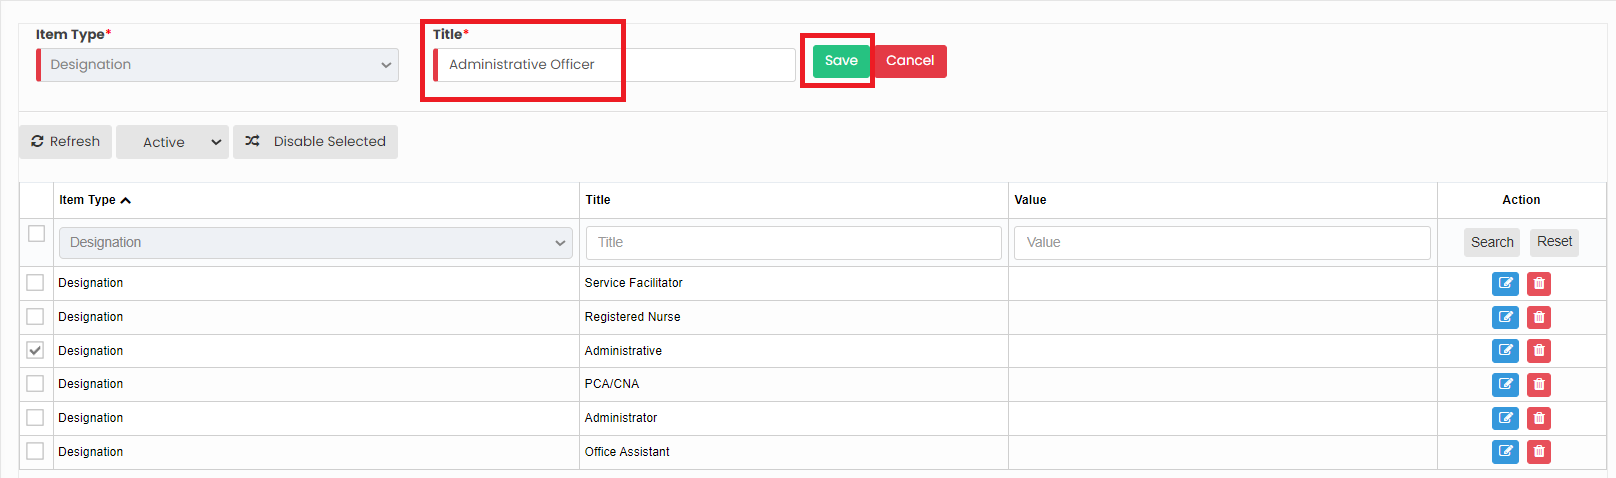](https://support.myezcare.com/uploads/images/gallery/2023-10/BWJimage.png) ### Delete Item type**Settings >> Dropdown Editor**
Select the Item type from the List using the check box and click Delete option or Disable selected option in the screen. [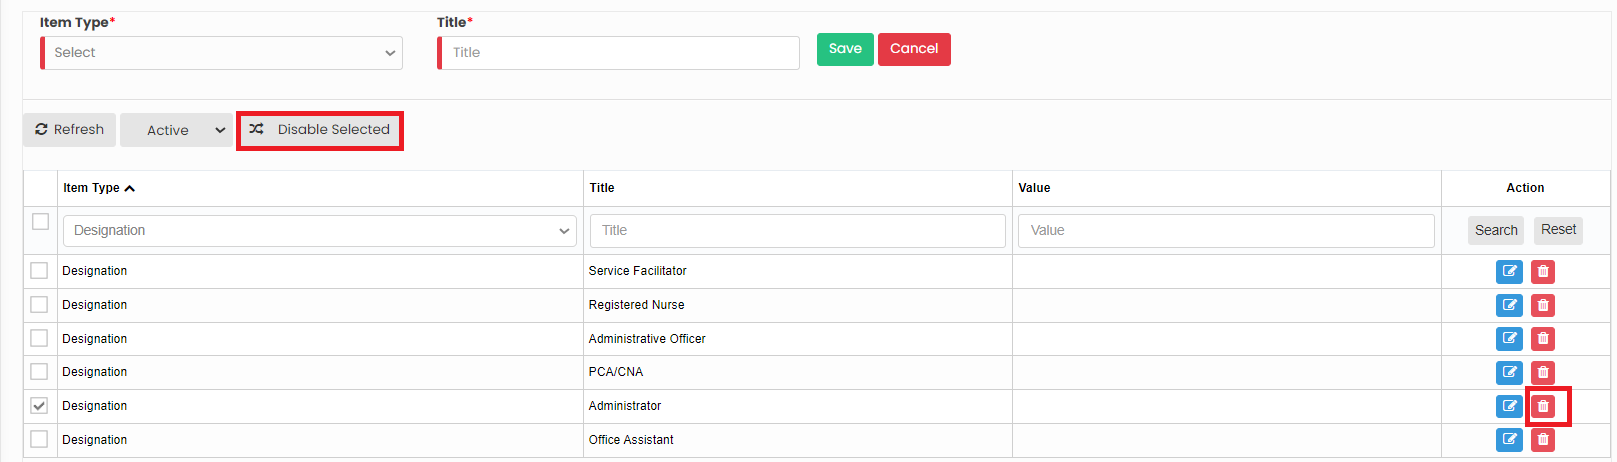](https://support.myezcare.com/uploads/images/gallery/2023-10/uWgimage.png) Now, the required item type has been deleted and we can view them under Deleted list. [](https://support.myezcare.com/uploads/images/gallery/2023-10/786image.png) The deleted Item Type can also be restored by using the option Active on the right side of the screen. [](https://support.myezcare.com/uploads/images/gallery/2023-10/m6dimage.png) # Org Preference Organization Preference refers to the choice that the home healthcare agency prefer for their Organization in the system. ### Org Preference Details**Settings >> Org Preference**
Update the Organization Preference details in the system and Click Save option. [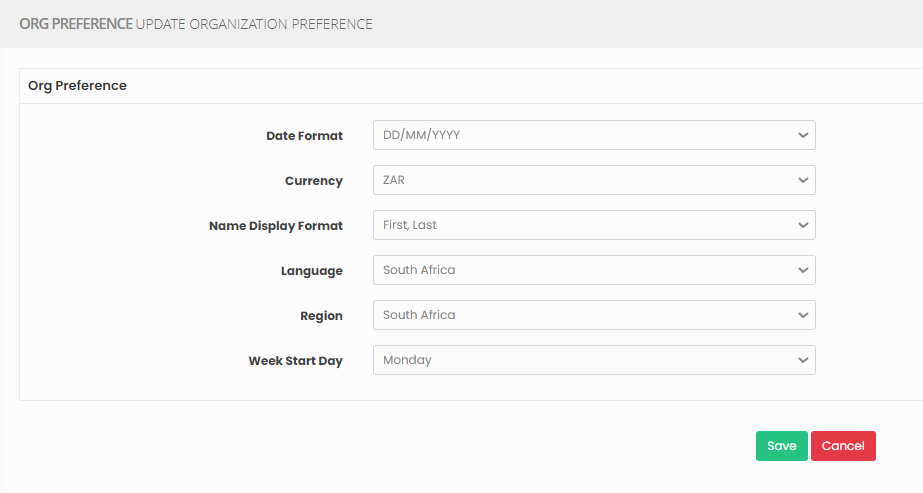](https://support.myezcare.com/uploads/images/gallery/2023-11/UEzimage.png) # Organization Forms Organization Forms includes the list of forms Available in the system and can be selected as per the requirement of the user. ### Select Organization Forms**Settings >> Organization Forms**
The user can select the required forms from the available forms in the system and click Save option. [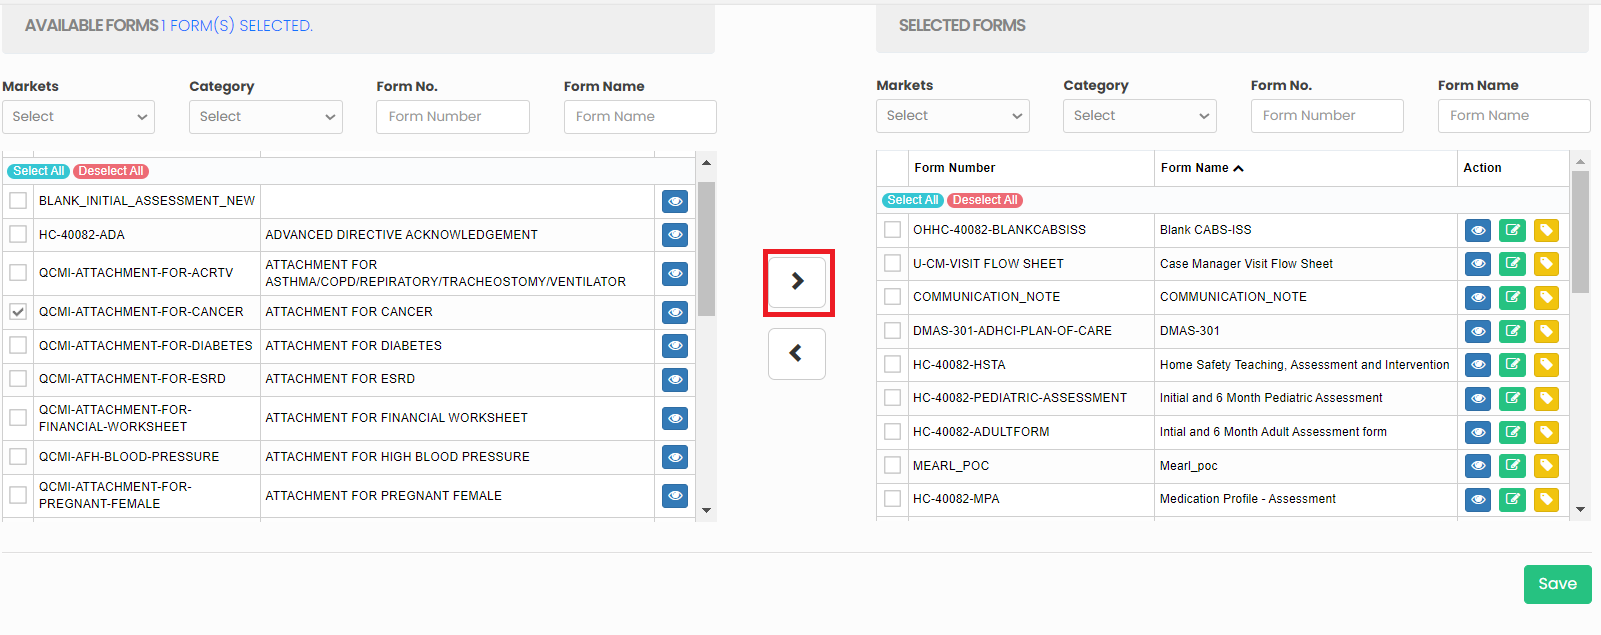](https://support.myezcare.com/uploads/images/gallery/2023-10/tZ5image.png) Also, the selected forms can be sent to available forms list in the system. [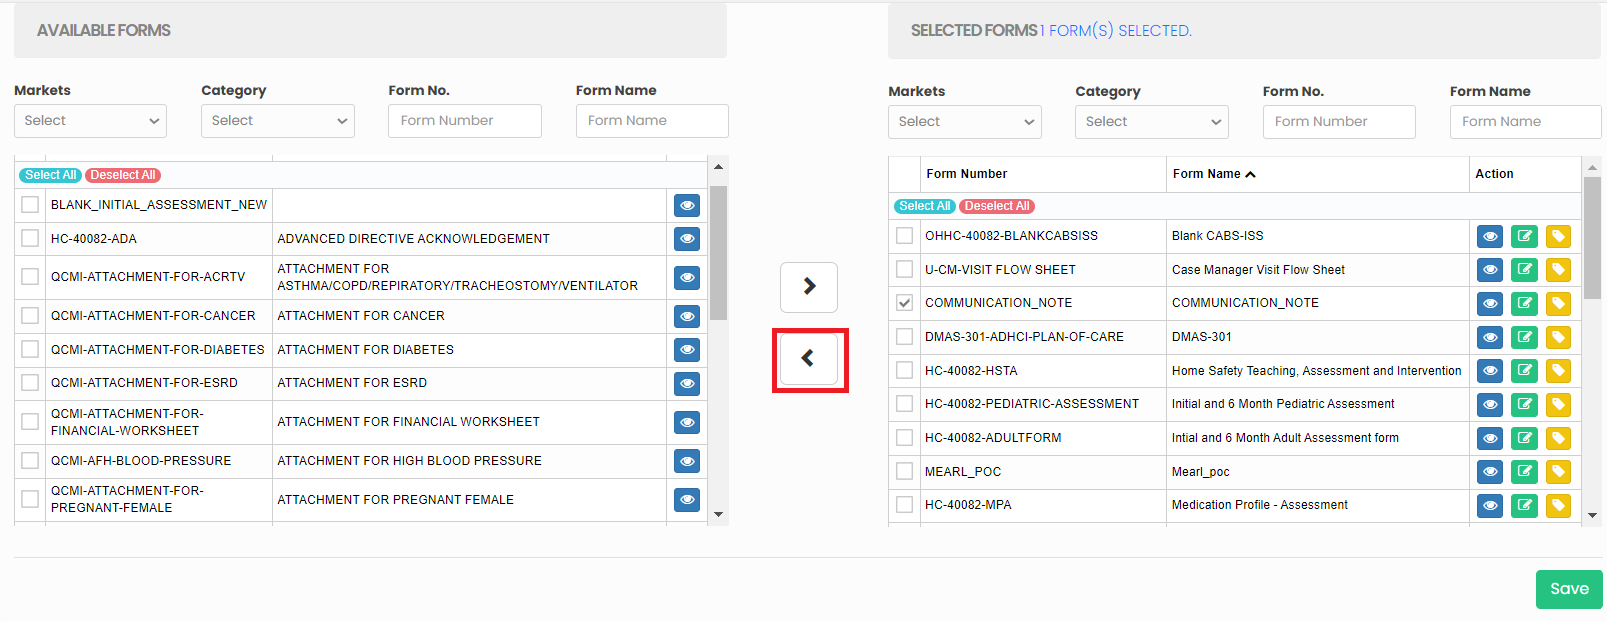](https://support.myezcare.com/uploads/images/gallery/2023-10/f5mimage.png) ### Edit Form Name**Settings >> Organization Forms**
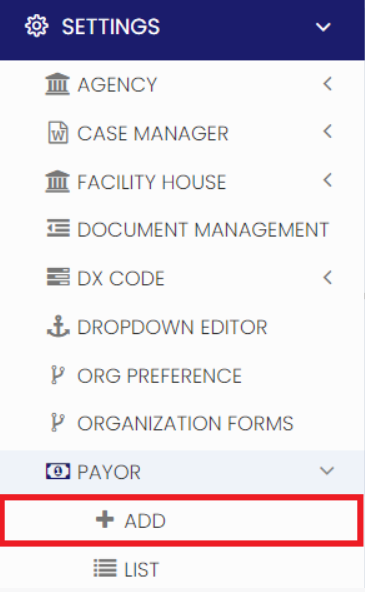
The selected form names can be edited by using the edit option on the right side of the screen. Edit the form name and click Save option. [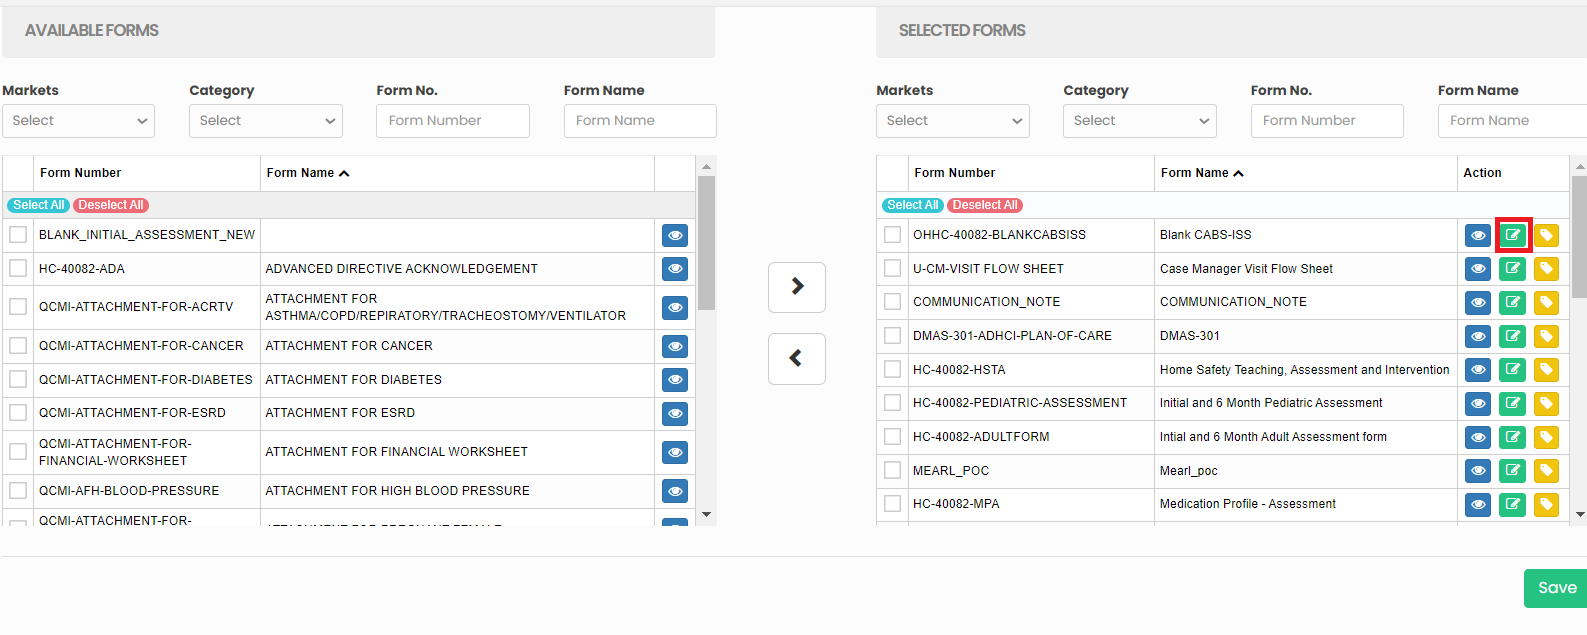](https://support.myezcare.com/uploads/images/gallery/2023-10/Yemimage.png) # Payor In home healthcare, a "payor" is the entity responsible for covering costs. Payors can include health insurance companies, Medicare, Medicaid, private pay and managed care organizations.Note: All Fields marked with **\*** are mandatory and must be filled out, otherwise the system will generate an error indicating that the required information is missing.
### Adding Payor Details**Settings >> Payor >> +Add option**
[](https://support.myezcare.com/uploads/images/gallery/2023-10/JiCimage.png) The user can update the required information in Payer Details and Click Save option. [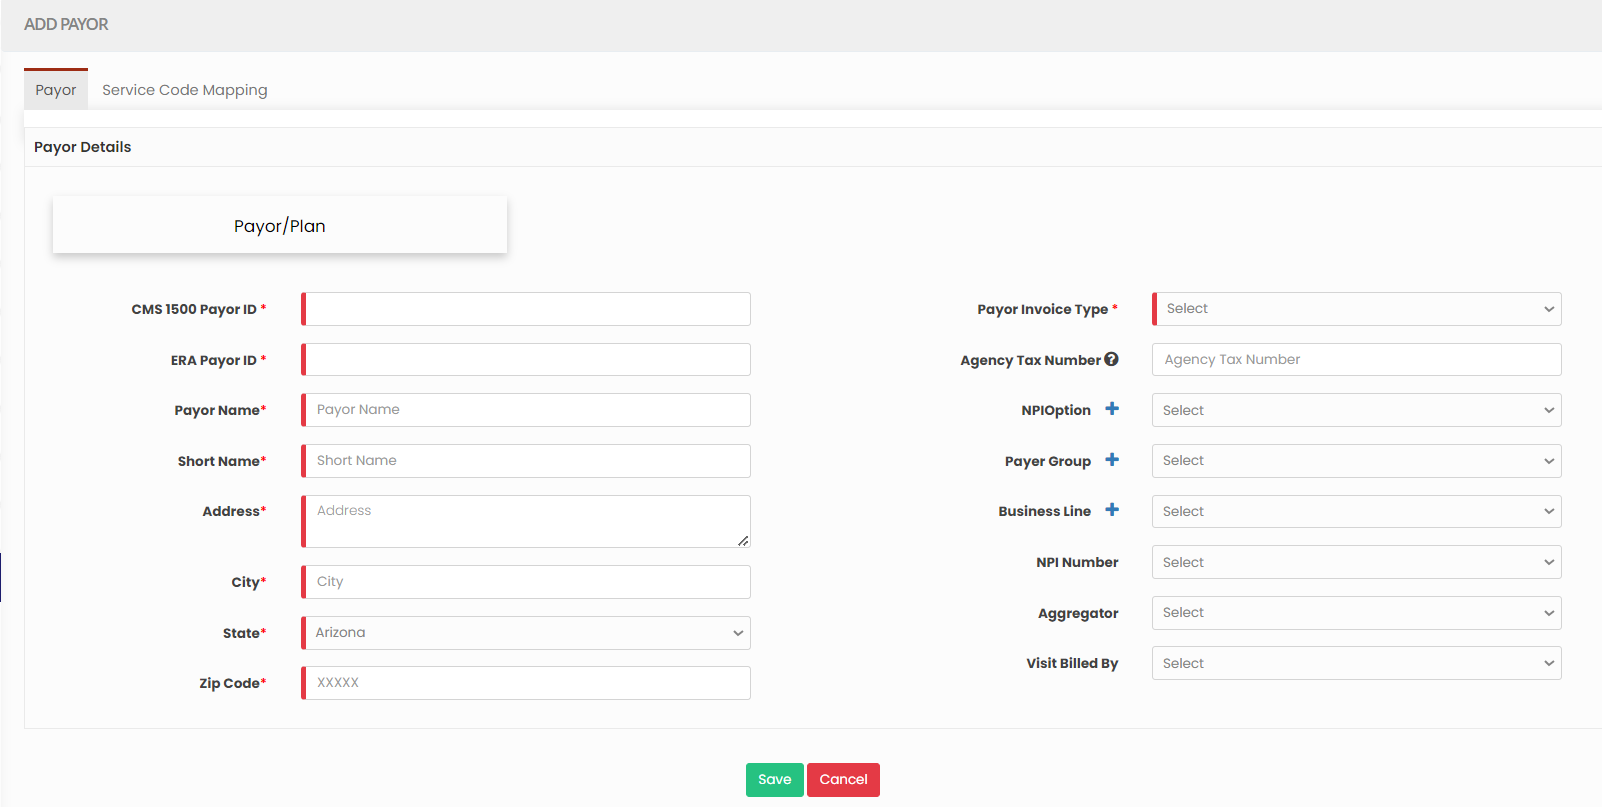](https://support.myezcare.com/uploads/images/gallery/2023-10/T6Mimage.png) ### Editing Payor Details**Settings >> Payor >> List**
Select the Payor from the List using the Edit option. [](https://support.myezcare.com/uploads/images/gallery/2023-10/iXgimage.png) Now, edit the required information in Payor Details and Click Update. [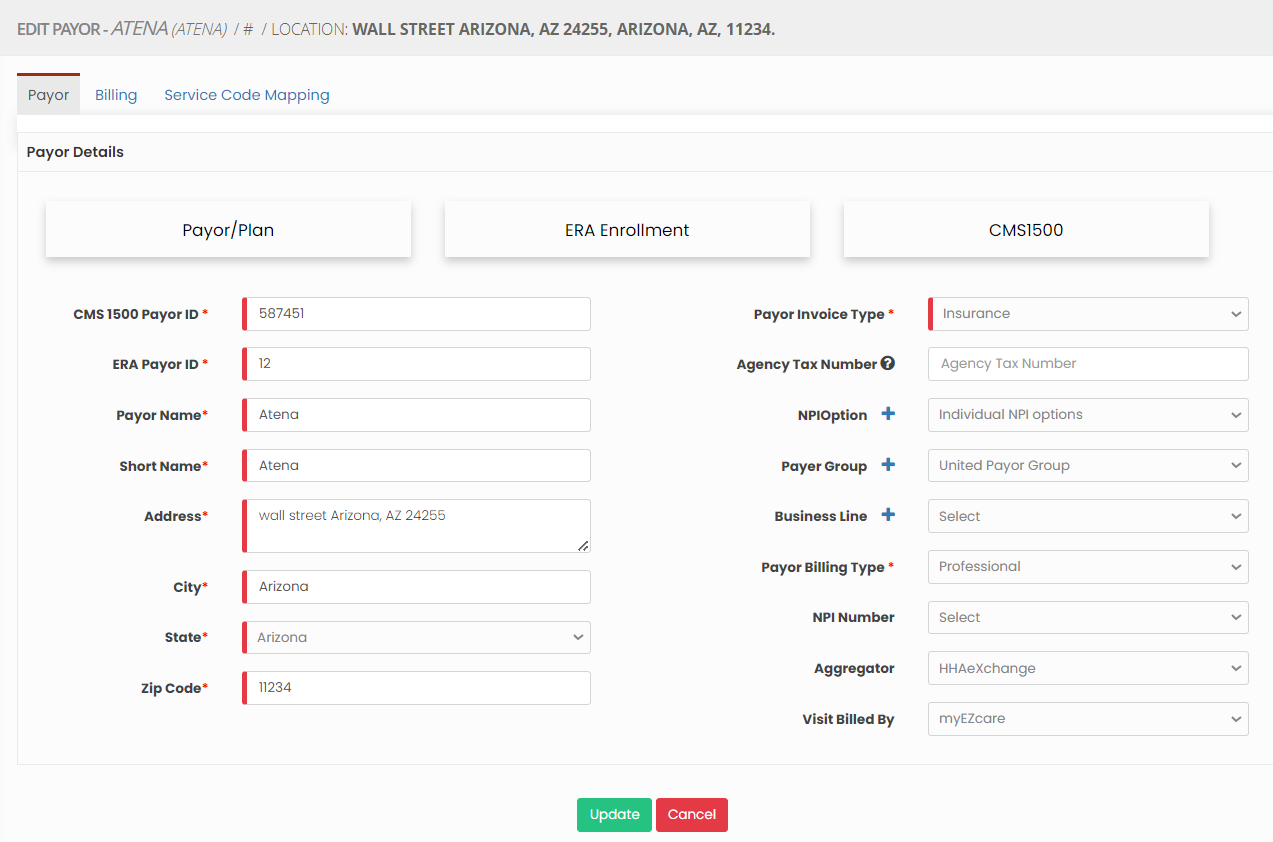](https://support.myezcare.com/uploads/images/gallery/2023-10/3DPimage.png) **Service Code Mapping** The Service Code Mapping can be done for the payor added in the system. Enter the required fields under Payor - Service code Mapping and click Save Option. [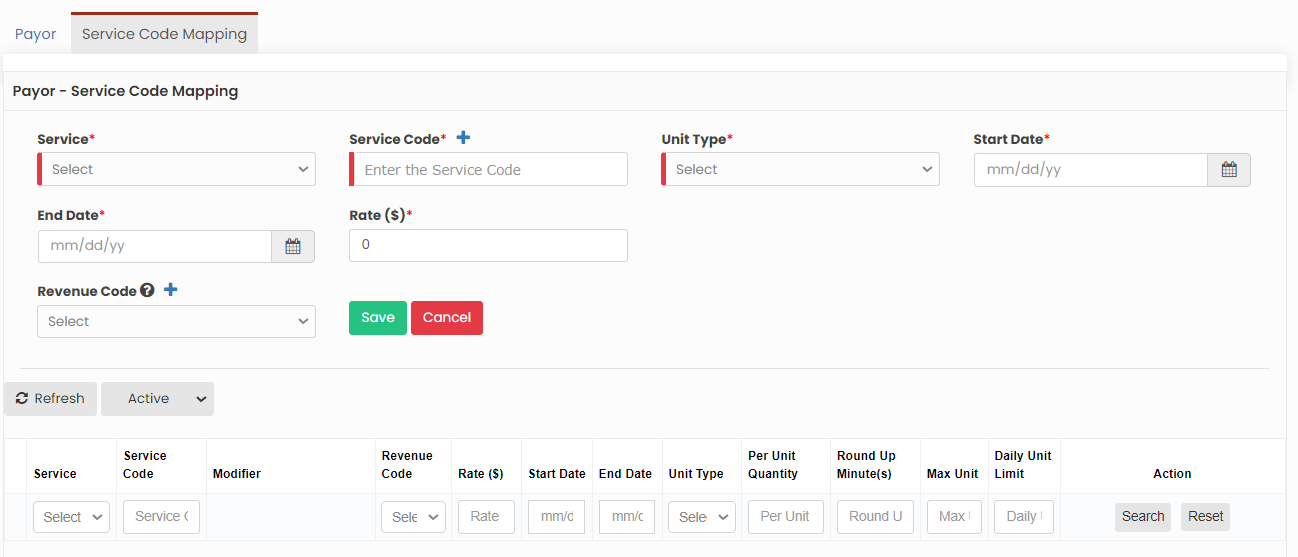](https://support.myezcare.com/uploads/images/gallery/2023-11/image.png) ### Delete Payor**Settings >> Payor >> List**
Select the payor from list using the check box and click Delete or Disable Selected option in the screen. [](https://support.myezcare.com/uploads/images/gallery/2023-10/0HQimage.png) Now, the payor gets deleted and we can view the payor under Deleted list. [](https://support.myezcare.com/uploads/images/gallery/2023-10/CFzimage.png) The user can also Restore the deleted payor by using the option Active on the right side of the screen. [](https://support.myezcare.com/uploads/images/gallery/2023-10/ddeimage.png) # Physician A physician refers to a licensed medical doctor who plays a critical role in overseeing and providing medical care to patients within the comfort of their own homes. These physicians diagnose, prescribe treatment plans, and monitor the health and well-being of patients, ensuring personalized and comprehensive medical support. ### Adding PhysicianNote: All Fields marked with **\*** are mandatory and must be filled out, otherwise the system will generate an error indicating that the required information is missing.
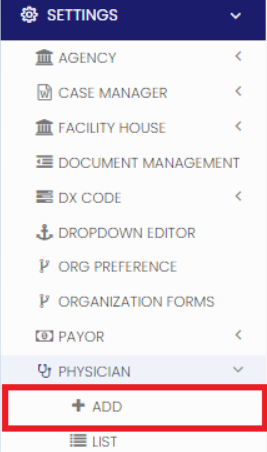
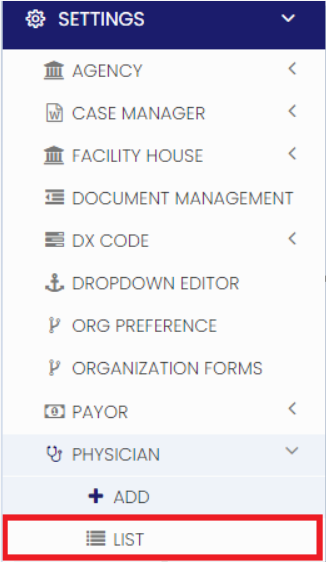
**Settings >> Physician >> +Add option**
[](https://support.myezcare.com/uploads/images/gallery/2023-10/IzYimage.png) The user can update the required Physician details and click Save option. [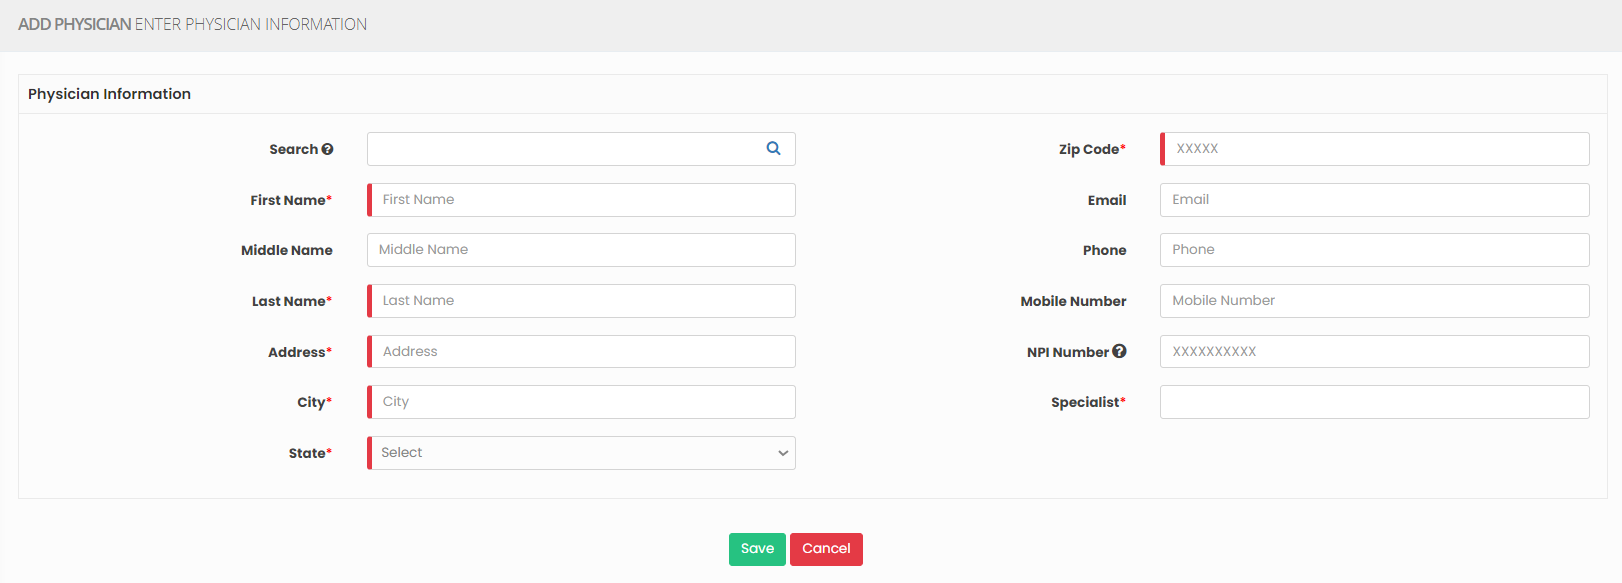](https://support.myezcare.com/uploads/images/gallery/2023-10/iv7image.png) ### Editing Physician**Settings >> Physician >> List**
[](https://support.myezcare.com/uploads/images/gallery/2023-10/1tQimage.png) Select the Physician from the list and Click the Edit option. [](https://support.myezcare.com/uploads/images/gallery/2023-10/fRFimage.png) Now, Edit the required information and Click Update. [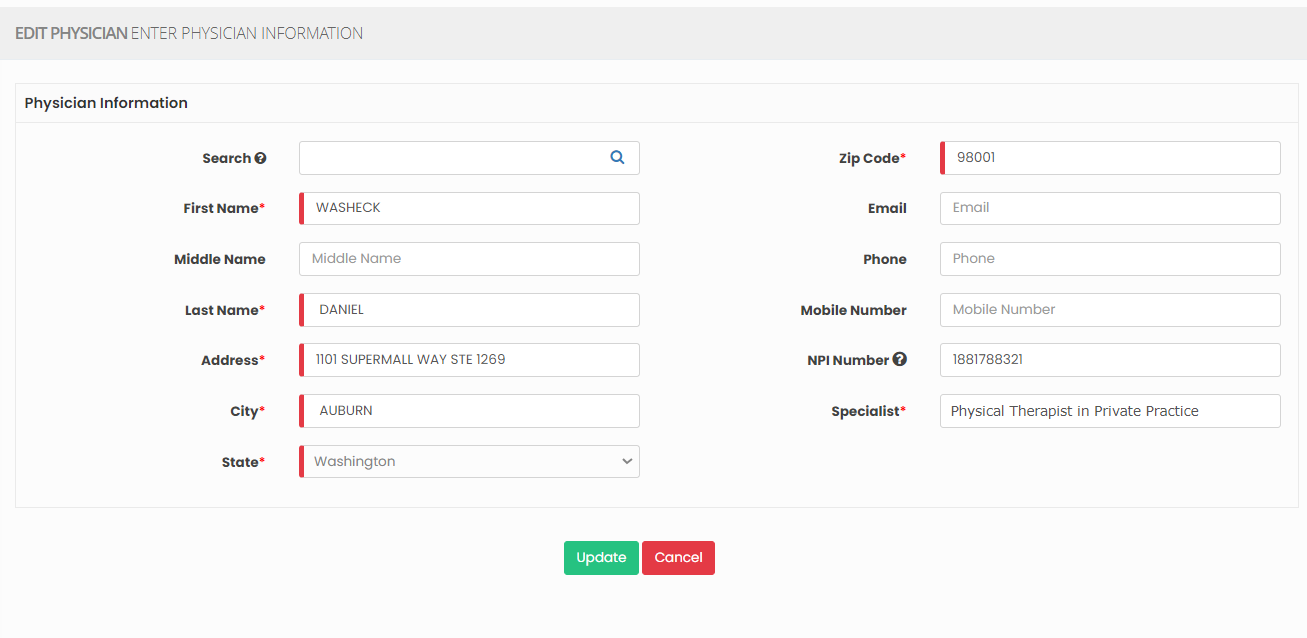](https://support.myezcare.com/uploads/images/gallery/2023-10/4DHimage.png) ### Delete Physician**Settings >> Physician >> List**
Select the physician from list using the check box and click Delete or Disable Selected option in the screen. [](https://support.myezcare.com/uploads/images/gallery/2023-10/WwAimage.png) Now, the physician gets deleted and we can view the physician under Deleted list. [](https://support.myezcare.com/uploads/images/gallery/2023-10/ho5image.png) The user can also restore the deleted physician by using the option Active on the right side of the screen. [](https://support.myezcare.com/uploads/images/gallery/2023-10/dY1image.png) # Preference / Skills Preference refers to the specific choices and desires of patients regarding the type of care, treatment, and services they wish to receive in their home. Skills refer to the specialized abilities, expertise, and competencies possessed by healthcare professionals who provide care and treatment to patients in their homes.Note: All Fields marked with **\*** are mandatory and must be filled out, otherwise the system will generate an error indicating that the required information is missing.
### Adding Preference / Skills**Settings >> Preference / Skill >> +Add option**
Select the Type and update the Name. Click Save to Add Preference / Skill detail [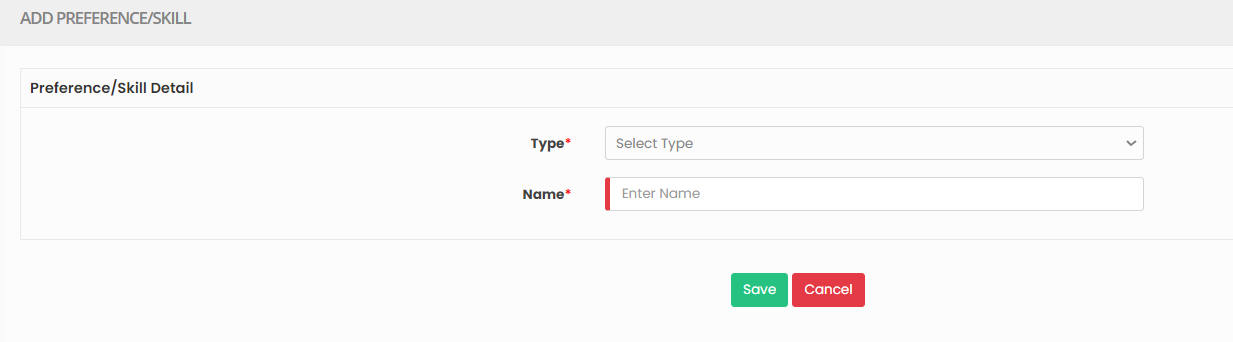](https://support.myezcare.com/uploads/images/gallery/2023-10/HM7image.png) ### Editing Preference / Skill**Settings >> Preference / Skill >> List**
Select the Preference from List and Click Edit option on the right side of the screen. [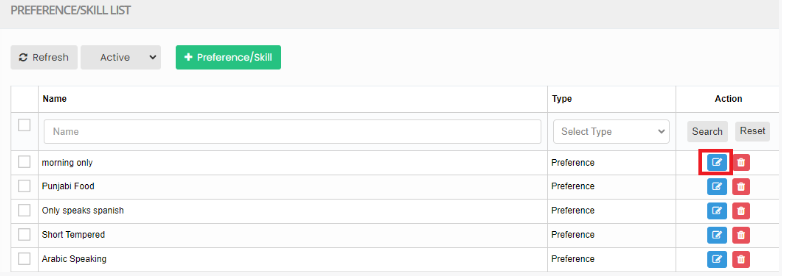](https://support.myezcare.com/uploads/images/gallery/2023-10/Zmmimage.png) Now, Edit the required information and Click Update option [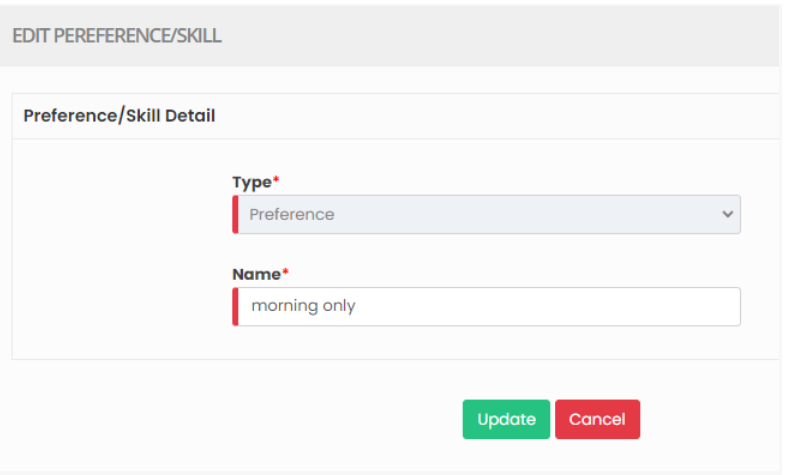](https://support.myezcare.com/uploads/images/gallery/2023-10/5osimage.png) ### Delete Preference / Skills**Settings >> Preference / Skill >> List**
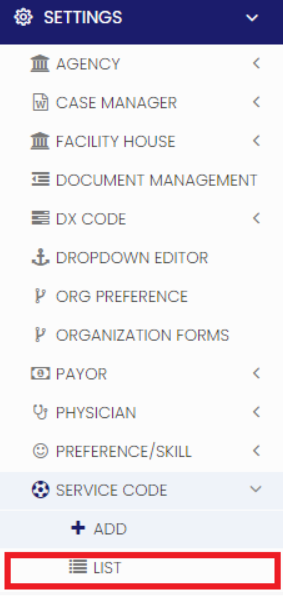
Select the physician from list using the check box and click Delete or Disable Selected option in the screen. [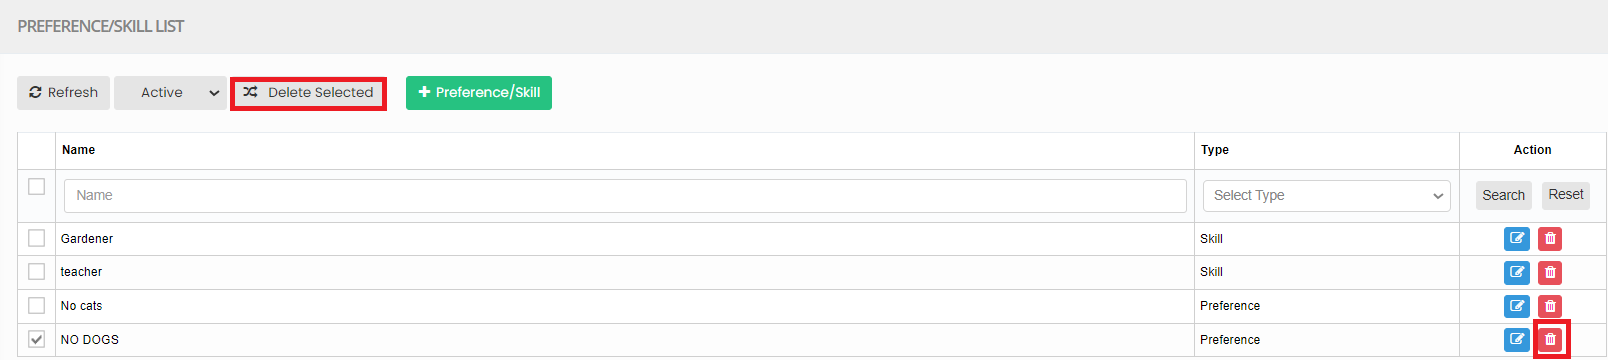](https://support.myezcare.com/uploads/images/gallery/2023-10/uzJimage.png) Now, the Preference / Skills gets deleted and we can view the details under Deleted list. [](https://support.myezcare.com/uploads/images/gallery/2023-10/UvUimage.png) The user can also Restore the deleted Preference by using the option Active on the right side of the screen. [](https://support.myezcare.com/uploads/images/gallery/2023-10/yHHimage.png) # Service Code A service code is a standardized alphanumeric or numeric code used for billing and documentation. It categorizes and identifies specific procedures, services, and equipment provided to patients. Service codes help ensure accurate billing, reimbursement, and compliance with healthcare regulations in the field. ### Adding Service CodeNote: All Fields marked with **\*** are mandatory and must be filled out, otherwise the system will generate an error indicating that the required information is missing.
**Settings >> Service Code >> + Add option**
[](https://support.myezcare.com/uploads/images/gallery/2023-10/mQaimage.png) The user can update the Service code details in the required field and Click Save option. [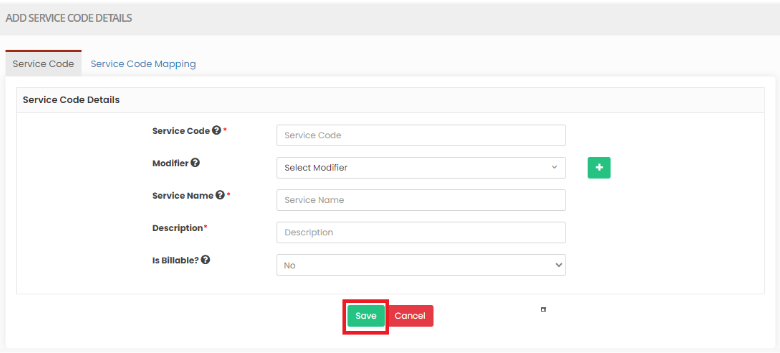](https://support.myezcare.com/uploads/images/gallery/2023-10/Y1mimage.png) ### Editing Service Code**Settings >> Service Code >> List**
[](https://support.myezcare.com/uploads/images/gallery/2023-10/AnUimage.png) Select the service code from the list and click Edit option on the right side of the screen. [](https://support.myezcare.com/uploads/images/gallery/2023-10/WSMimage.png) Now, Edit the required information and click update option. [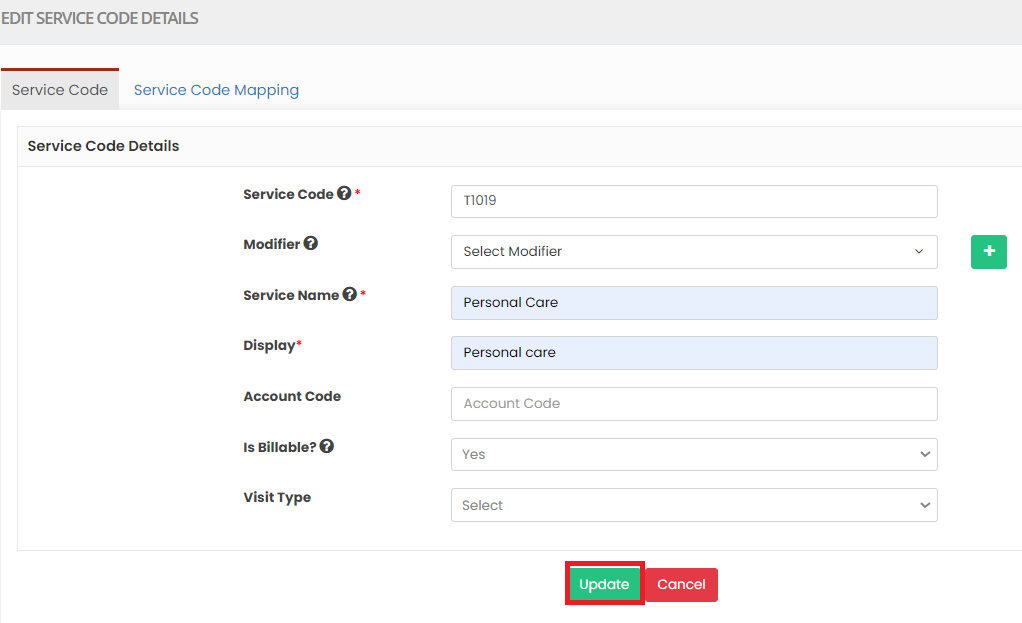](https://support.myezcare.com/uploads/images/gallery/2023-10/aByimage.png) **Service Code Mapping** The Service Code Mapping can be done for the payor added in the system. Click + Service code mapping option. Select the payor, enter the required fields under Payor - Service code Mapping and click Save Option. [](https://support.myezcare.com/uploads/images/gallery/2023-11/TBXimage.png) ### Delete Service Code**Settings << Service Code << List**
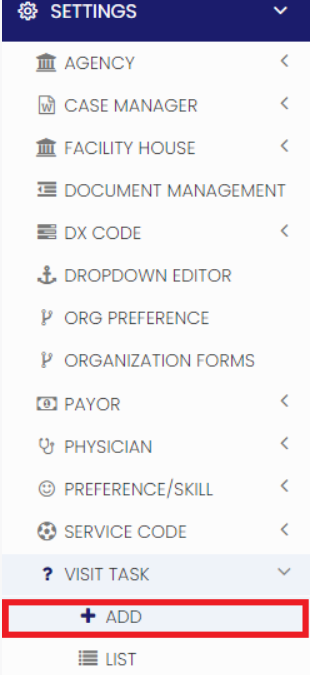
Select the Service Code from list and click Delete option on the right side of the screen. [](https://support.myezcare.com/uploads/images/gallery/2023-10/TAHimage.png) # Visit Task A Visit Task refers to a specific set of responsibilities and activities performed by a healthcare professional during a patient's home visit.Note: All Fields marked with **\*** are mandatory and must be filled out, otherwise the system will generate an error indicating that the required information is missing.
### Adding Visit Task**Settings >> Visit Task >> +Add option**
[](https://support.myezcare.com/uploads/images/gallery/2023-10/FLaimage.png) The user can update the task details in the required fields and Click Save option. If the task is a required task, select "YES" under Is Required field. We can also add forms to the task using the option + Add form under Form Mapping and map the the form to the updated task. The Mapped form will automatically appear in the mobile app for the when the Caregiver add the task in the mobile app and once the form is completed it will be automatically assigned with the Timesheet for the visits. [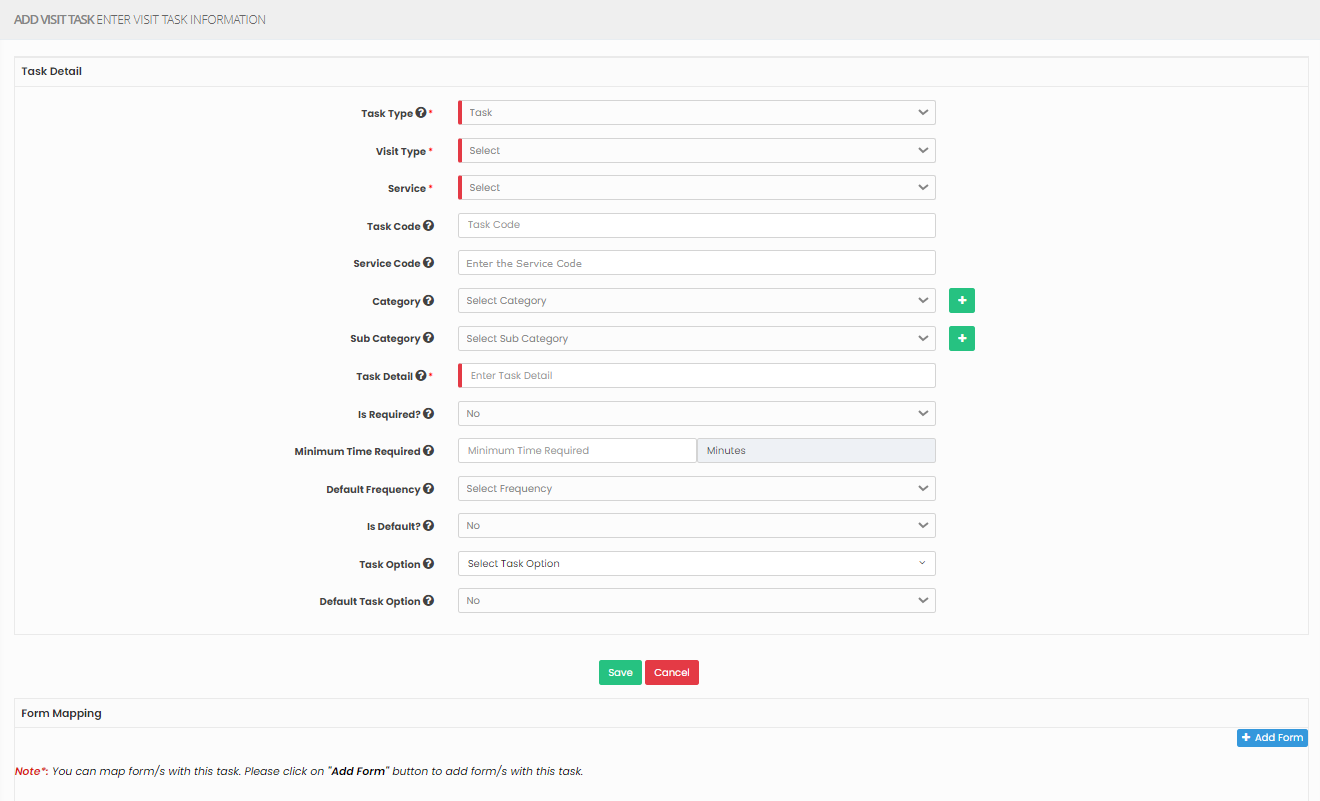](https://support.myezcare.com/uploads/images/gallery/2024-04/q3ximage.png) ### Editing Visit Task**Settings >> Visit Task >> List**
[](https://support.myezcare.com/uploads/images/gallery/2023-10/q53image.png) Select the task from the list using the checkbox and Click Edit option on the right side of the screen. [](https://support.myezcare.com/uploads/images/gallery/2023-10/Wkgimage.png) Now, Edit the required information and Click Update option. [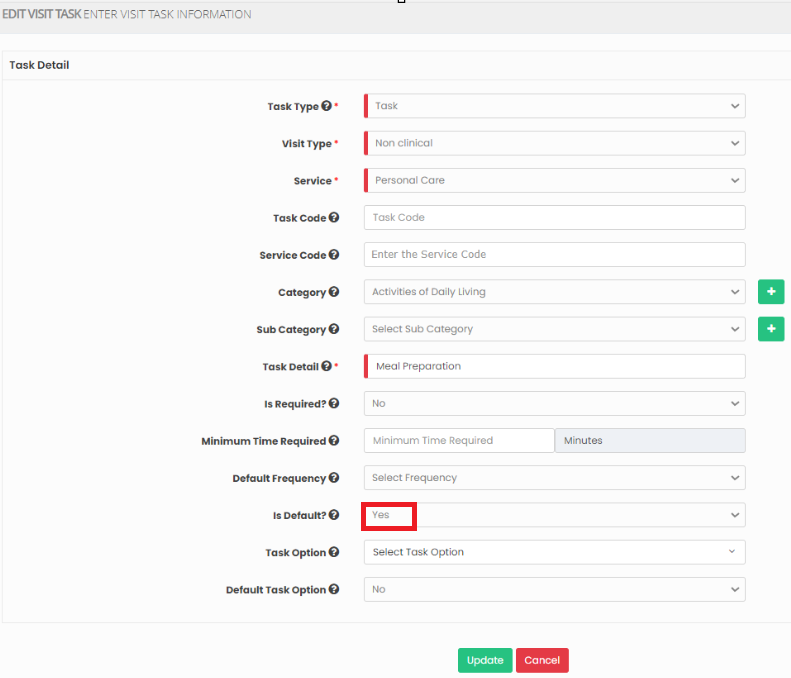](https://support.myezcare.com/uploads/images/gallery/2023-11/c4Fimage.png) ### Delete Visit Task**Settings >> Visit Task >> List**
Select the Visit Task from list using the check box and click Delete or Disable Selected option in the screen. [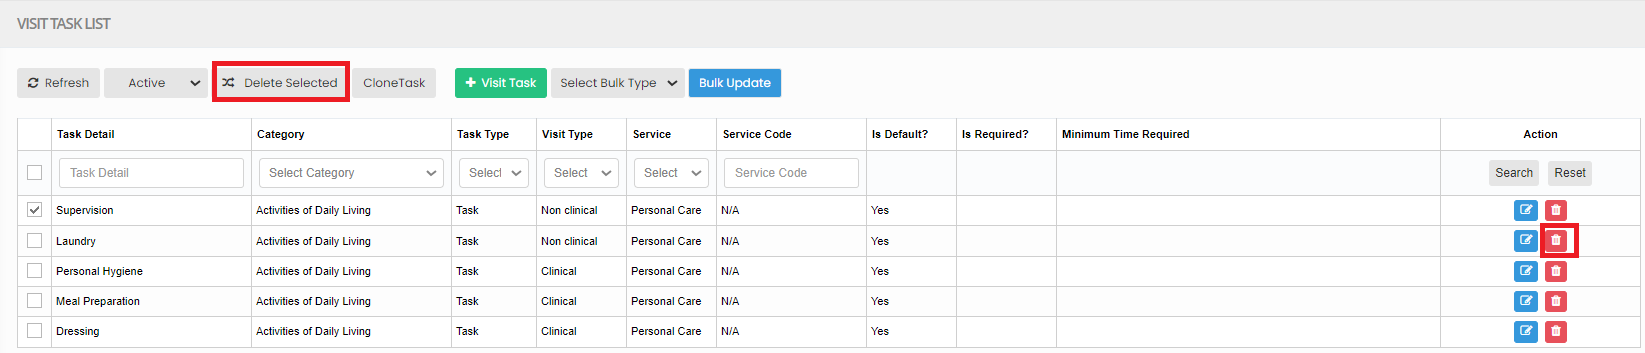](https://support.myezcare.com/uploads/images/gallery/2023-10/QdQimage.png) Now, the Visit Task gets deleted and we can view the Visit Task under Deleted list. [](https://support.myezcare.com/uploads/images/gallery/2023-11/eWmimage.png) The user can also Restore the deleted Visit Task by using the option Active on the right side of the screen. [](https://support.myezcare.com/uploads/images/gallery/2023-10/S9mimage.png) ### Clone Task**Settings >> Visit Task >> List**
The user can create the same Visit Task details for different service code by using the option Clone Task. Select the Visit Task and click Clone Task on the screen. [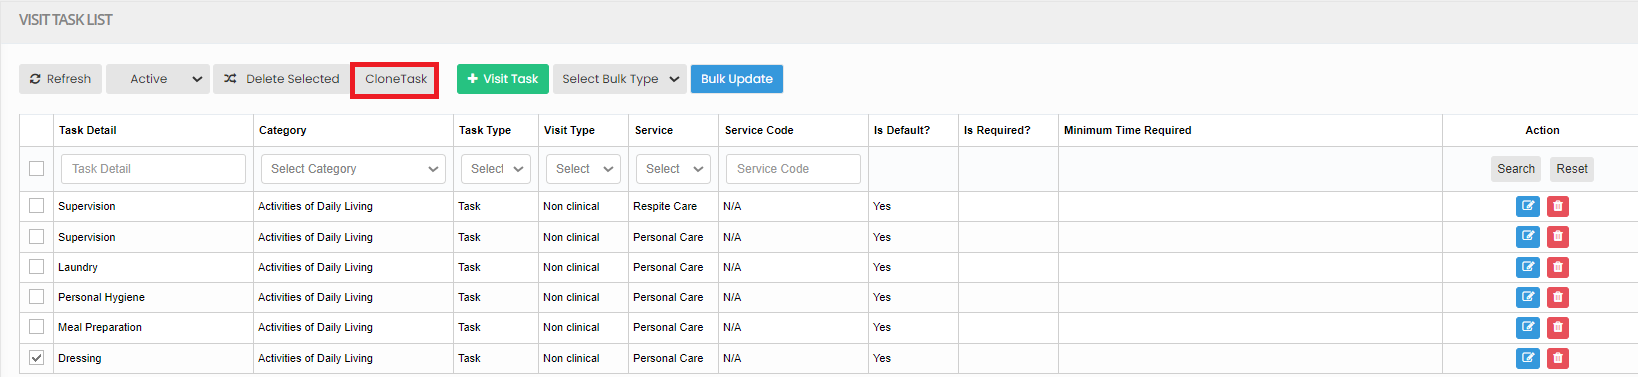](https://support.myezcare.com/uploads/images/gallery/2023-10/2p6image.png) Now, the clone task screen appears. Select the Target service from the List and click Clone option. [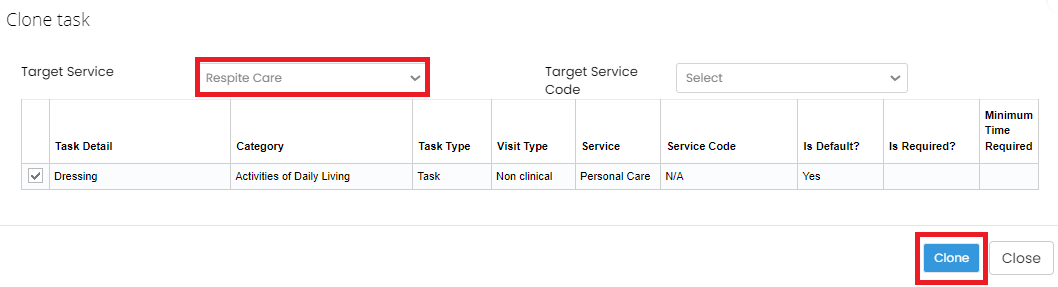](https://support.myezcare.com/uploads/images/gallery/2023-10/iCQimage.png) Now the new Visit task is created with Service name Respite Care in the List. [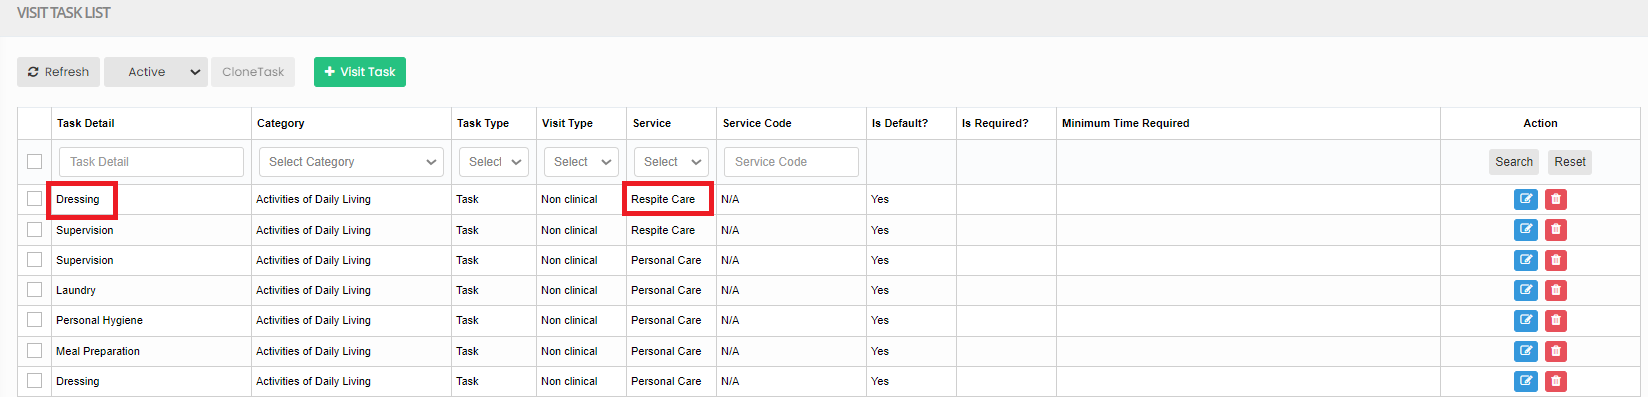](https://support.myezcare.com/uploads/images/gallery/2023-10/4CRimage.png) ### Bulk Update**Settings >> Visit Task >> List**
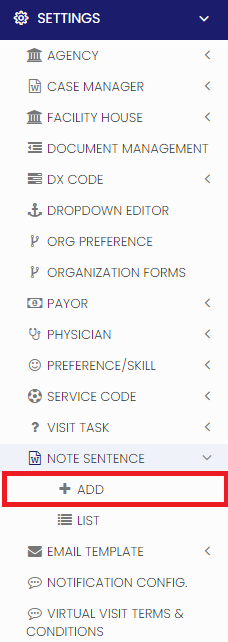
The user can Bulk update the Task details like Visit Type, Task Type, Care Type and Service Code by using the option Bulk Update. Select the Visit Task by using the check box and click Select Bulk Type option. [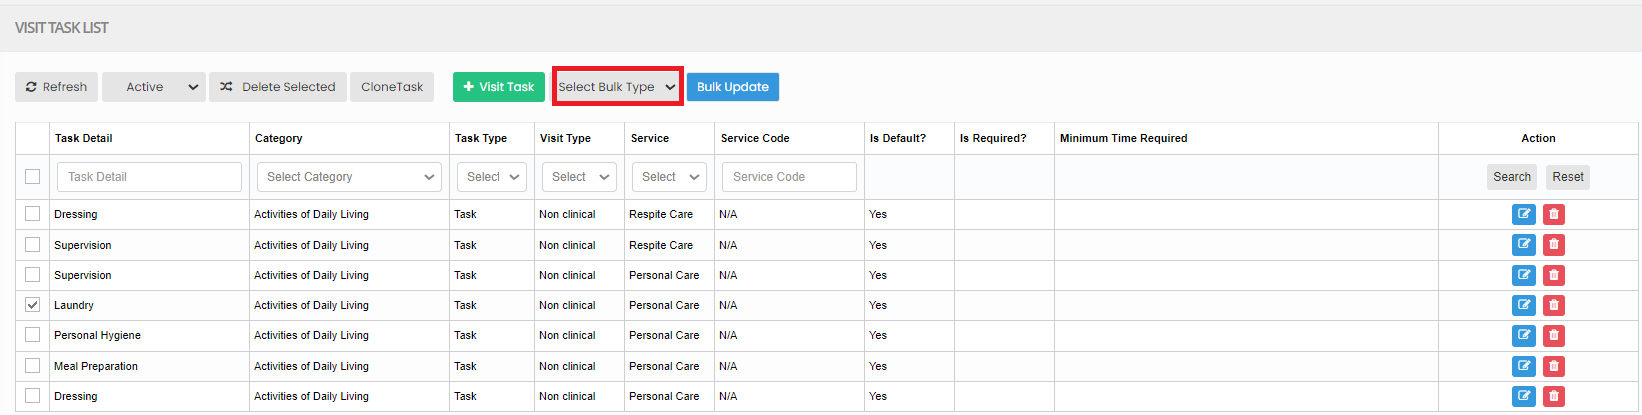](https://support.myezcare.com/uploads/images/gallery/2023-10/61himage.png) Now, select the Category from the list and the related options and then click Bulk Update option. [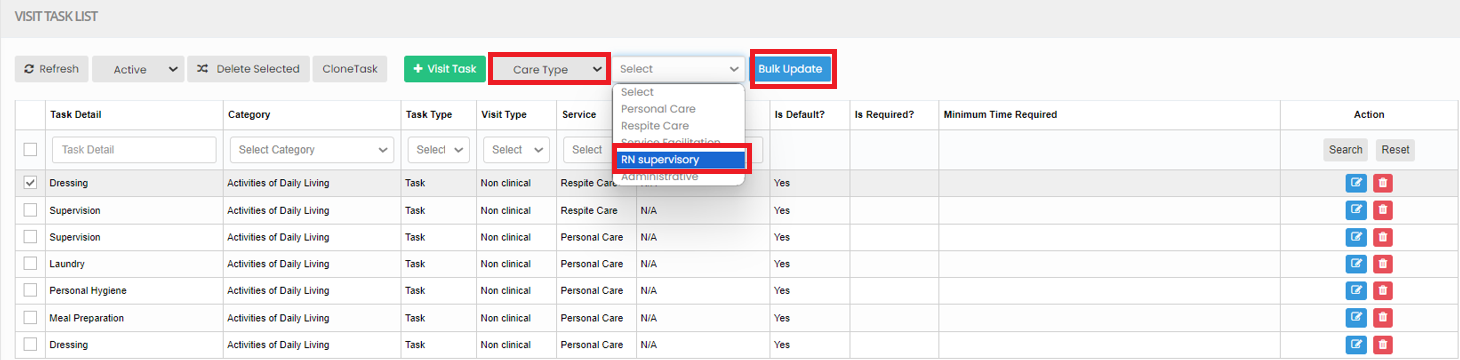](https://support.myezcare.com/uploads/images/gallery/2023-10/Vxuimage.png) The required Category has been added in the list. [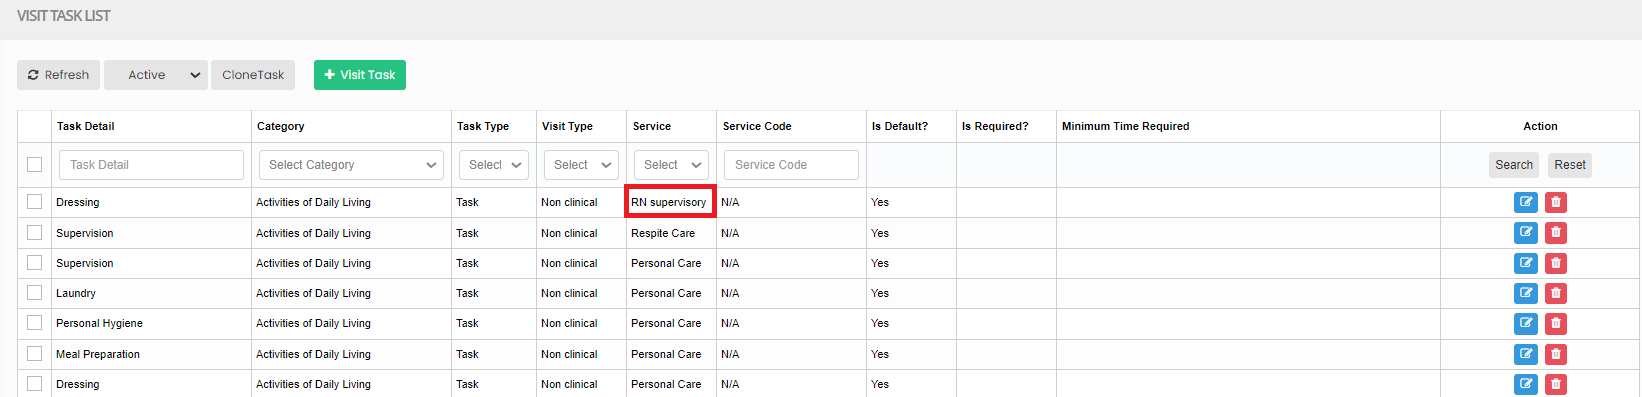](https://support.myezcare.com/uploads/images/gallery/2023-10/RBiimage.png) # Note Sentence A Note Sentence is a brief message, serving to convey information, reminders, or thoughts. ### Adding Note SentenceNote: All Fields marked with **\*** are mandatory and must be filled out, otherwise the system will generate an error indicating that the required information is missing.
**Settings >> Note Sentence >> Add**
[](https://support.myezcare.com/uploads/images/gallery/2023-10/Yp0image.png) The user can add the Note Sentence Title and Note Sentence Details in the system and click Save option. [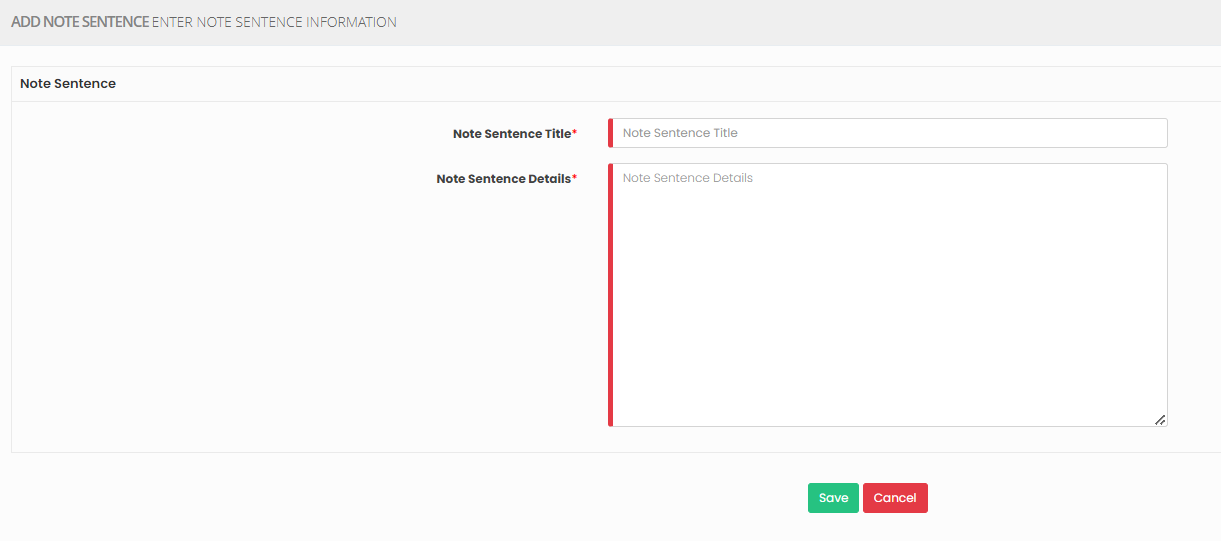](https://support.myezcare.com/uploads/images/gallery/2023-10/vsgimage.png) ### Editing Note Sentence**Settings >> Note Sentence >> List**
[](https://support.myezcare.com/uploads/images/gallery/2023-10/8uRimage.png) Select the note sentence and click edit option on the right side of the screen. [](https://support.myezcare.com/uploads/images/gallery/2023-10/Lljimage.png) Now, enter the required information and click update option. [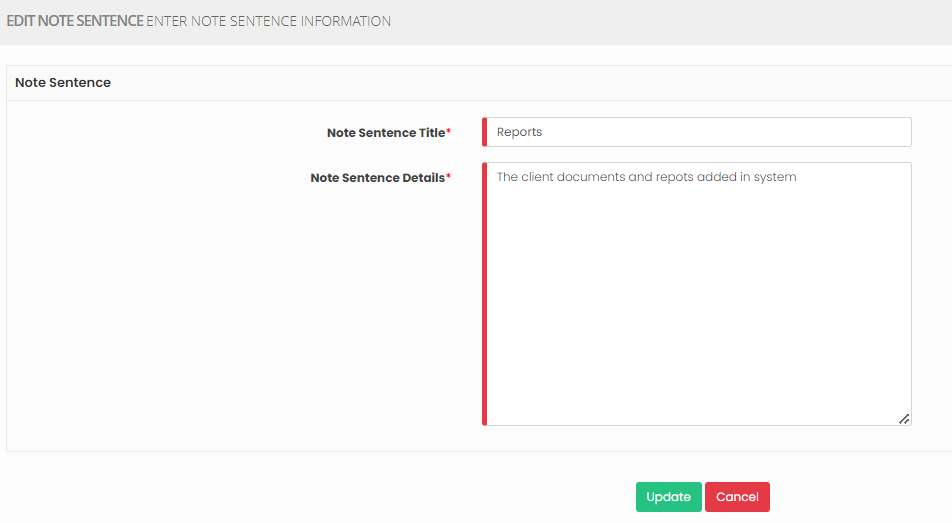](https://support.myezcare.com/uploads/images/gallery/2023-10/PTximage.png) ### Delete Note Sentence**Settings >> Note Sentence >> List**
Select the Note Sentence by using the check box and click Delete option or Disabled Selected on the screen. [](https://support.myezcare.com/uploads/images/gallery/2023-10/sbYimage.png) Now, the Note Sentence gets deleted and we can view the Note Sentence under Deleted list. [](https://support.myezcare.com/uploads/images/gallery/2023-10/619image.png) The user can also Restore the deleted Note Sentence by using the option Active on the right side of the screen. [](https://support.myezcare.com/uploads/images/gallery/2023-11/IM2image.png) # Email Template An email template is a pre-designed message format for efficient and consistent email communication. Templates save time and maintain professionalism in various email contexts, such as marketing campaigns and customer support. ### Adding Email TemplateNote: All Fields marked with **\*** are mandatory and must be filled out, otherwise the system will generate an error indicating that the required information is missing.
**Settings << Email Template << Add**
Enter the Template Name and the required fields in Template Detail Screen and click Save. [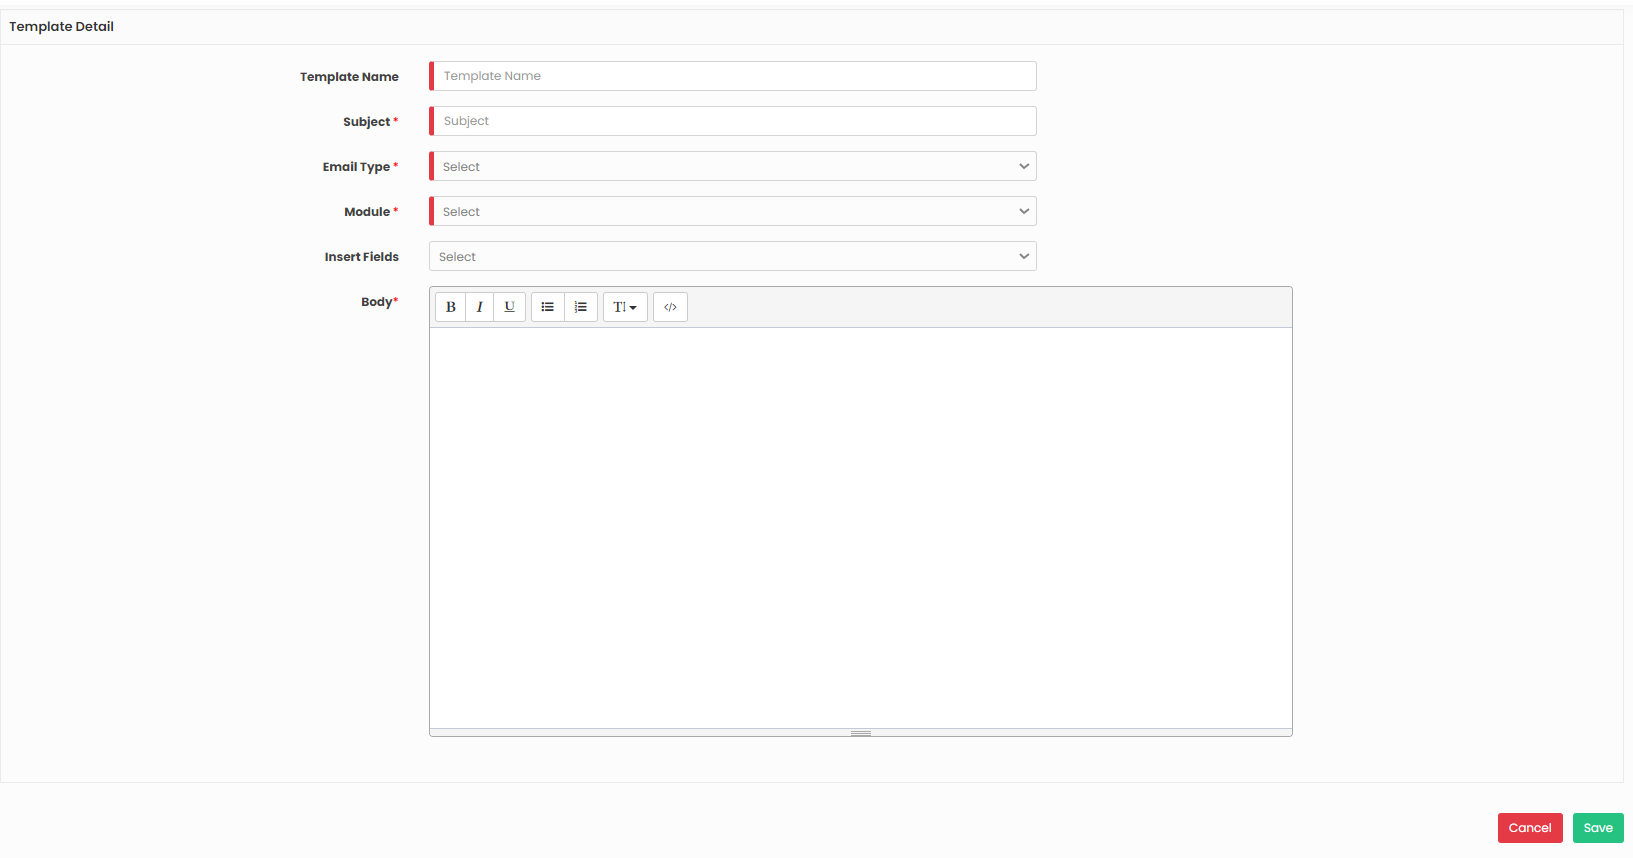](https://support.myezcare.com/uploads/images/gallery/2023-10/mPUimage.png) ### Edit Email Template**Settings << Email Template << List**
From the List of Email Template, click the Edit option on the right side of the screen. Enter the required information in Template Detail screen and click Update option. [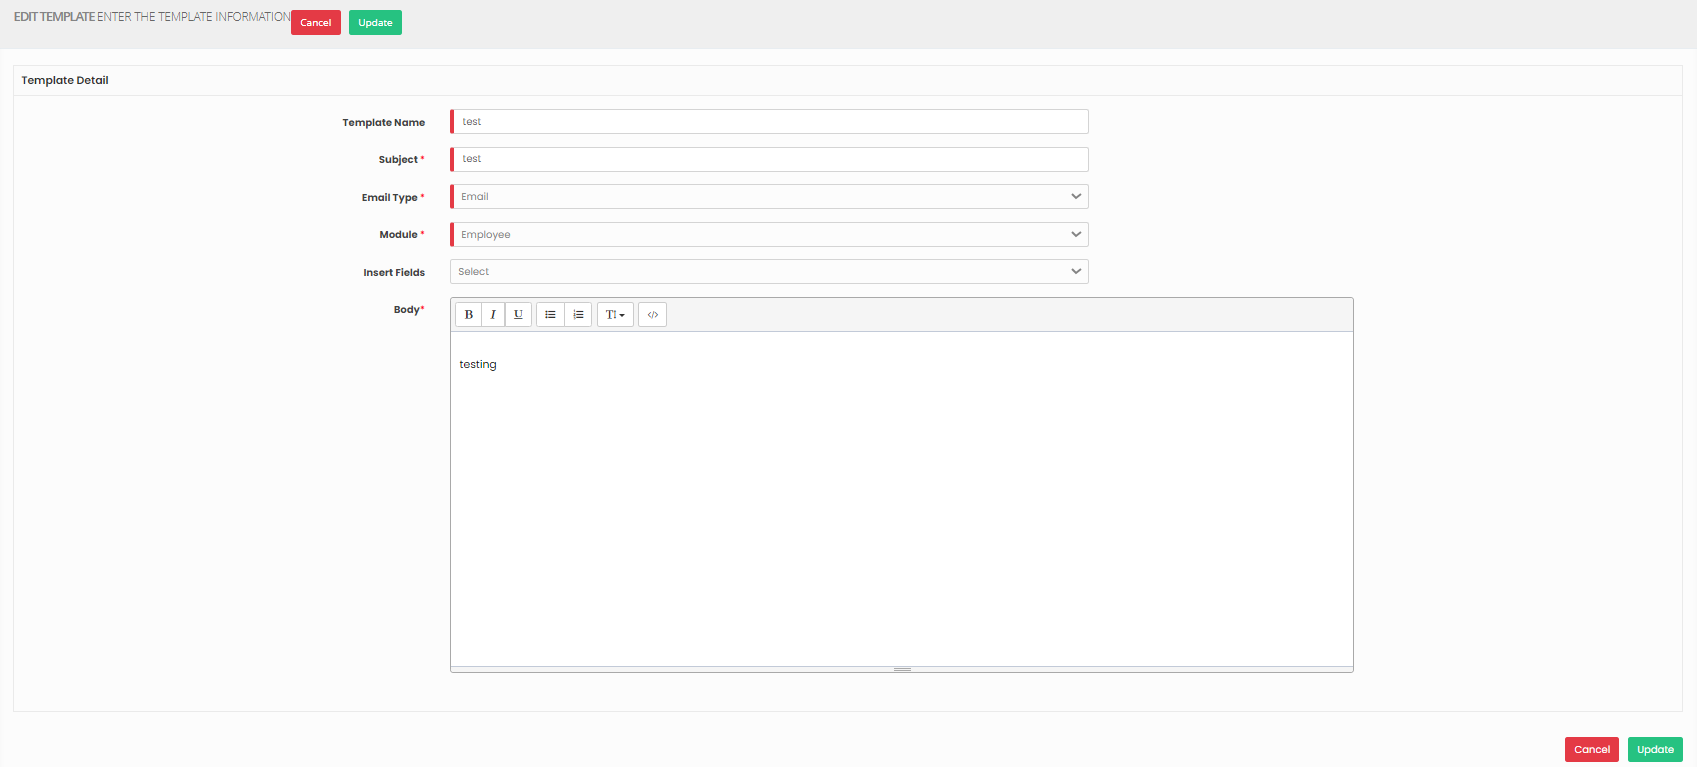](https://support.myezcare.com/uploads/images/gallery/2023-10/m1Limage.png) ### Delete Email Template**Settings << Email Template << List**
To Delete the Email Template, Click Delete option on the right side of Template Details screen. [](https://support.myezcare.com/uploads/images/gallery/2023-10/Aewimage.png) # Notification Configuration Notification configuration defines how alerts or messages are generated and delivered within a system. ### Adding Notification ConfigurationNote: All Fields marked with **\*** are mandatory and must be filled out, otherwise the system will generate an error indicating that the required information is missing.
**Settings >> Notification Configuration**
Select the Role, check the Notification Configuration from the list and click Save option. [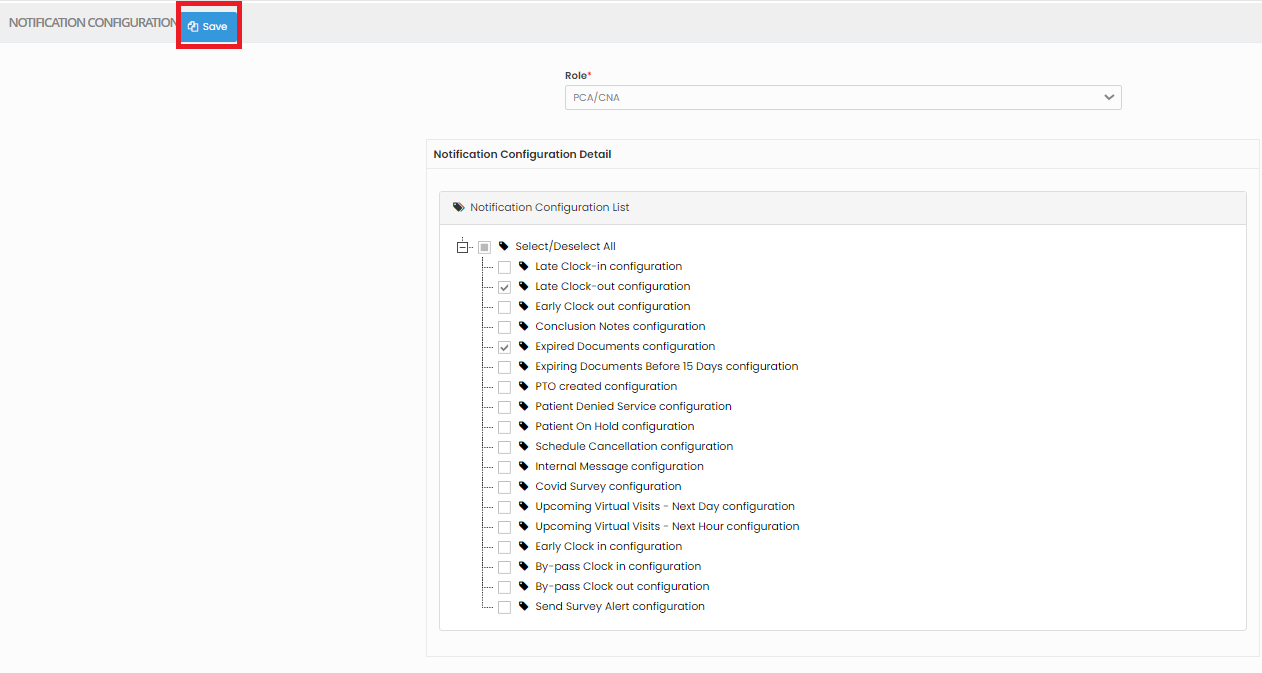](https://support.myezcare.com/uploads/images/gallery/2023-10/2RRimage.png) # Virtual Visit Terms and Conditions Virtual visit terms and conditions are legal agreements governing rules and responsibilities for online interactions. Patient and providers should read and understand these terms before participating in virtual visits to ensure a clear and secure experience. ### Adding Virtual Visit Terms and Conditions**Settings << Virtual Visit Terms and Conditions**
Update the Terms and Conditions of the Virtual Visit and Click Save option. [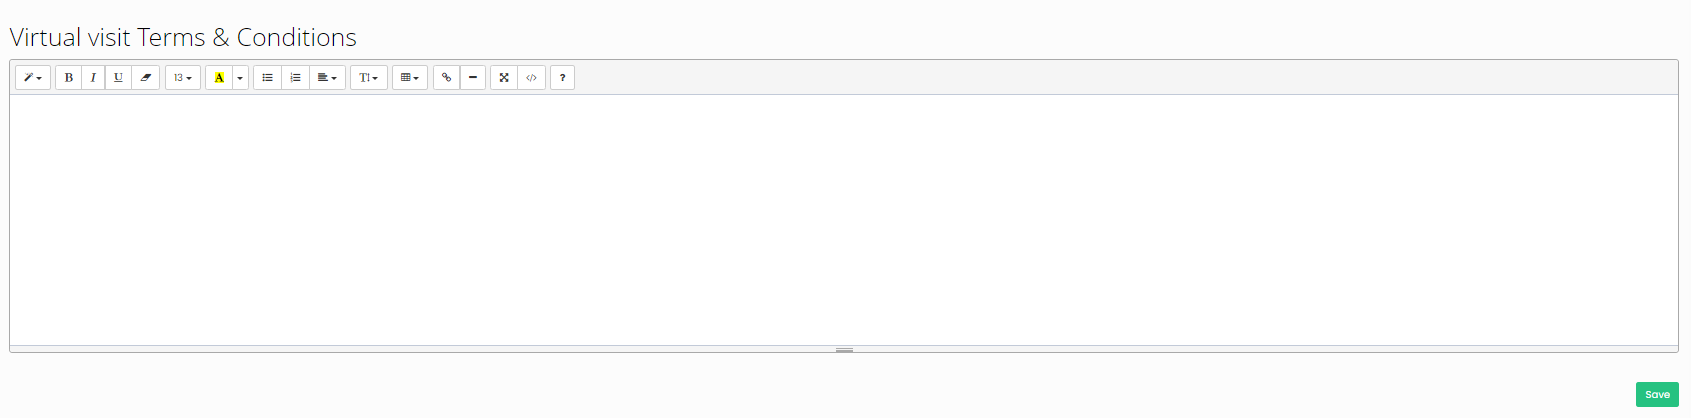](https://support.myezcare.com/uploads/images/gallery/2023-10/reNimage.png) # Employee Our system allows for the secure and centralized storage of all employee information and documents. Accessible only to authorized personnel, this feature ensures data confidentiality and compliance with data protection regulations. # New Employee A new employee in home health care is a recently hired individual who provides healthcare services in a patient's home. Their role includes assisting with daily tasks, medication administration, and health monitoring. ### Adding Employee InformationNote: All Fields marked with \* are mandatory and must be filled out, otherwise the system will generate an error indicating that the required information is missing.
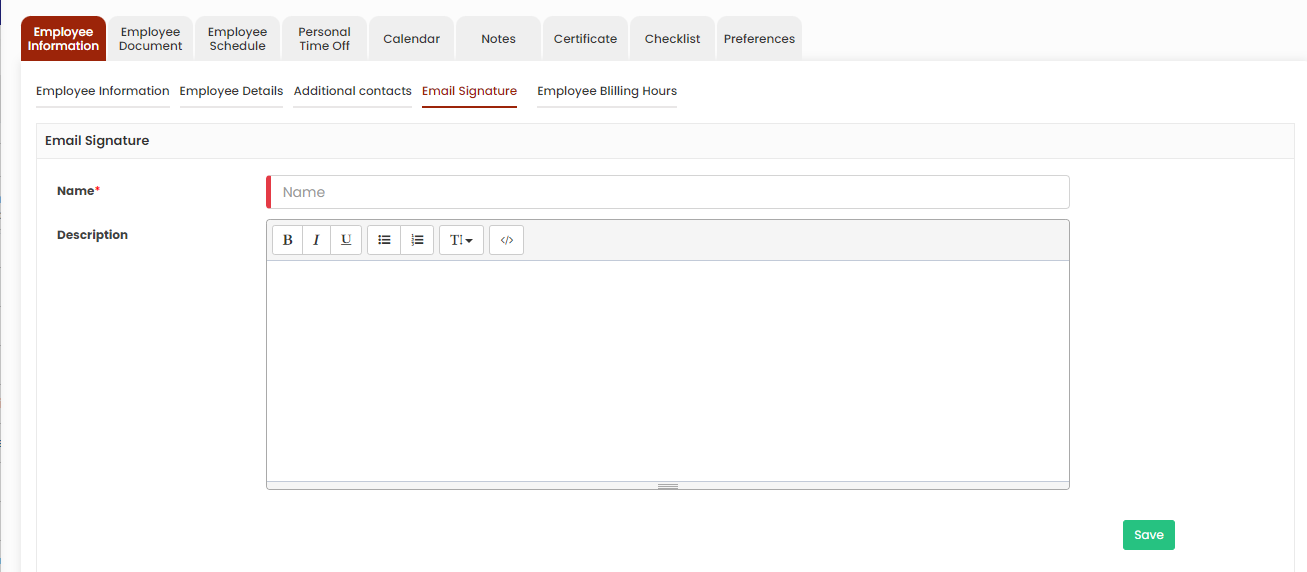
1. Locate the +Add option under Employee Tab. [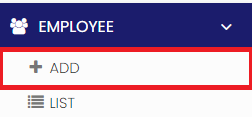](https://support.myezcare.com/uploads/images/gallery/2023-10/LFUimage.png) 2. Click +Add option to update the Employee Information. Enter the Employee information in the required field and Click Next option. If the Employee Account has been locked due to Invalid password in the mobile app for more than 3 times, then the user can unlock the Employee Account using the option "Account Status". Also, if the Patient is residing in a Big Apartment and the Employee having issues in clocking in the mobile app at patient's residence, we can provide the option Update Location as Yes, when it is set as Yes, the 'Employee can will get an option in the mobile to update the Location Coordinates and Clock-in for the visits. If the Visit gets completed, we can set the option Update Location as No in he system. [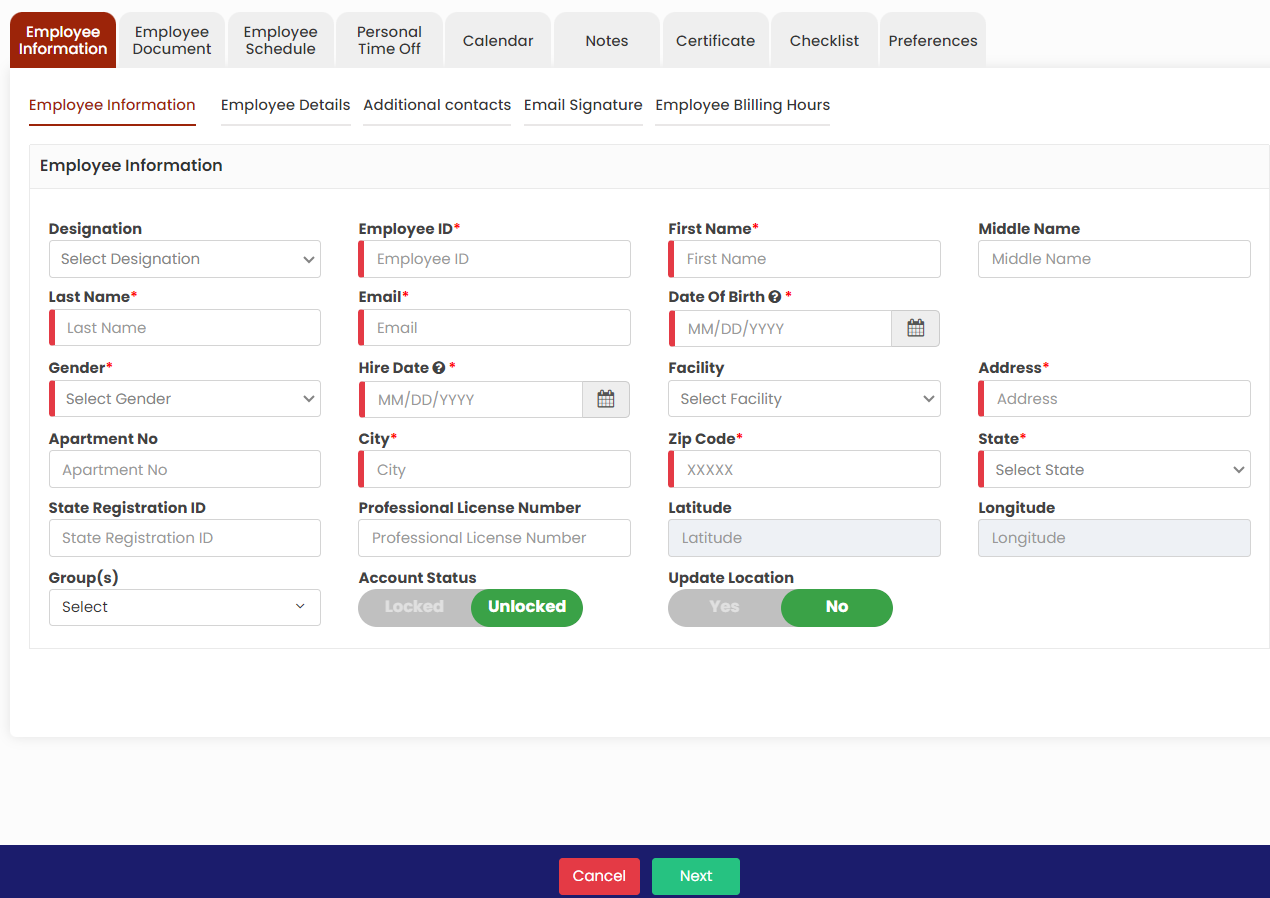](https://support.myezcare.com/uploads/images/gallery/2023-10/8xHimage.png) 3\. The Employee details screen appears. In Employee details, update the username with the format (first name initials and last name). Also enter the 4 digit IVR Pin which is used to login using Mobile Application for each employee. The user can add the signature of the Employee by using the option Upload Signature. After completing the required field, Click Next option. [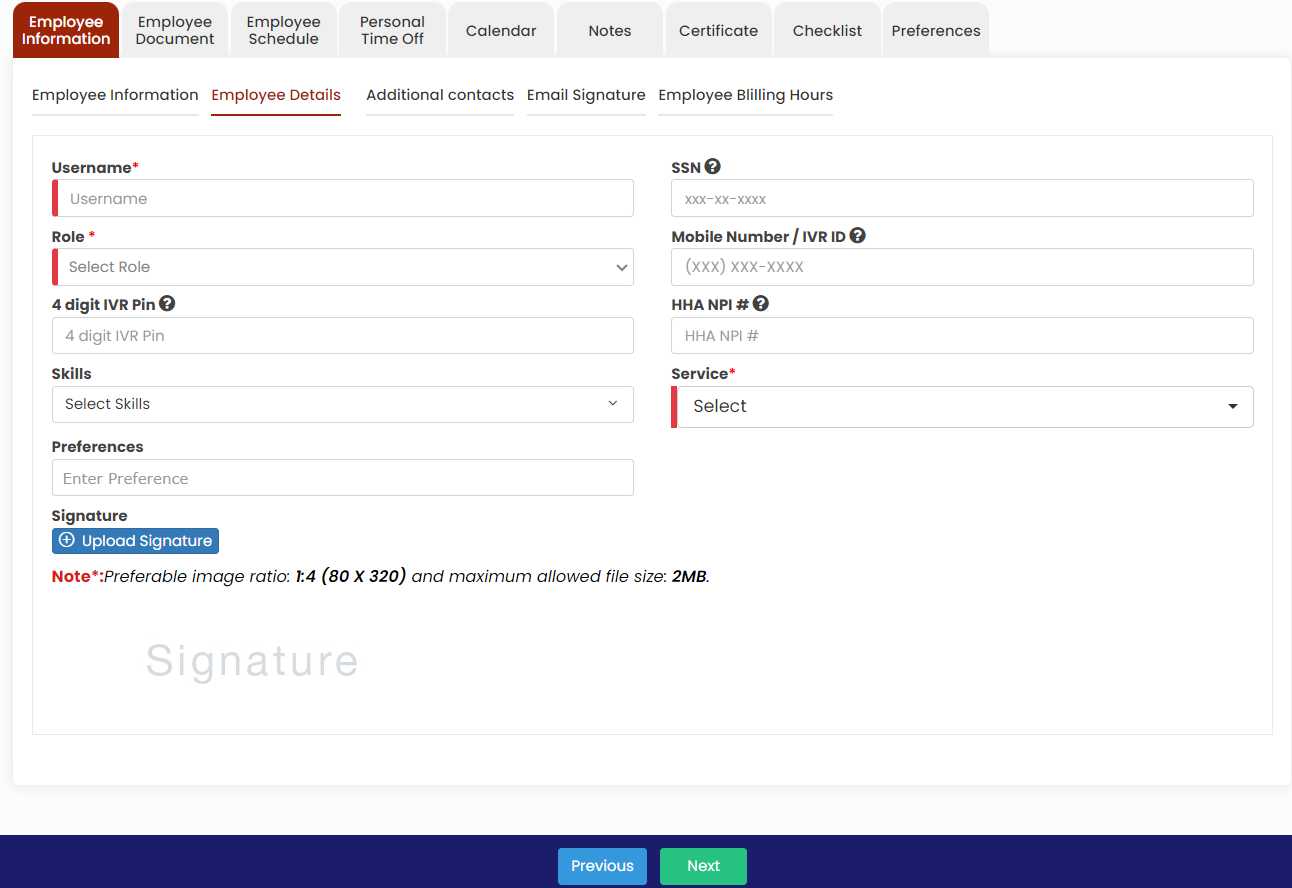](https://support.myezcare.com/uploads/images/gallery/2023-10/l9kimage.png) 4\. The Additional Contacts screen appears in which the user can update the additional contact details of the employee by using the +Add New Contact option and Click Save button. [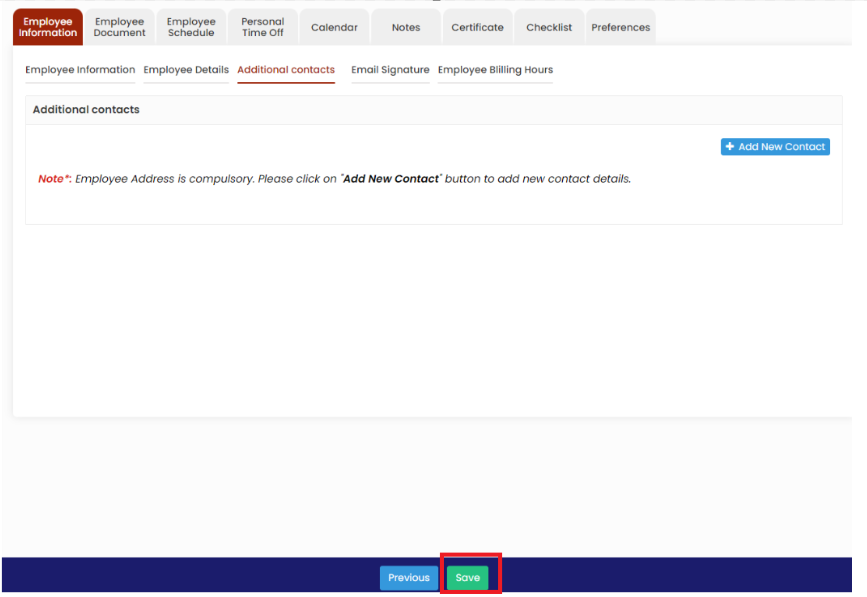](https://support.myezcare.com/uploads/images/gallery/2023-10/ApZimage.png) ### Editing Employees Information To navigate through the process of editing Employee information, follow these steps: 1. Locate List option under Employee Tab. [ ](https://support.myezcare.com/uploads/images/gallery/2023-10/uidimage.png) 2\. Select the Employee from the list to edit the information. Click the blue color Edit option under Action on the right side of the screen for editing the Employee information or click on the Employee name. [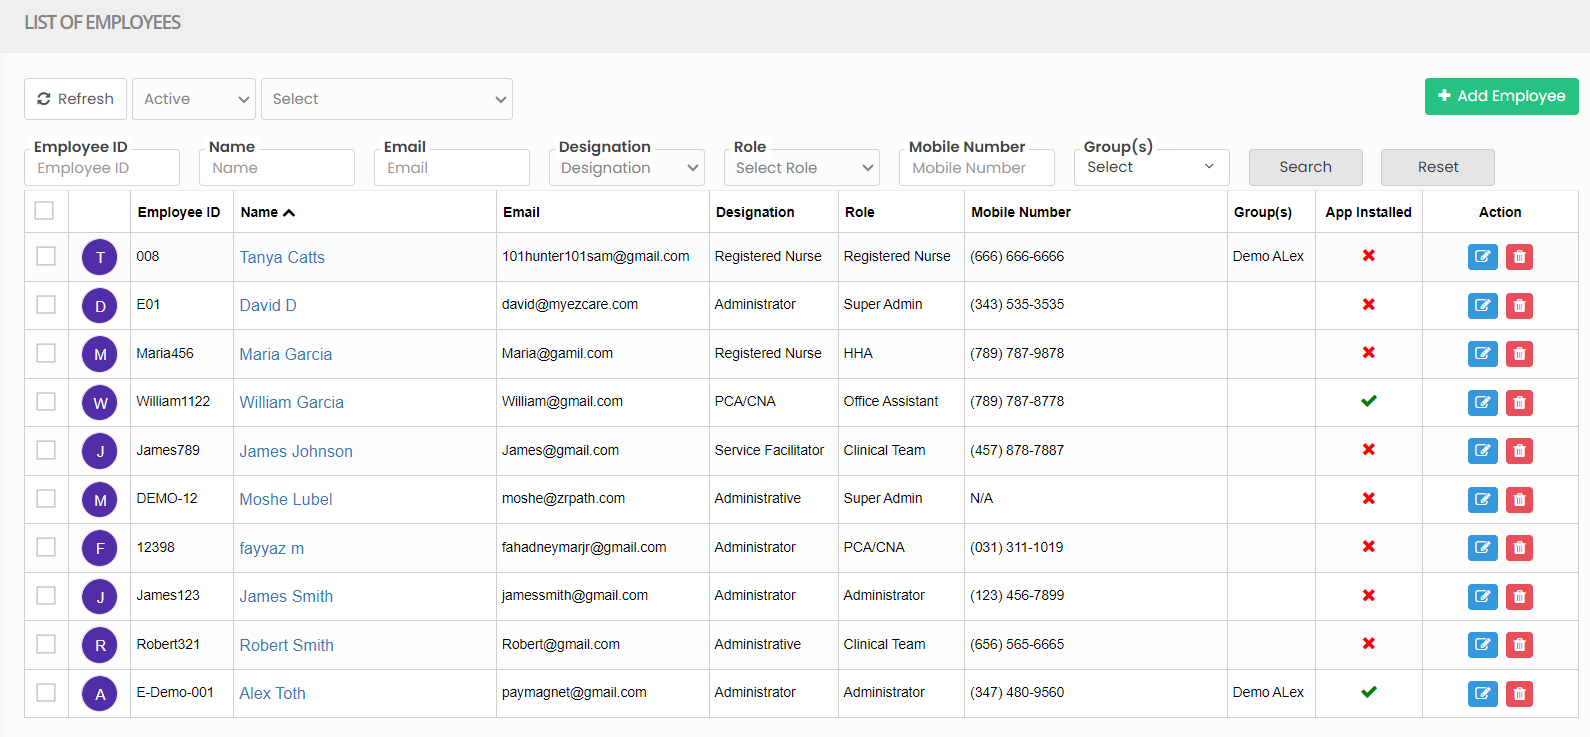](https://support.myezcare.com/uploads/images/gallery/2023-10/1frimage.png) 3\. The following screen appears to edit the required information of the Employee. [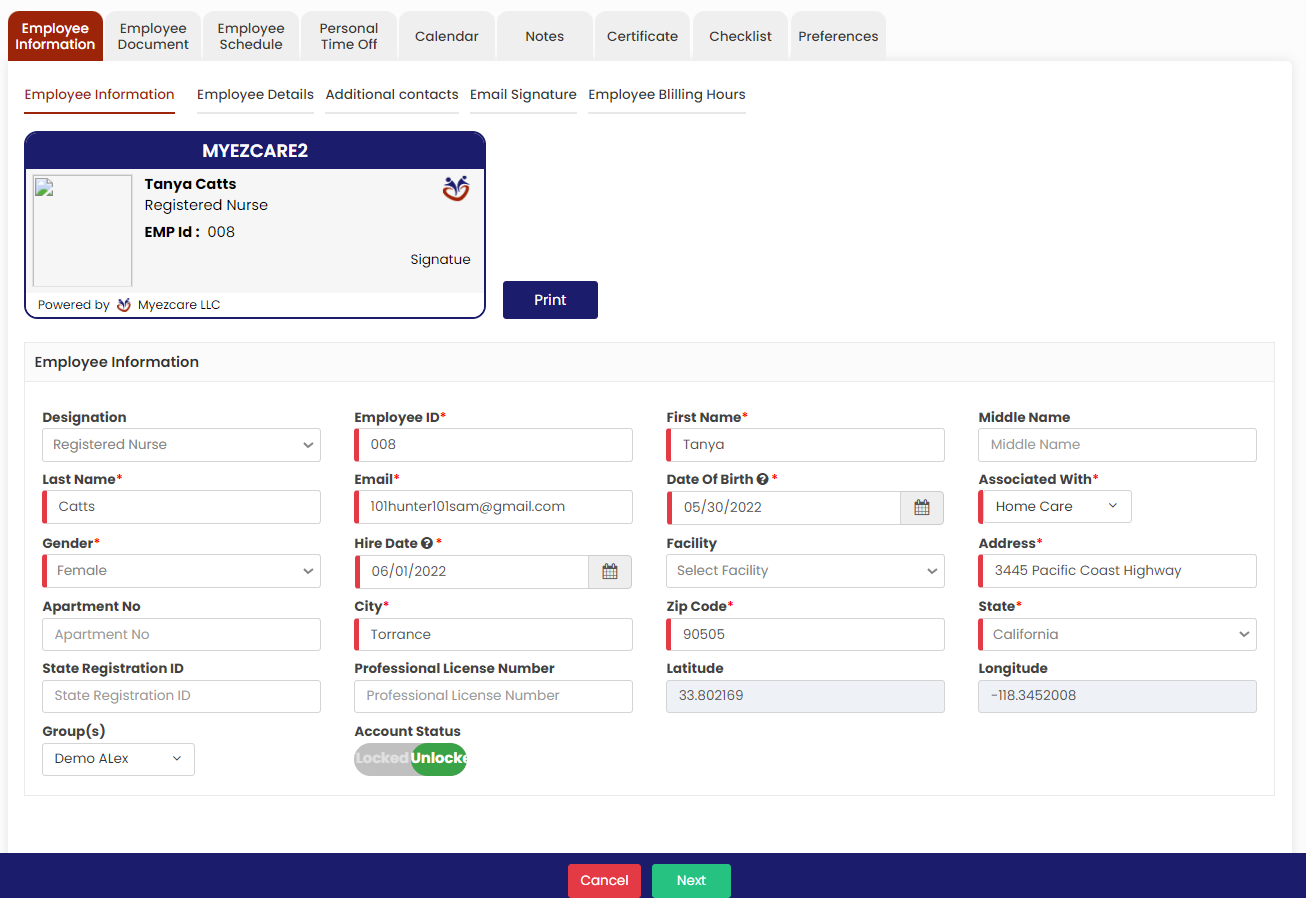](https://support.myezcare.com/uploads/images/gallery/2023-10/0vQimage.png) [](https://support.myezcare.com/uploads/images/gallery/2023-11/DTvimage.png) Click Update option in Additional contact screen to update the information for the Employee. [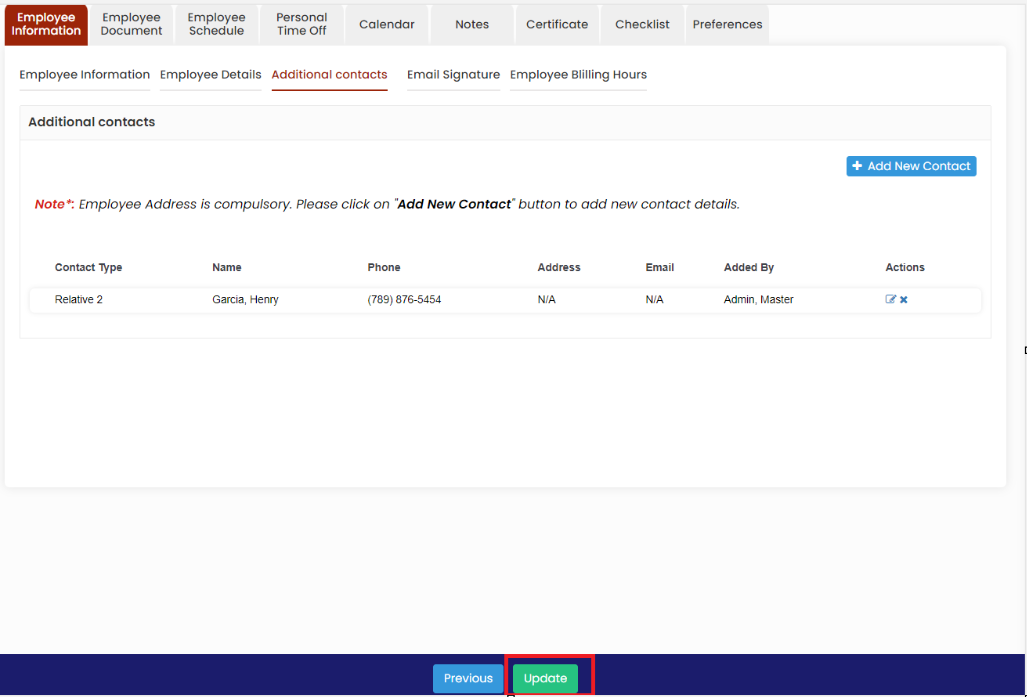](https://support.myezcare.com/uploads/images/gallery/2023-10/qDIimage.png) --- ### Email signature The user can update the email signature by using the email signature option. Update the required information and Click Save option.**Employee Tab>>List>>Employee name>>Email signature**
[](https://support.myezcare.com/uploads/images/gallery/2023-10/zJsimage.png) ### Employee Billing Hours In Employee Billing Hours option, the user can update the Regular working hours, Regular Working / Hour Rate and Overtime Rate of the employee.**Employee Tab>>List>>Employee name>>Employee Billing Hours**
[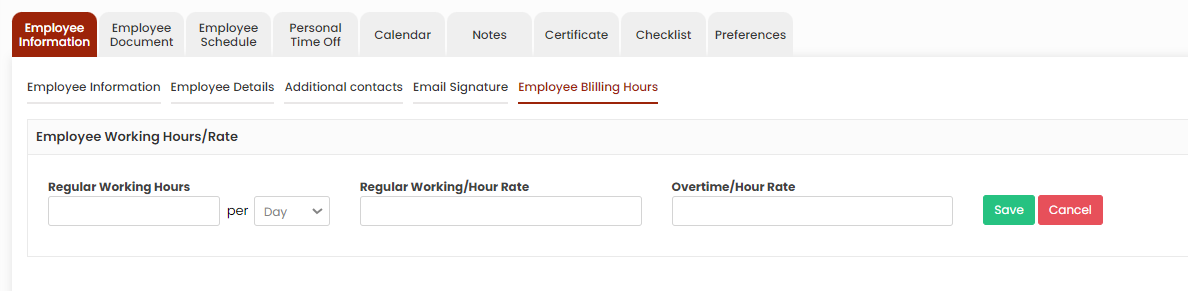](https://support.myezcare.com/uploads/images/gallery/2023-10/vWuimage.png) # Employee Document The Employee documents may include certifications, employment contracts, and care plans, ensuring compliance with regulations and offering a comprehensive overview of the caregiver's qualifications and responsibilities. ### Uploading Employee Document The required documents of the Employee can be uploaded in the system by using the option Employee Document.**Employee Tab >> List >> Select Employee >> Employee Document**
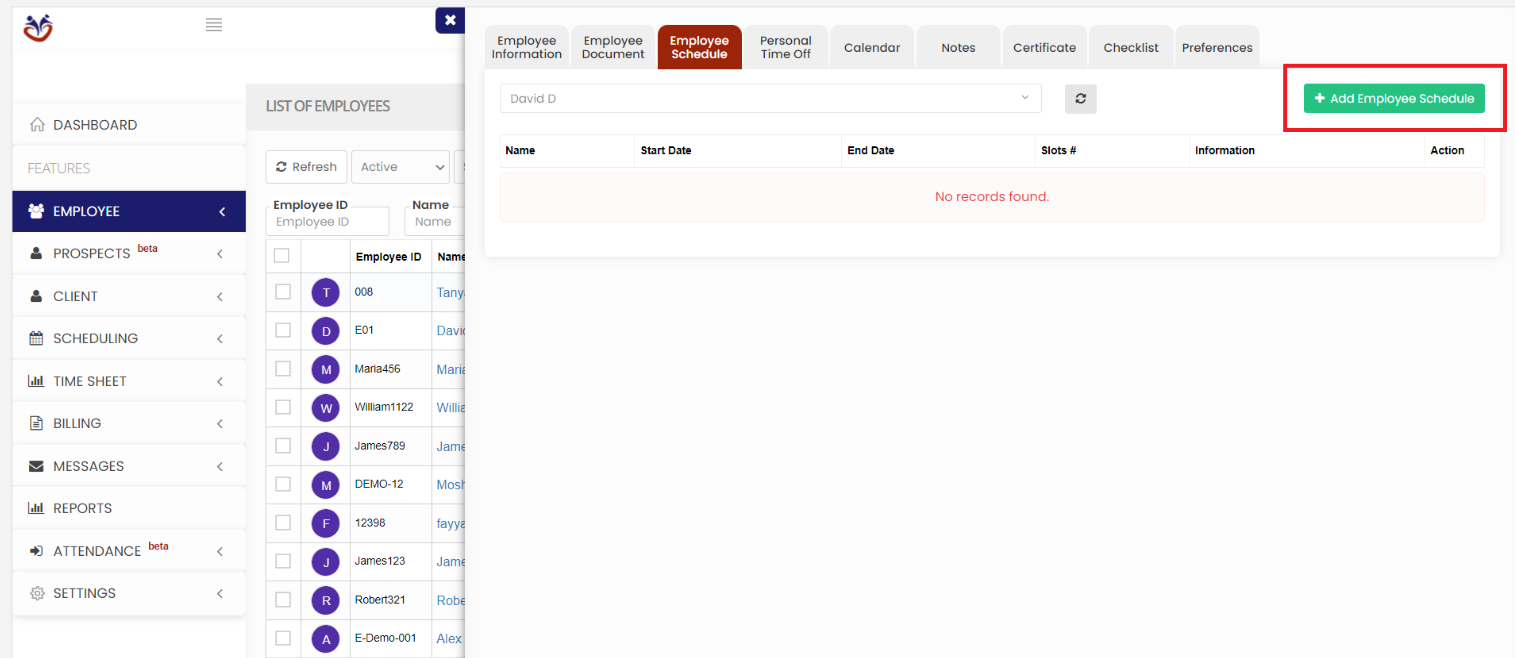
[](https://support.myezcare.com/uploads/images/gallery/2023-10/ci3image.png) Select the type of document from the list and Click the Upload Documents option. The user can also Add New Folders and Subfolders to upload the documents. [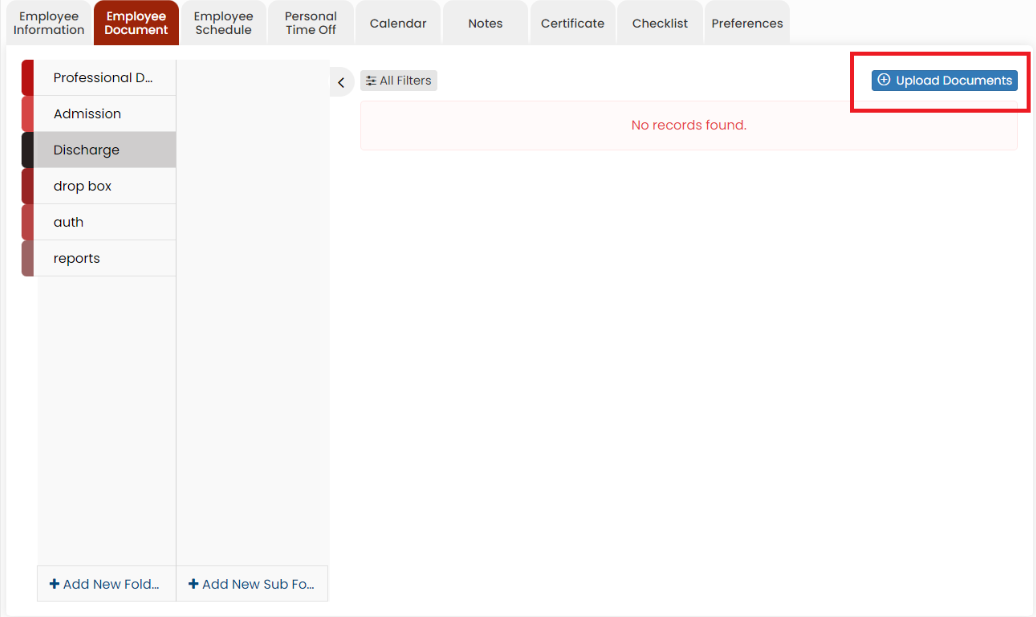](https://support.myezcare.com/uploads/images/gallery/2023-10/E1ximage.png) ### Adding New Folder in Employee document Click + Add New Folder option in Employee document. The following screen appears, update the required information. Also in the option Show to All, if the user needs the folder name to be added for all the employee click Yes option. If the user wants the folder to be added only for the particular employee click No option and click Save. [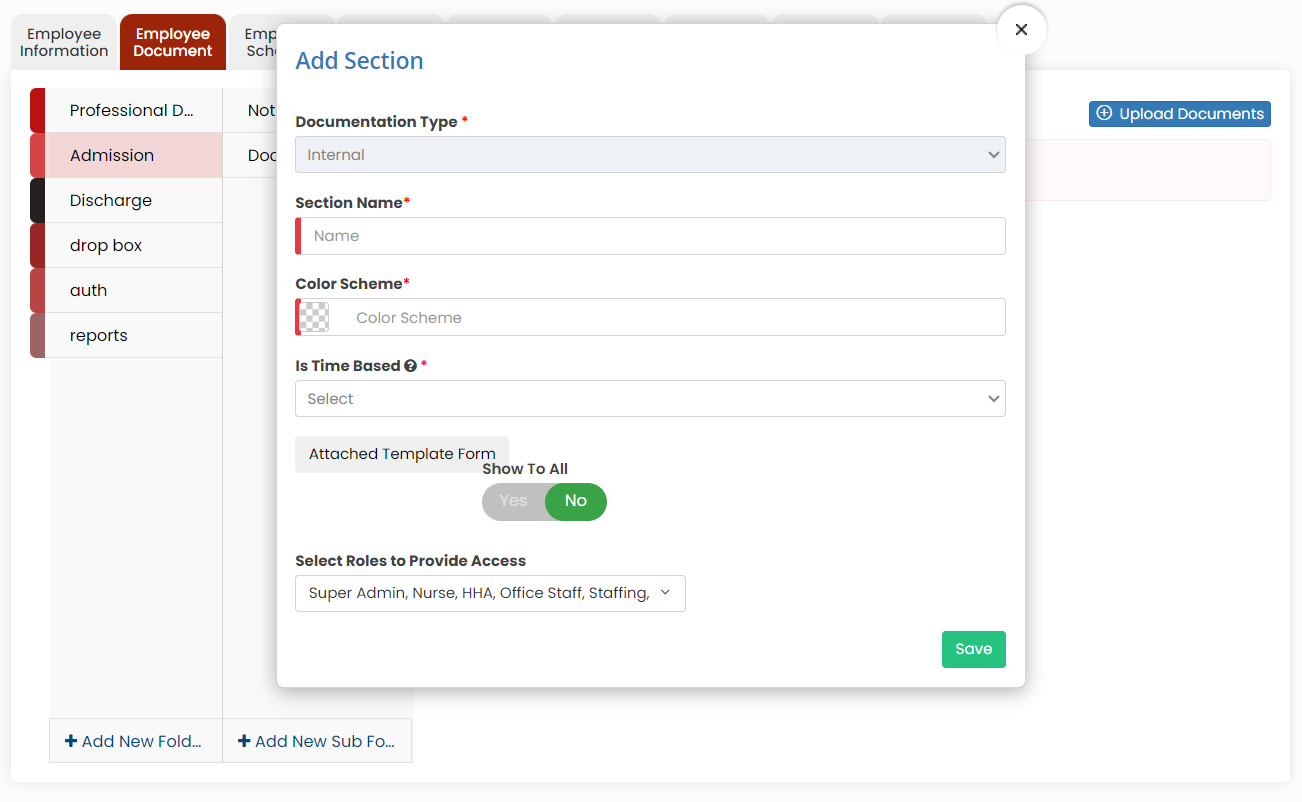](https://support.myezcare.com/uploads/images/gallery/2023-10/fInimage.png) The folder Documents is added successfully to upload the required documents of the employee. [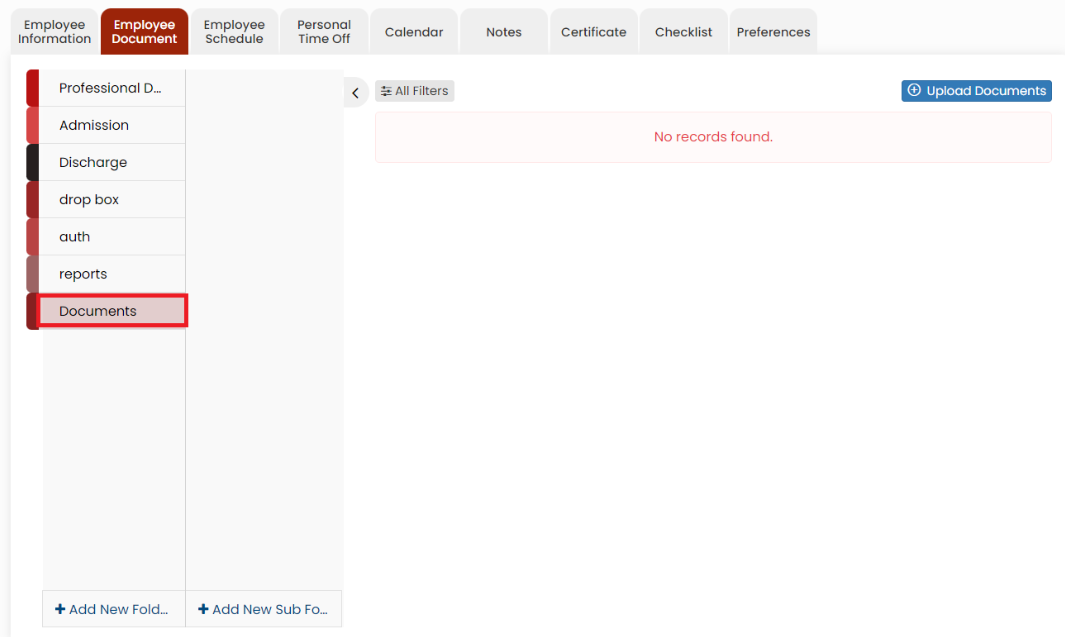](https://support.myezcare.com/uploads/images/gallery/2023-10/y5Qimage.png) ### Adding New Sub Folder in Employee Document Select the folder name and click the option +Add New Sub Folder option. The following screen appears, update the required information. Also in the option Show to All, if the user needs the Sub folder name to be added for all the employee click Yes option. If the user wants the folder to be added only for the particular employee click No option and click Save. [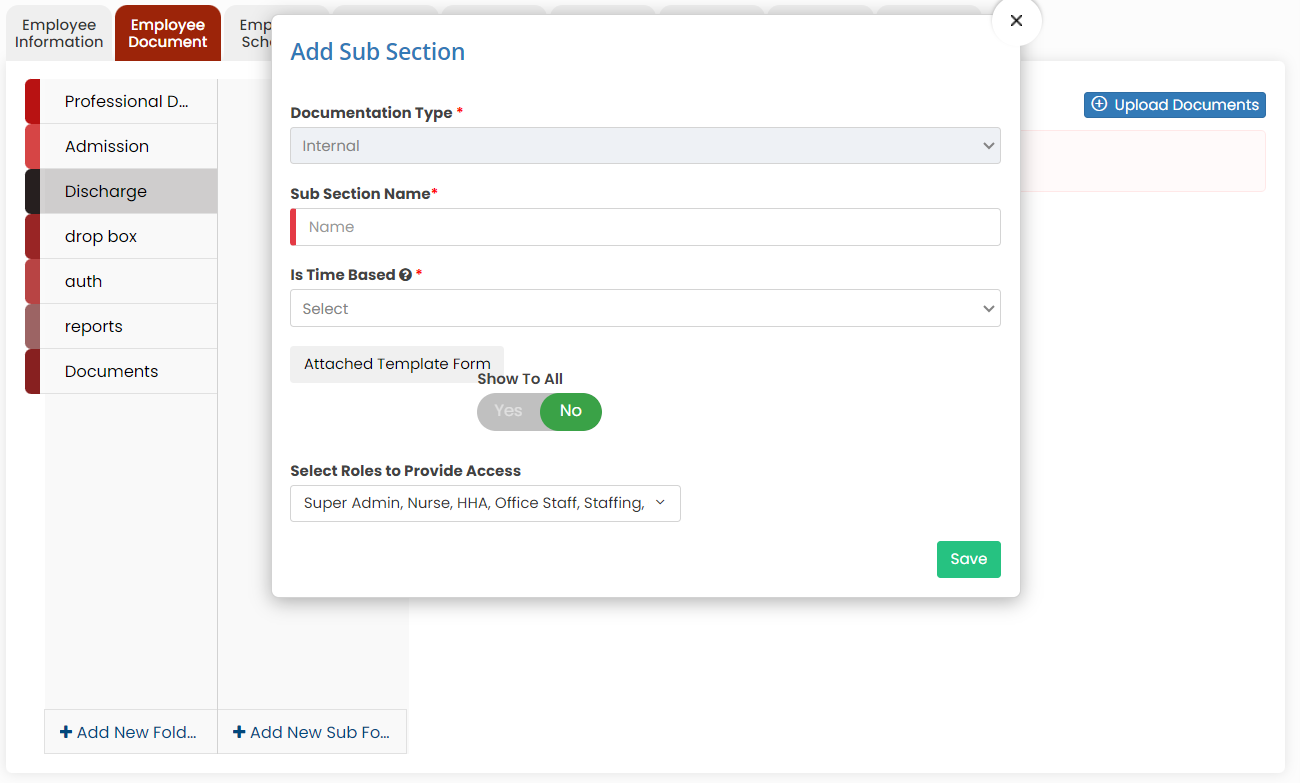](https://support.myezcare.com/uploads/images/gallery/2023-10/nl7image.png) The Sub folder 2023 is now added under folder name Discharge to upload the required documents of the Employee. [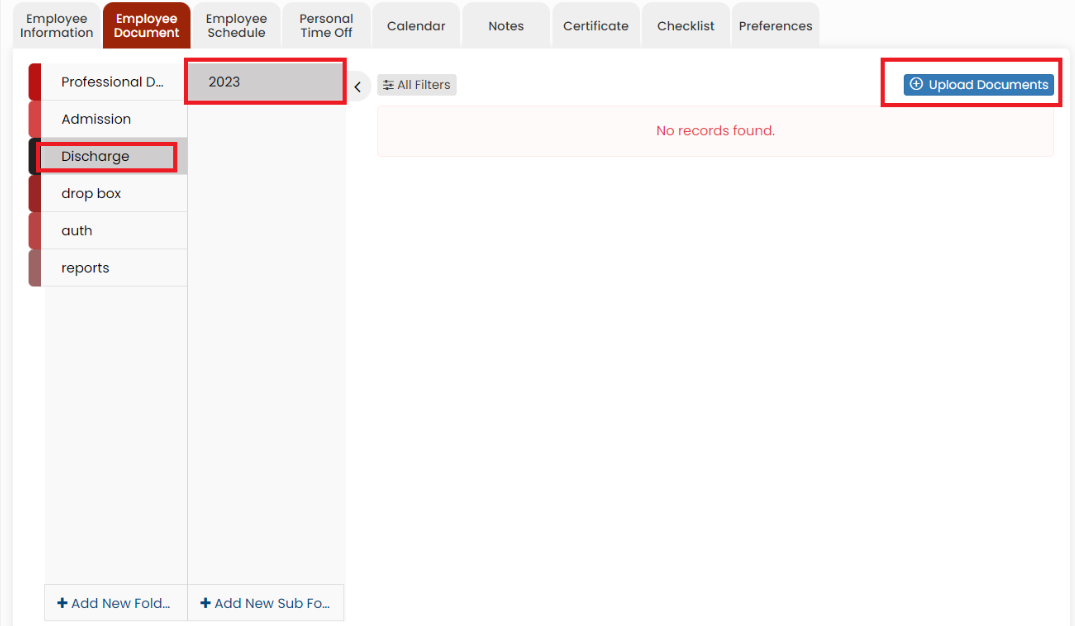](https://support.myezcare.com/uploads/images/gallery/2023-10/4LMimage.png) --- --- #### Uploading Documents To upload the documents, select the folder name and click Upload documents. When we click the option Upload Documents, the following screen appears, [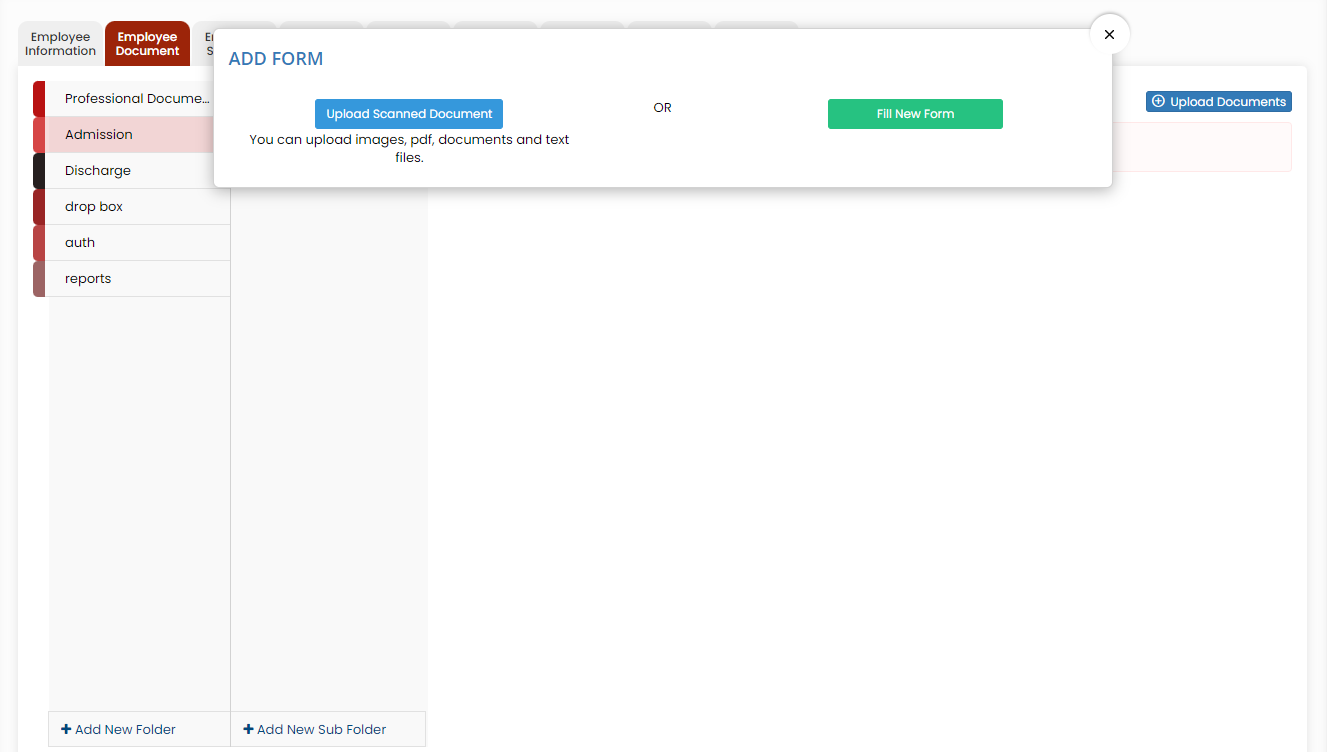](https://support.myezcare.com/uploads/images/gallery/2024-04/F8oimage.png) The Scanned documents can be uploaded using the option Upload Scanned Document option. The forms in the system can be uploaded using Fill New Form option. For each scanned document under action we have the following options. [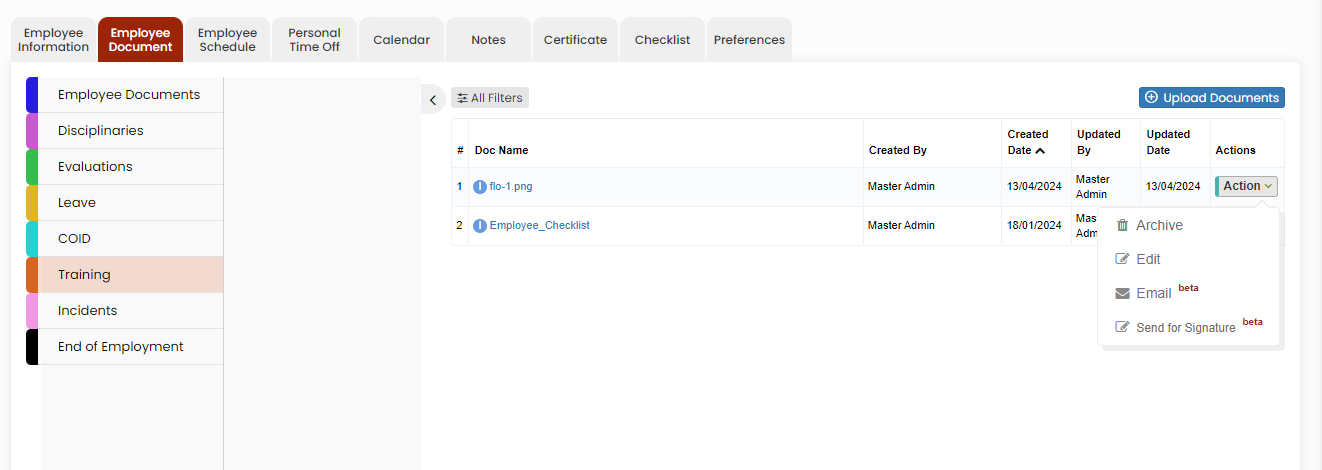](https://support.myezcare.com/uploads/images/gallery/2024-04/1uMimage.png) **Archive option** Click the option Archive to delete the uploaded scanned document. The following pop-up appears. Click Yes Continue option. [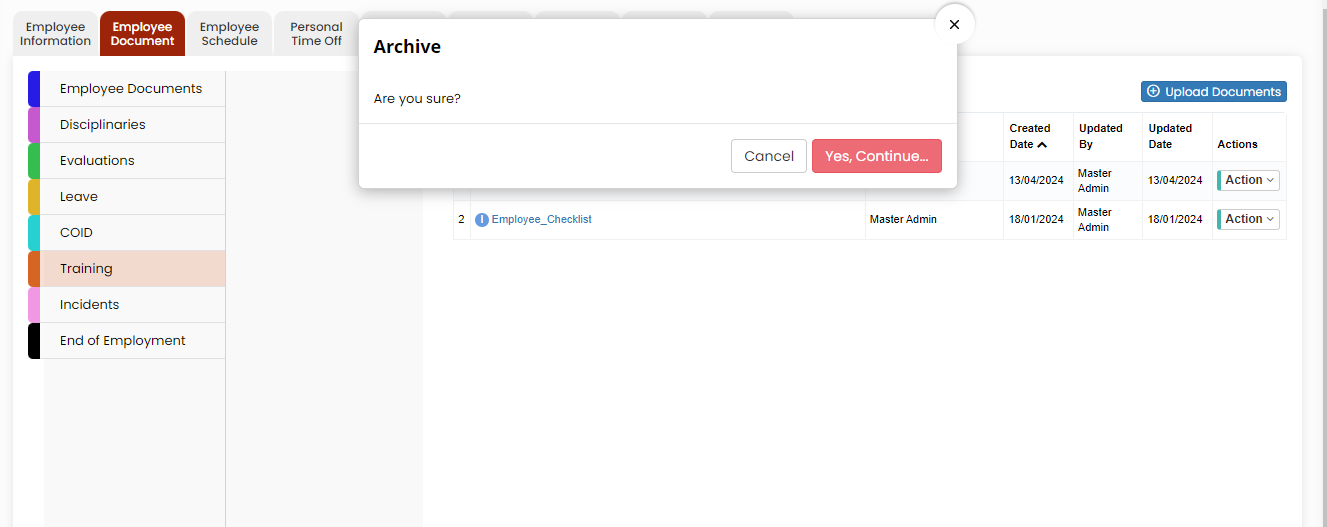](https://support.myezcare.com/uploads/images/gallery/2024-04/0hiimage.png) The document is now deleted from the Active documents list. To view the deleted document, Click All Filters option and select the Status Archive. [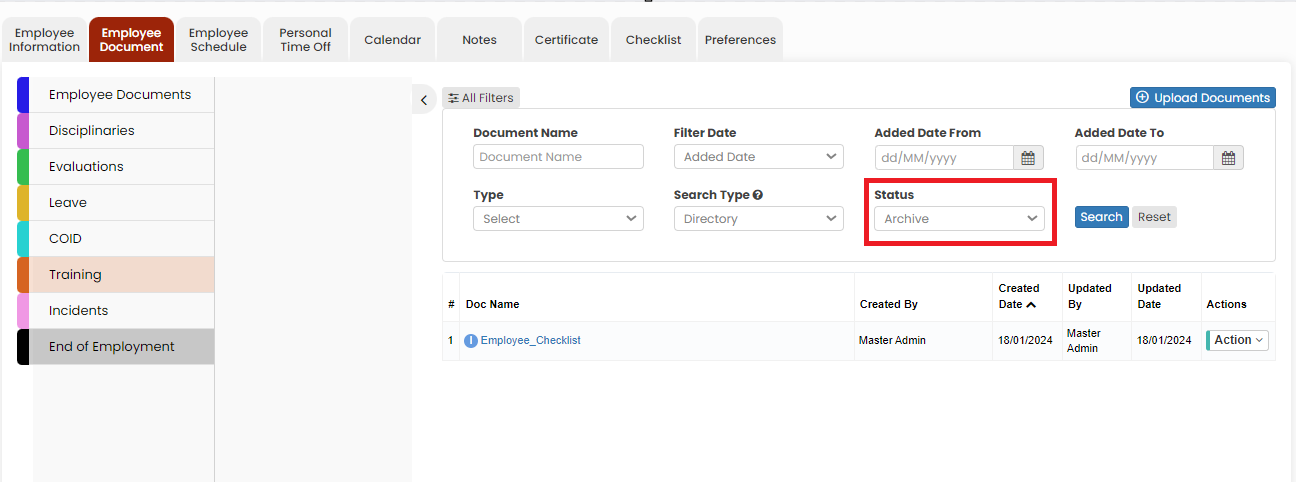](https://support.myezcare.com/uploads/images/gallery/2024-04/2L9image.png) **Edit Option** Click Edit option to edit the required information in the uploaded forms. Also we can edit the Document name of the uploaded scanned document using the Edit option. [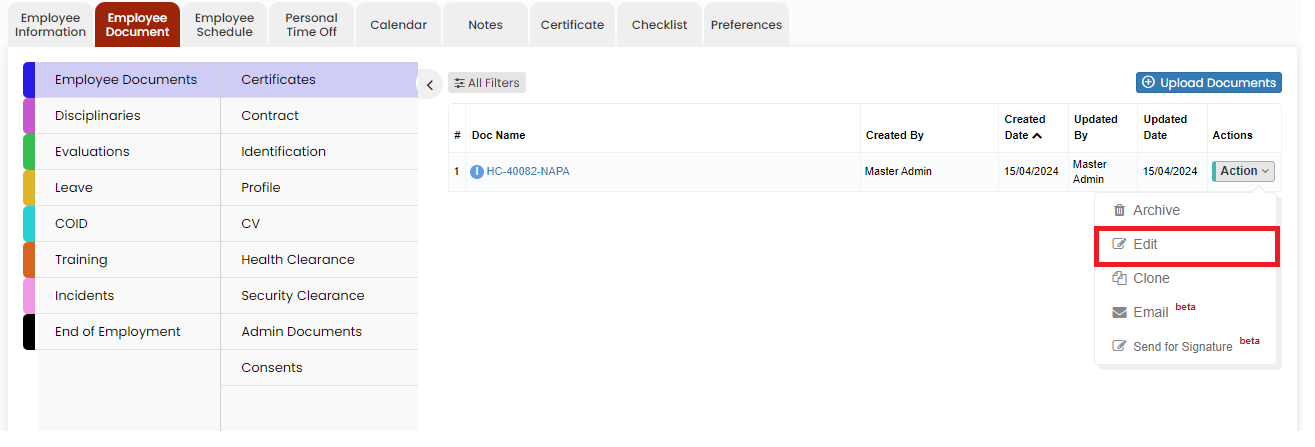](https://support.myezcare.com/uploads/images/gallery/2024-04/cfKimage.png) **Email Option** The uploaded scanned document can be sent through Email using the Email option. Click Email option under Actions of the scanned document. The following screen appears, update the Email address, Subject and content of the Email and click Send option. The Email will be sent along with the scanned document. We can also create templates for the Email under Settings >> Email Template option. The user can use the created email template by using the option Templates in the Email Screen. [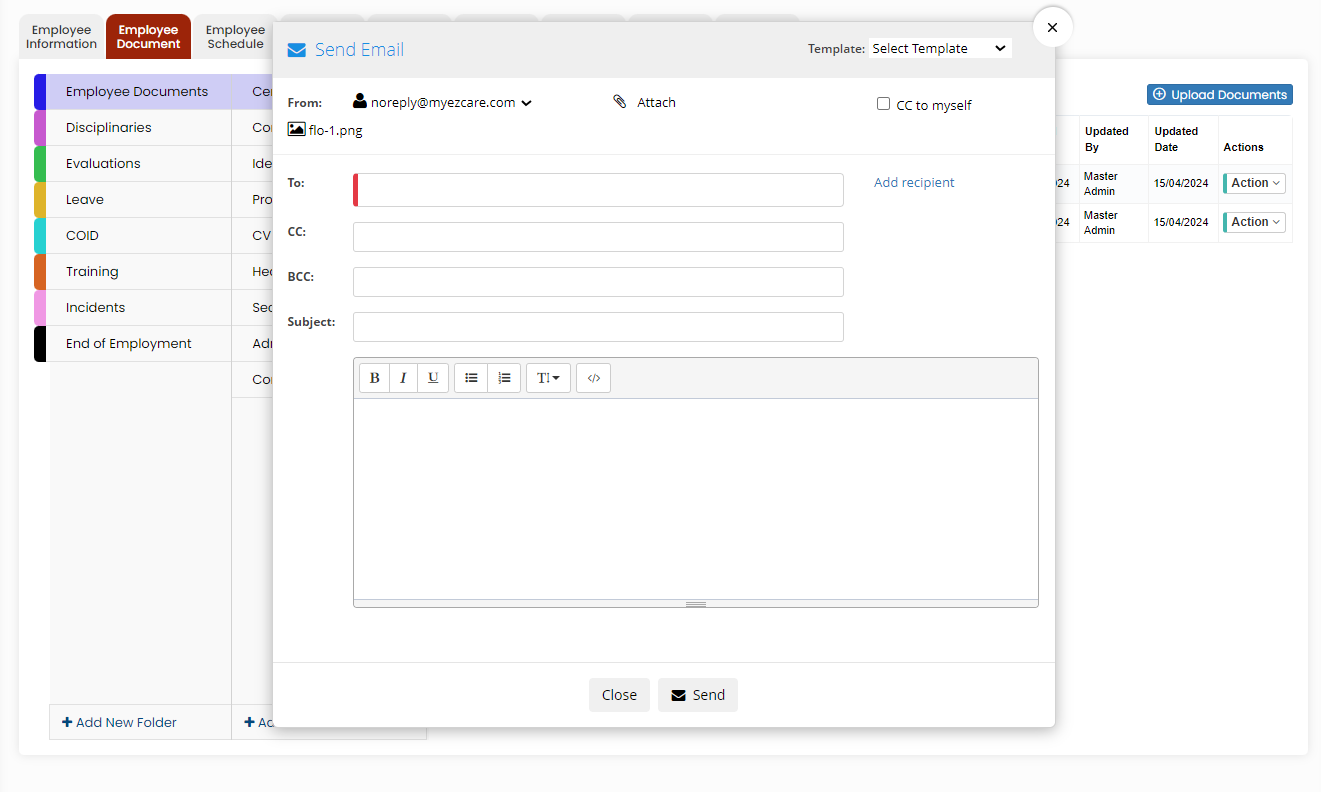](https://support.myezcare.com/uploads/images/gallery/2024-04/HwSimage.png) **Send for Signature option** The user can send the forms in the system to get the Electronic Signature from the Employee by using the option Send for Signature under Actions. [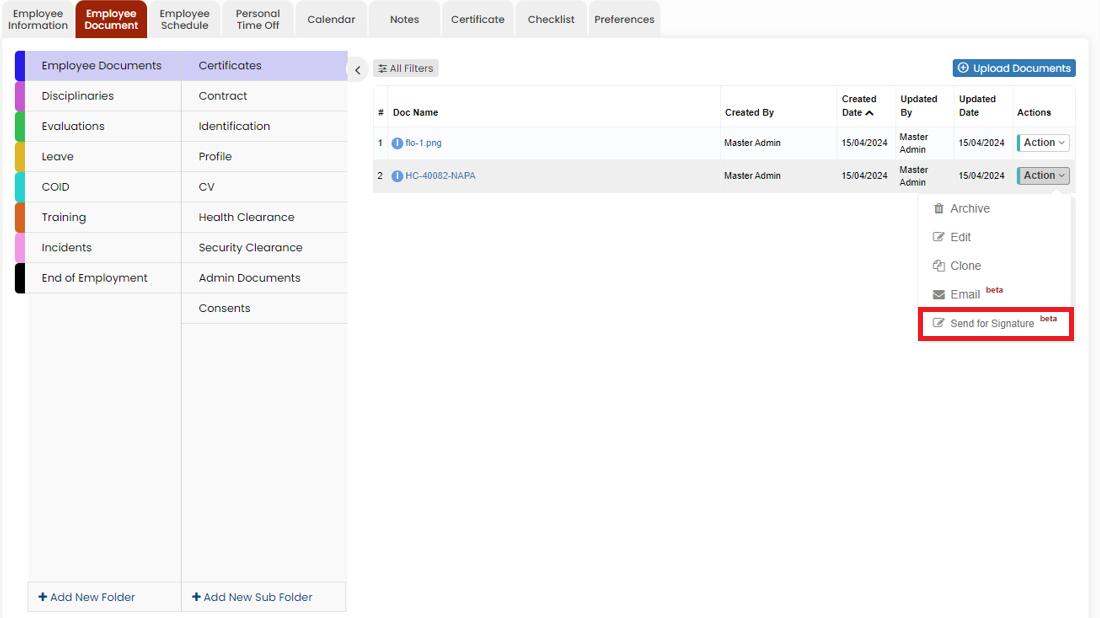](https://support.myezcare.com/uploads/images/gallery/2024-04/htsimage.png) Click the option Send for Signature, the following screen appears, [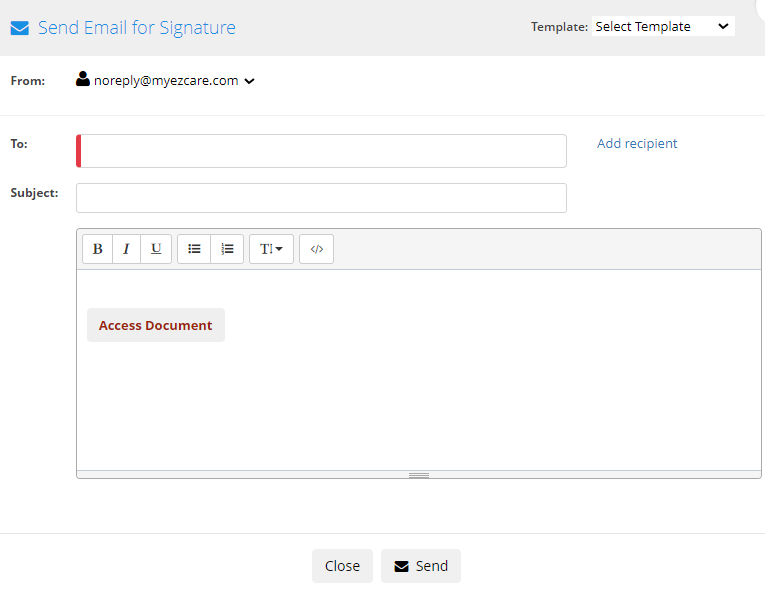](https://support.myezcare.com/uploads/images/gallery/2024-04/MKCimage.png) Update the required details and Click Send option. Now the email will be sent with the Document for signature. When the employee click on the Access Document, the following screen appears. On clicking the Send option, the employee will receive a 5 digit OTP for verification. Once the verification is completed, the Document automatically opens in which the employee can update their signature and save the document. The Signature updated document will be visible under the folders. [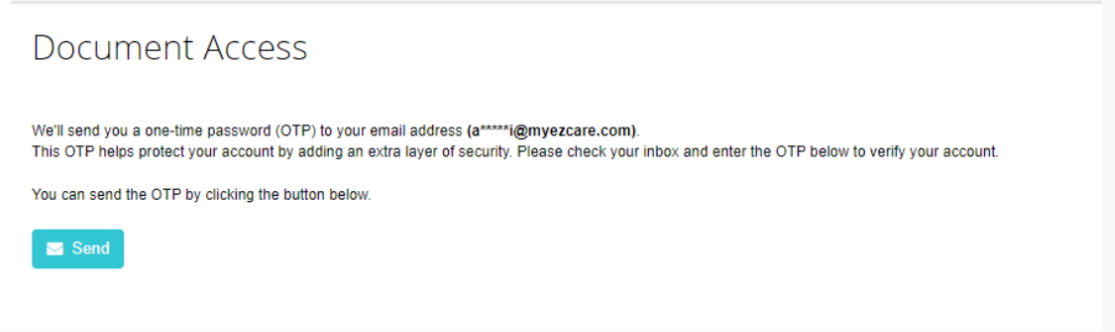](https://support.myezcare.com/uploads/images/gallery/2024-05/image.png) The Signature updated document will be visible under the folders. [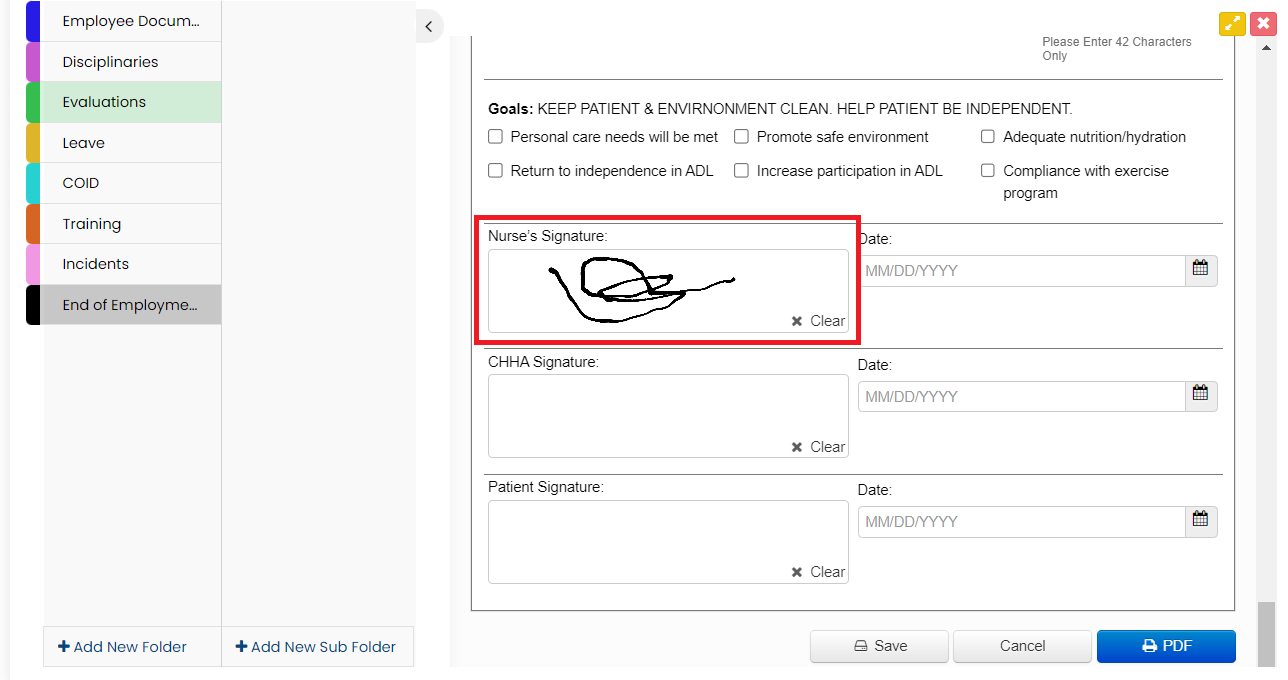](https://support.myezcare.com/uploads/images/gallery/2024-05/DUZimage.png) # Employee Schedule An employee schedule in home health care is a structured plan outlining staff work hours and compliance with regulations. It ensures continuous patient care, staff well-being, and communication to ensure quality care delivery. ### Adding Employee Schedule The user can update the Employee Schedule for their visits by selecting the +Add Employee Schedule button.**Employee Tab >> List >> Select Employee from List>> Employee Schedule or Employee Tab >> Schedule**
[](https://support.myezcare.com/uploads/images/gallery/2023-10/Wrtimage.png) Click +Add Employee Schedule button, the following screen appears. Update the Start Date and End Date (optional) of the Schedule and Click Save & Add Time Slot button. [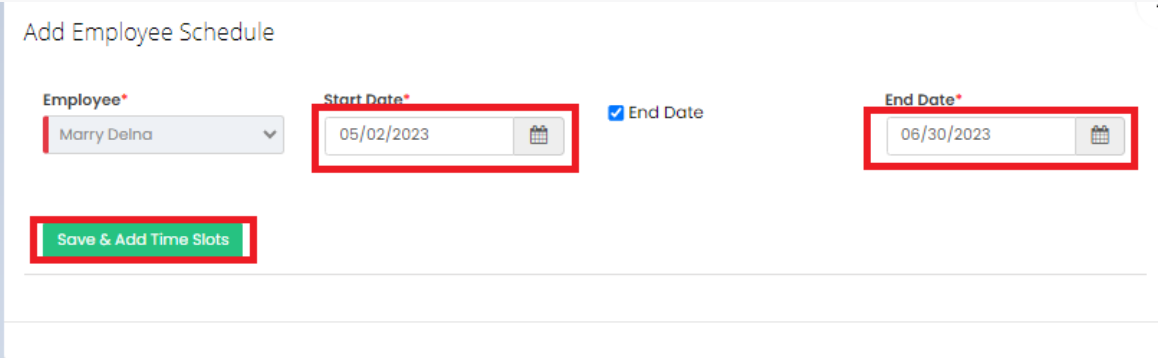](https://support.myezcare.com/uploads/images/gallery/2023-10/GxJimage.png) To Add the Time Slot of the Employee the user has to Select the Days, Start Time, End Time and check the option All Day or Is 24hrs of the Employee Schedule and Click Add. [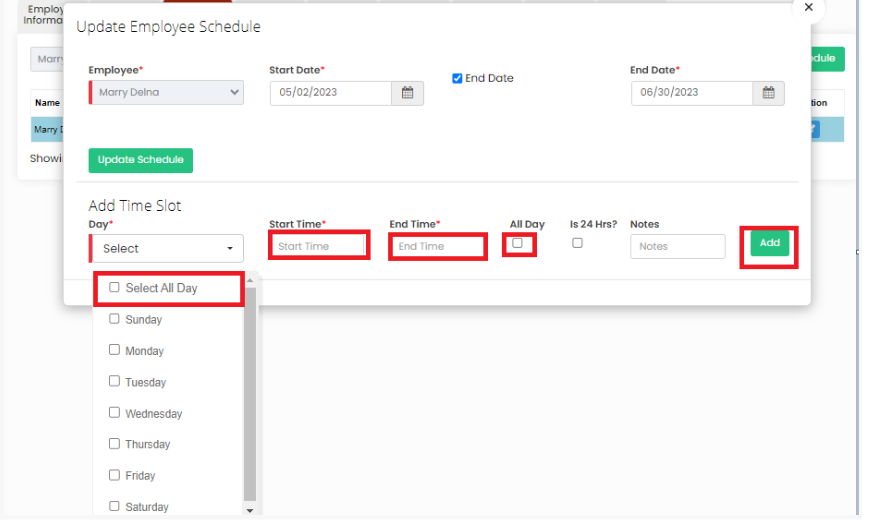](https://support.myezcare.com/uploads/images/gallery/2023-10/E9Uimage.png) The Time Slot of the Employee Schedule is created successfully with the required details. [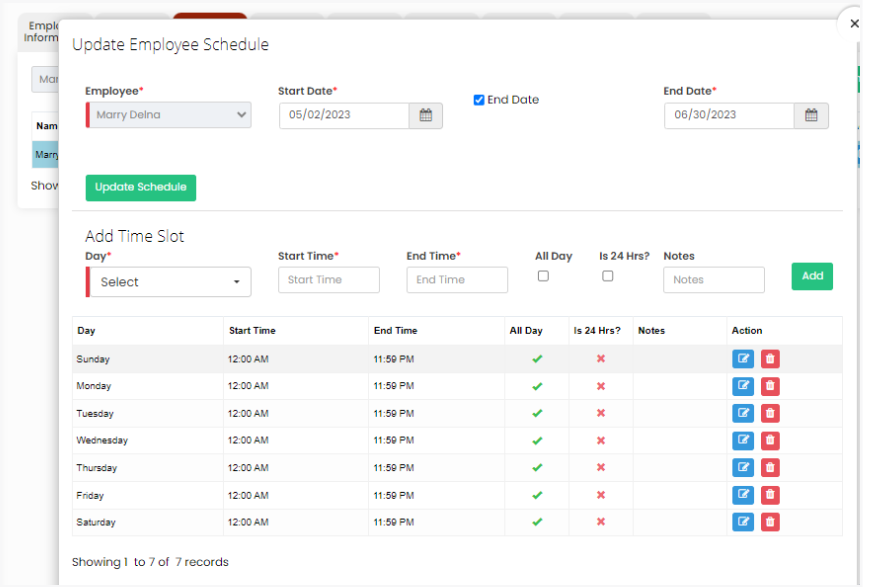](https://support.myezcare.com/uploads/images/gallery/2023-10/KMWimage.png) # Employee Personal Time Off, Calendar & Notes ### Employee Personal Time Off The Employee PTO ( Personal Time Off ) can be updated by selecting the Personal Time Off Tab.**Employee Tab >> Personal Time Off (PTO)**
[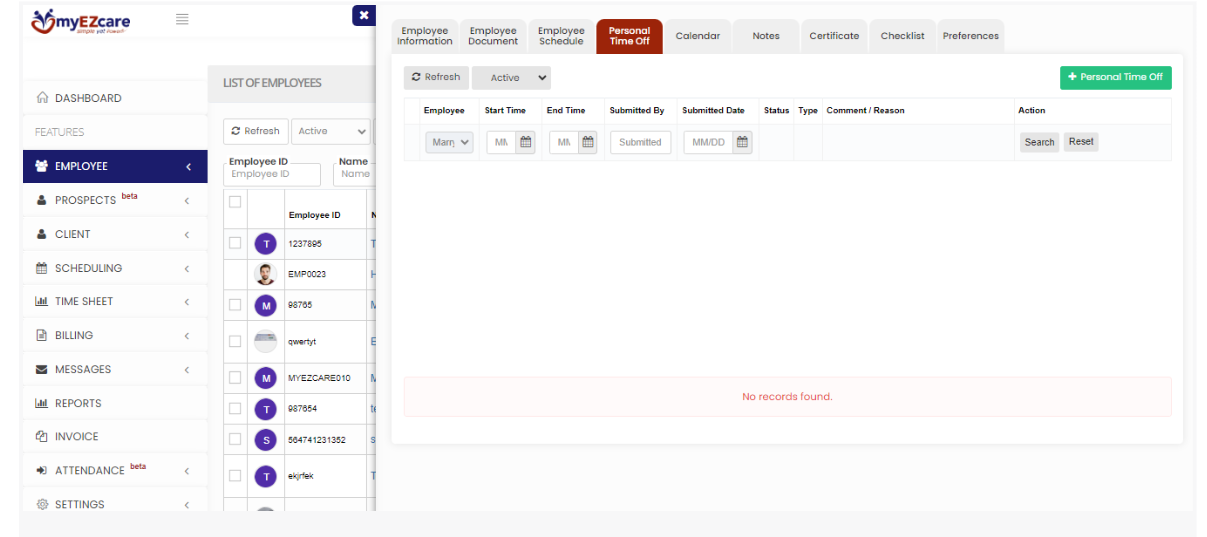](https://support.myezcare.com/uploads/images/gallery/2023-10/N4himage.png) Select the + Personal Time Off option. The following screen appears, update the required information of the Employee Time Off and Click Save. [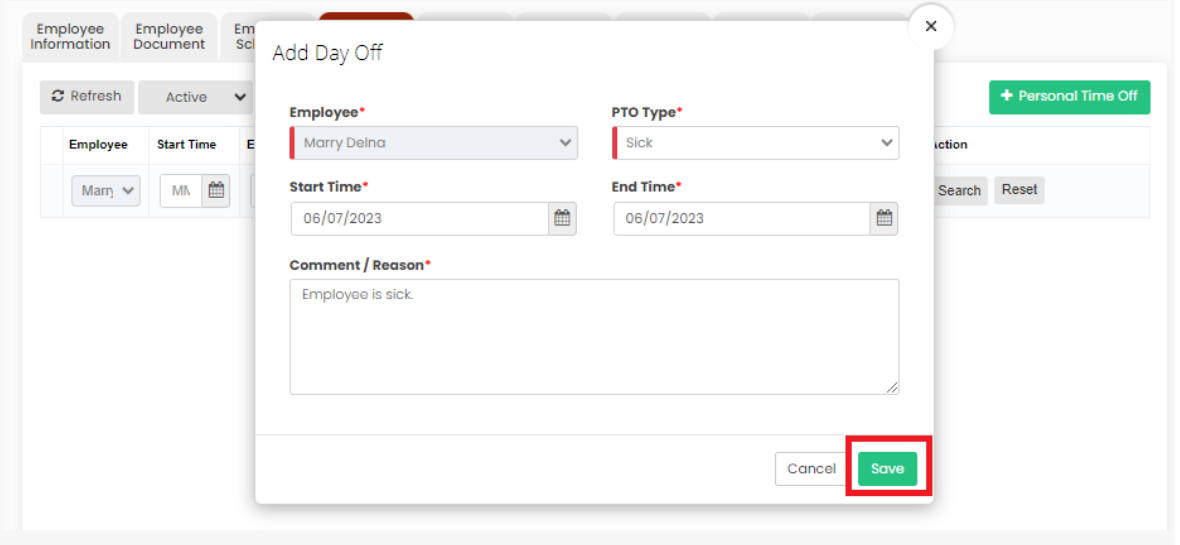](https://support.myezcare.com/uploads/images/gallery/2023-10/bhIimage.png) ### Employee Calendar The user can view the Employee calendar for their scheduled visits. The Employee calendar has the details of the client name, Care type and the scheduled time.**Employee Tab >> Calendar**
[](https://support.myezcare.com/uploads/images/gallery/2023-10/wcYimage.png) ### Employee Notes The Notes Tab is used to add notes of the employee in the system. Click the option +Add Note. Select the required fields and update the notes of the employee and Click Save option.**Employee Tab >> List >> Employee Name >> Notes**
[](https://support.myezcare.com/uploads/images/gallery/2023-10/JRMimage.png) # Employee Certificate, Checklist and Preferences ### Employee Certificate The Employee Certificate can be uploaded in the system by using the Certificate Tab. Click + Add Certificate option, update the required information and upload the Certificate.**Employee Tab >> List >> Employee Name >> Certificate**
[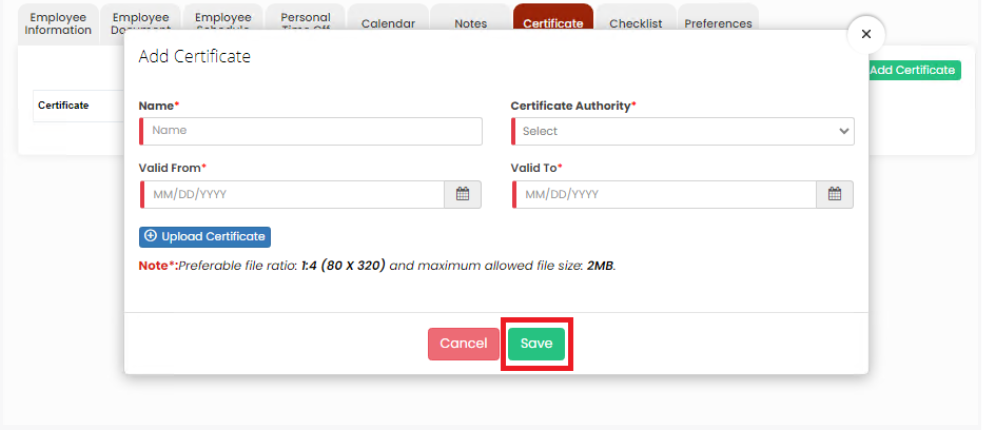](https://support.myezcare.com/uploads/images/gallery/2023-10/DD1image.png) ### Employee Checklist The user can check the documents in the checklist and update the Expiration date and Date of Completion in the checklist.**Employee Tab >> List >> Employee Name >> Checklist**
[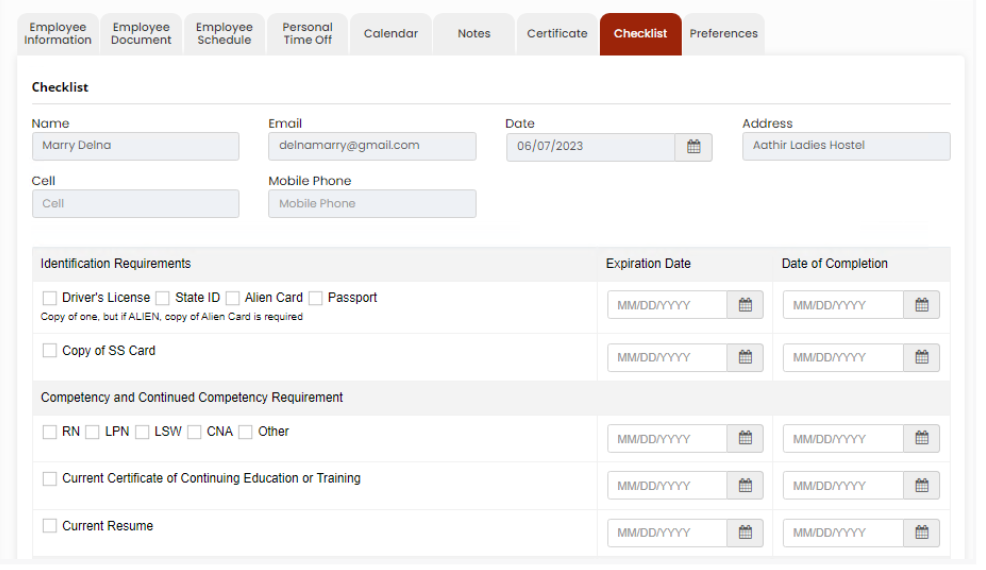](https://support.myezcare.com/uploads/images/gallery/2023-10/IJ1image.png) ### Employee Preferences The user can update the Employee Preferences by using the Preferences option. Check the Preferences from the list and click Save Notification Preferences option.**Employee Tab >> List >> Employee Name >> Preferences**
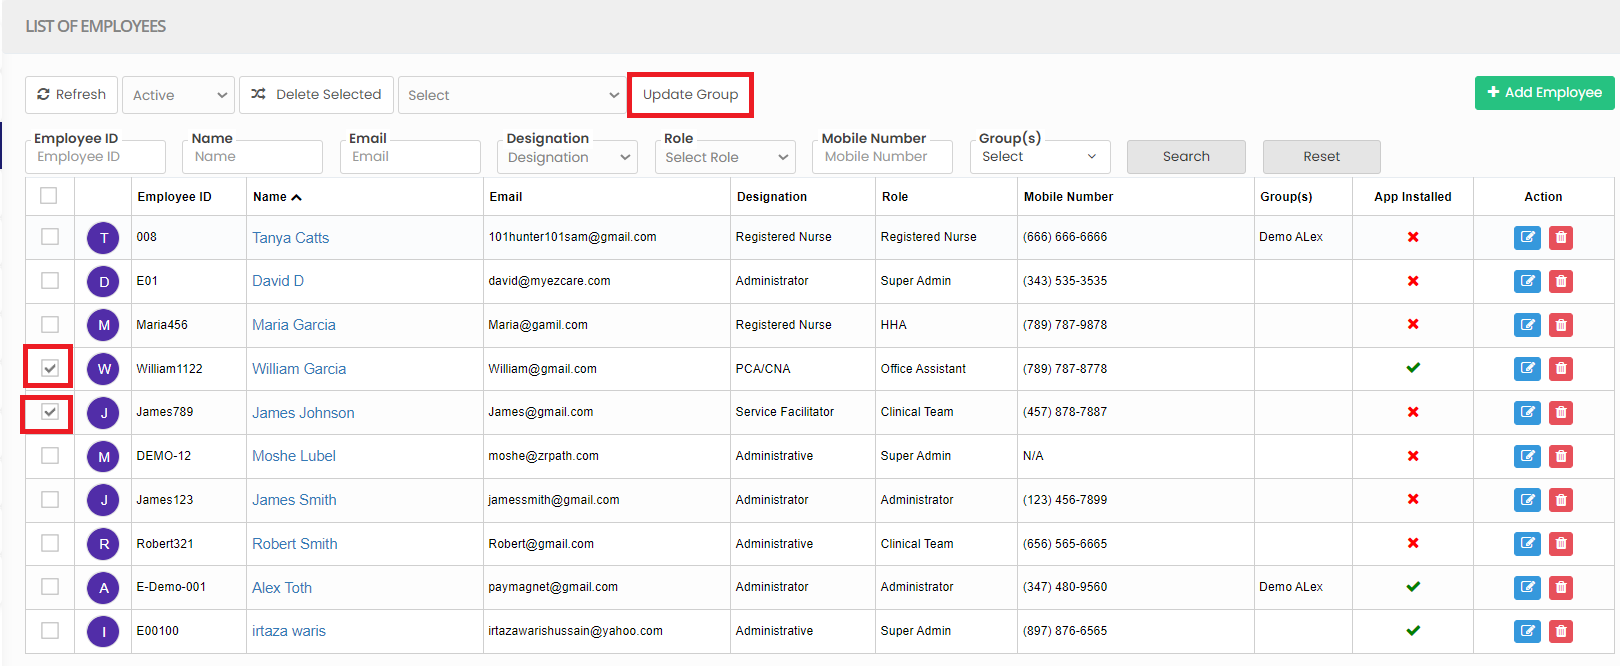
[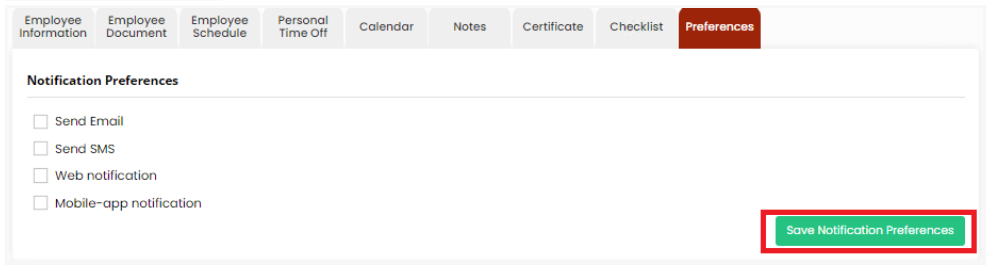](https://support.myezcare.com/uploads/images/gallery/2023-10/9Ceimage.png) # Employee List An employee list in home health care is a record of staff providing in-home clinical and non-clinical services. ### Bulk update Employee Group The Employee Group information can be bulk updated for the list of employees in the system. Click the check-box before the Employee ID in employee list and click Update Group.**Employee Tab >> List**
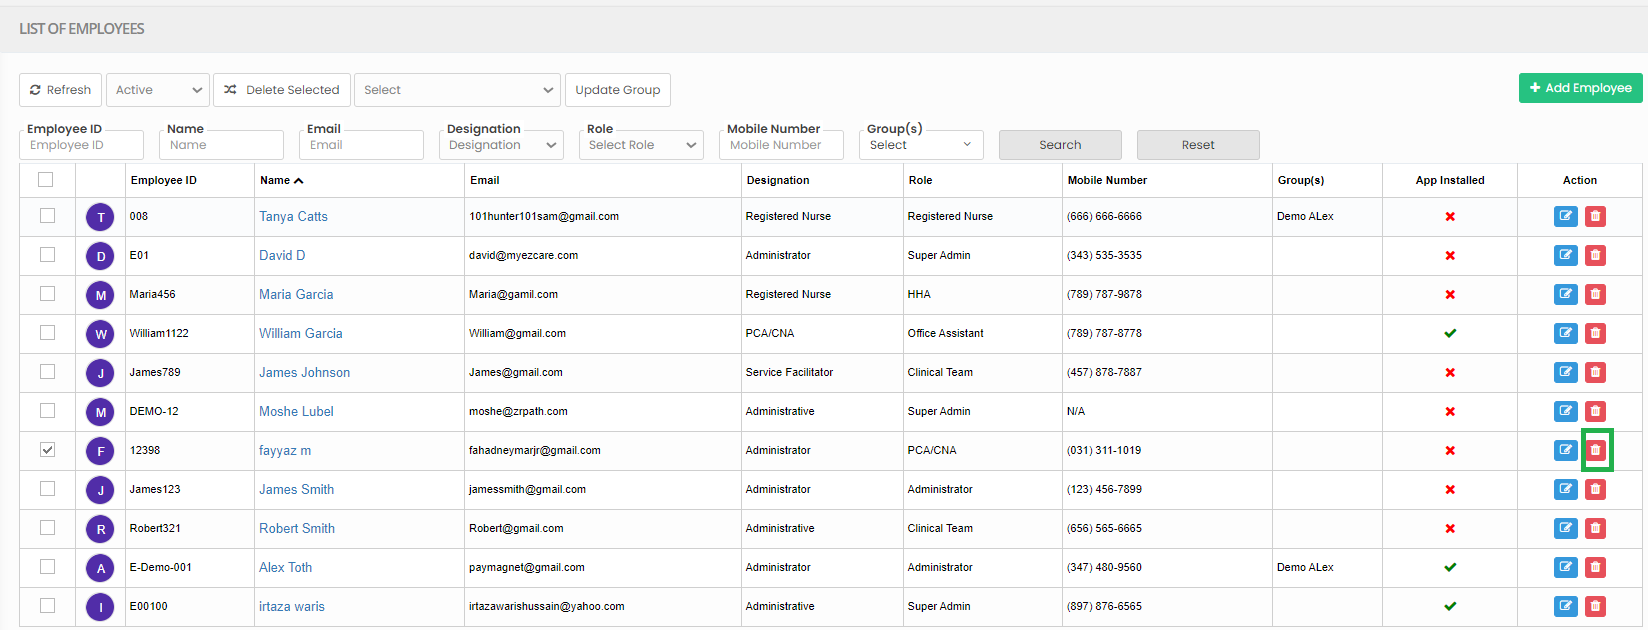
[](https://support.myezcare.com/uploads/images/gallery/2023-10/1Itimage.png) The following screen appears, select the Group from list and click Save option. [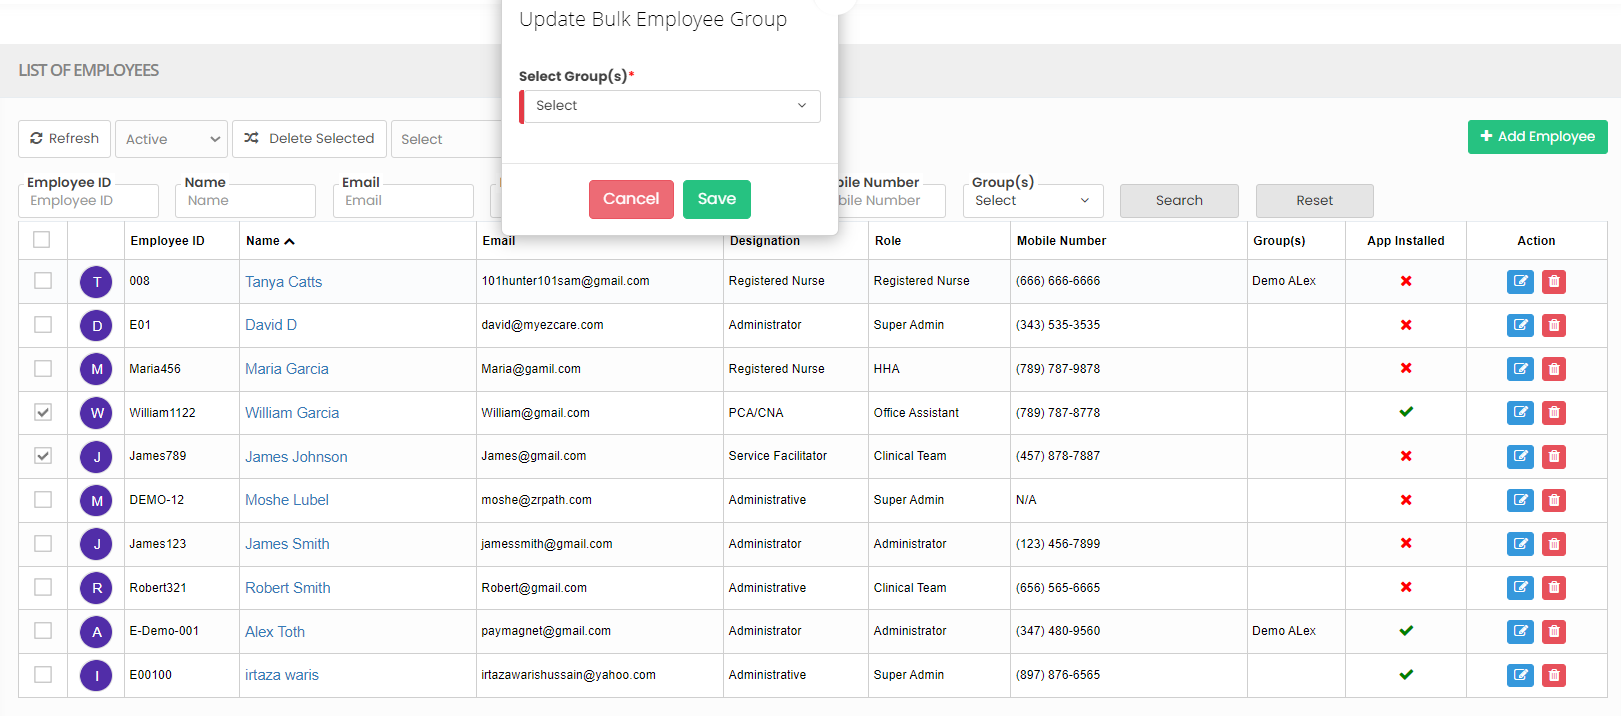](https://support.myezcare.com/uploads/images/gallery/2023-10/oUwimage.png) ### Delete Employee The Employee can be deleted from the system by using the option Delete in Employee List. Select the Employee name by using the check box and click delete option.**Employee Tab >> List**
[](https://support.myezcare.com/uploads/images/gallery/2023-10/rTyimage.png) ### Activate Deleted Employee Select Deleted from the dropdown box. The Deleted employee can also be activated in the system by using the option Active. [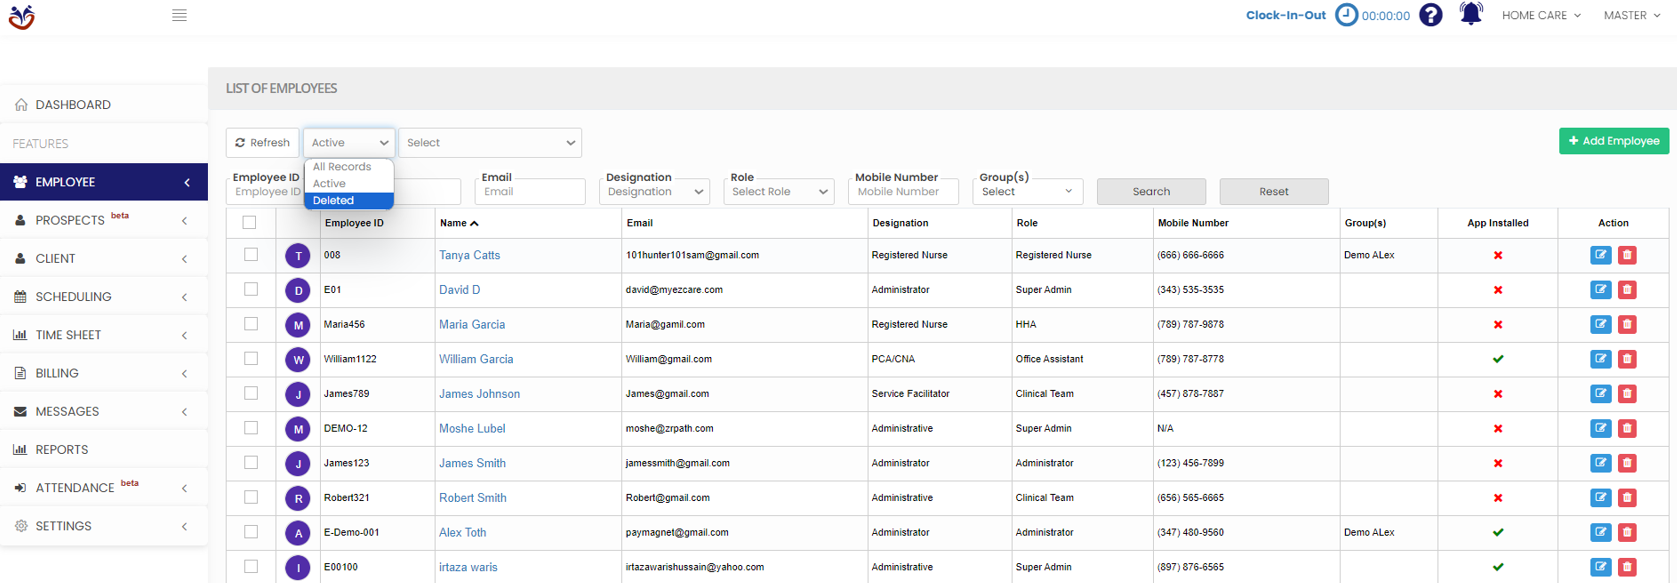](https://support.myezcare.com/uploads/images/gallery/2023-10/kRHimage.png) Click the check box for the employee to be activated and click Active option. Now, the deleted employee is successfully restored. [](https://support.myezcare.com/uploads/images/gallery/2023-10/EpOimage.png) # Prospects Prospects are potential clients or patients who could utilize in-home non-medical services, including seniors with health issues, post-operative individuals, or anyone in need of assistance with daily tasks. These opportunities allow home healthcare employees to offer their specialized care. # New Referral A new referral is a formal process by which a medical professional, such as a physician or nurse, recommends and arranges for a patient to receive specialized healthcare services in the comfort of their own home. This typically includes skilled nursing, therapy, and personal care services, aiming to promote recovery, manage chronic conditions, or enhance the patient's quality of life. ### Adding New ReferralNote: All Fields marked with \* are mandatory and must be filled out, otherwise the system will generate an error indicating that the required information is missing.
**Prospects >> + Add option**
The New Referral details can be added in the system by using the option Prospects. Update the required information and click Save option. The user can also Attach form for new Referral in the system. [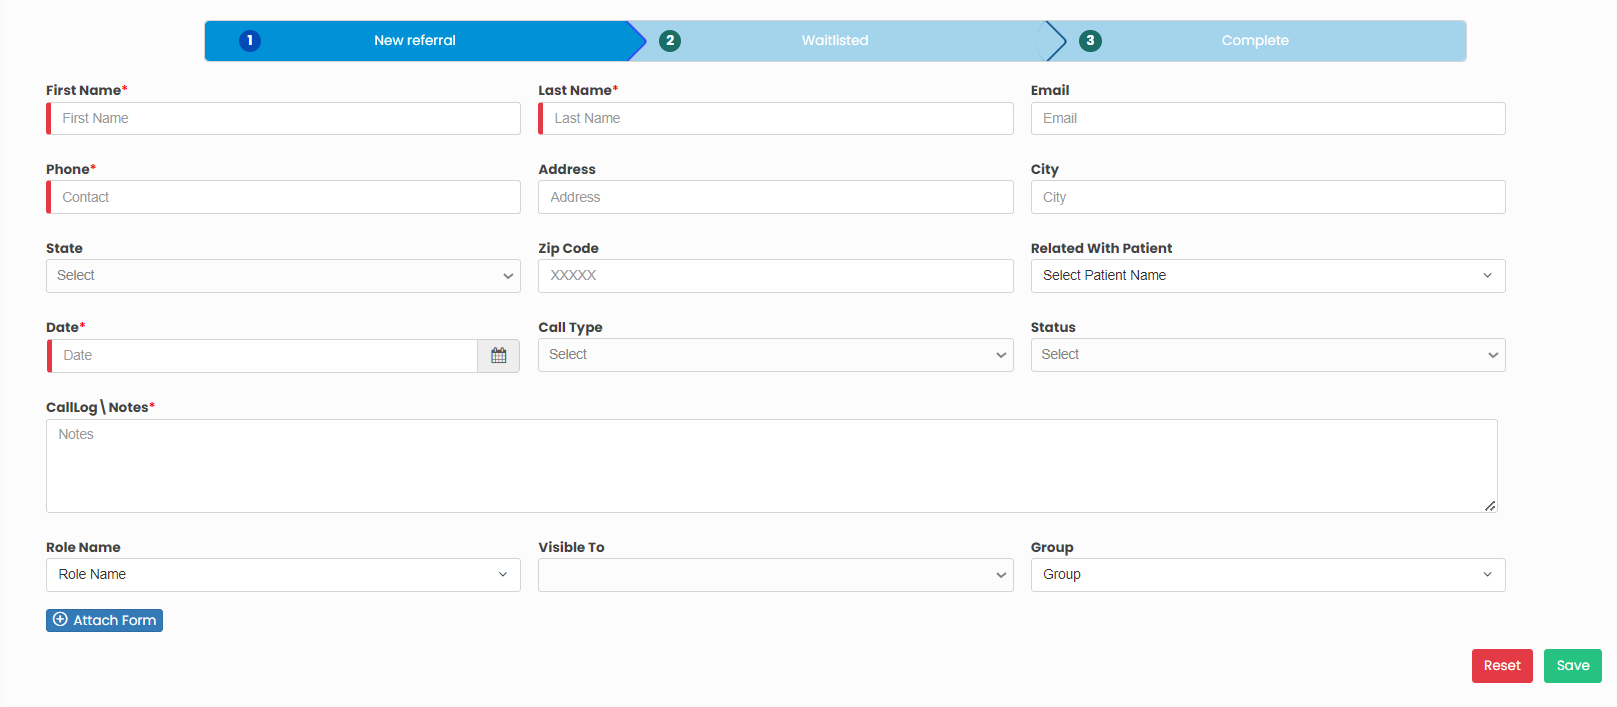](https://support.myezcare.com/uploads/images/gallery/2023-11/ovIimage.png) ### Edit New Referral**Prospects >> List**
Select the New Referral from the List and click Edit option under Action. Edit the required information and click Update option. [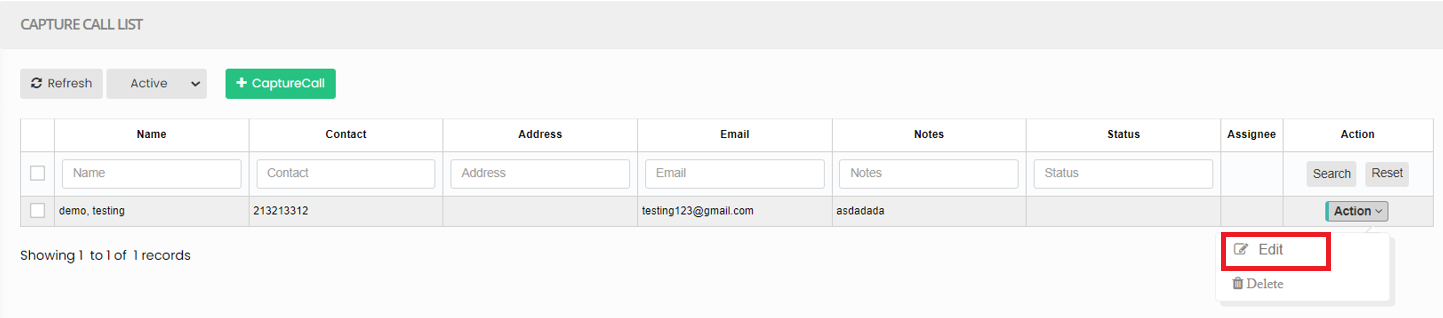](https://support.myezcare.com/uploads/images/gallery/2023-11/S2Wimage.png) [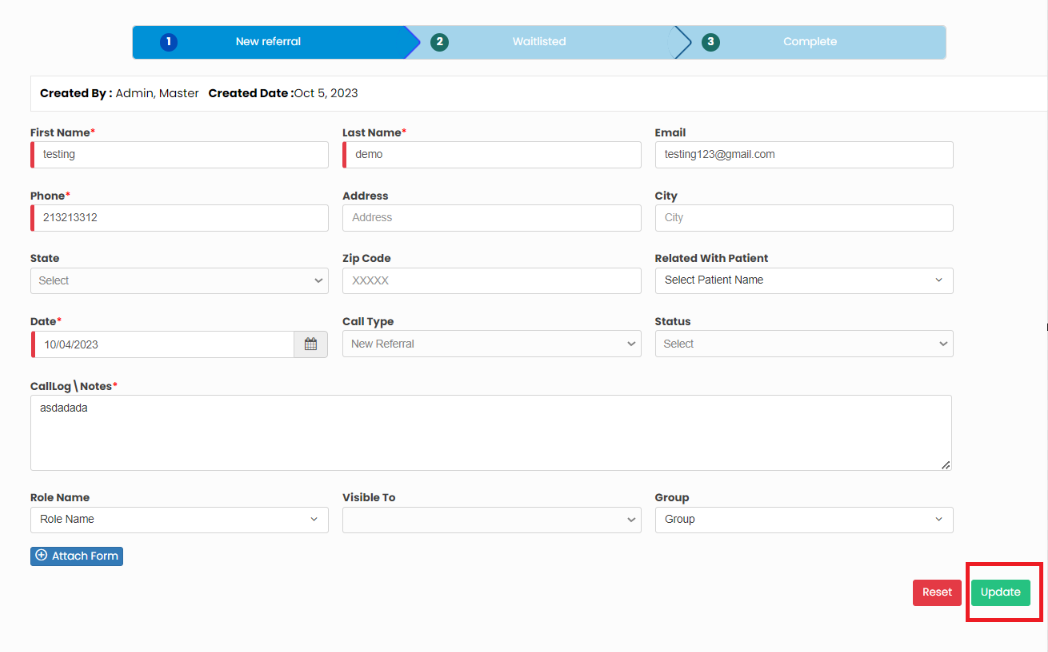](https://support.myezcare.com/uploads/images/gallery/2023-11/slpimage.png) ### Delete Referral**Prospects >> List**
Select the Referral from list and Click Delete option under Action or Click Delete Selected option on the screen. [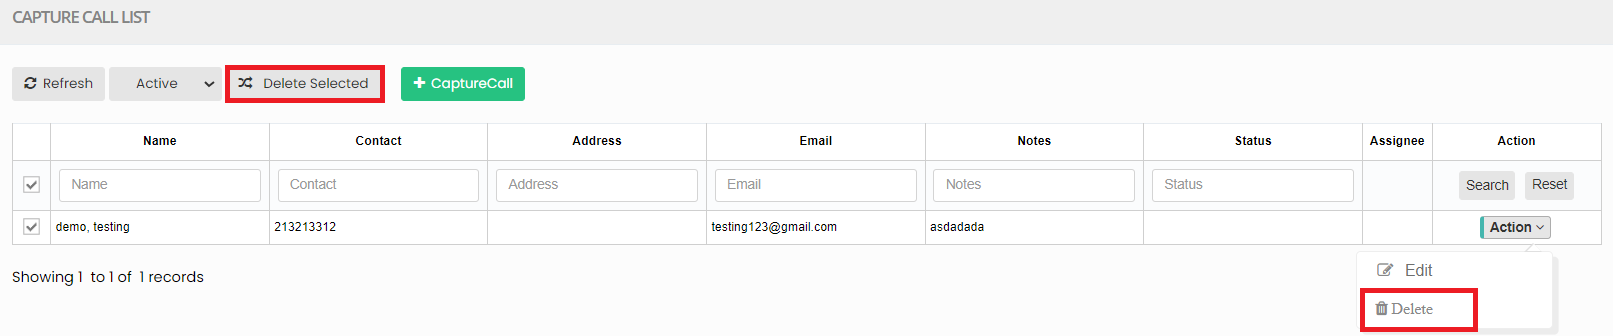](https://support.myezcare.com/uploads/images/gallery/2023-11/Vu4image.png) # Client The patient often a central figure in the healthcare ecosystem, is an individual seeking medical attention and care for their physical or mental well-being. # Client Information ### Adding New PatientNote: All Fields marked with \* are mandatory and must be filled out, otherwise the system will generate an error indicating that the required information is missing.
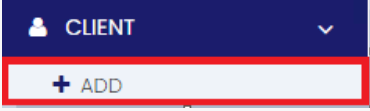
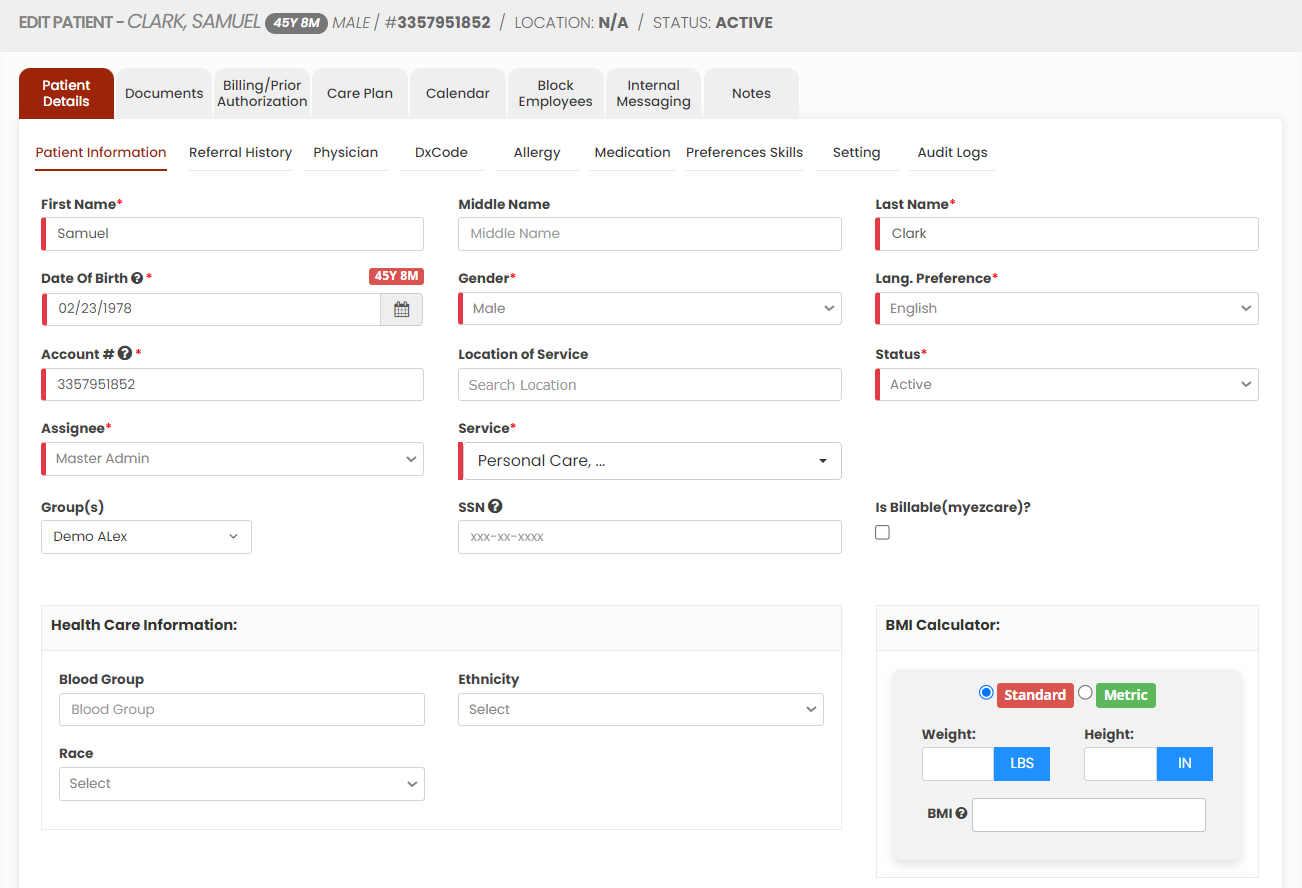
For adding new patient information in the system follow these steps.**Client >> + Add option**
[](https://support.myezcare.com/uploads/images/gallery/2023-10/3aLimage.png) Update the patient information in the required field. Click +Add New Contact option to enter the patient address and then click save. The user can also upload the profile image of the patient for additional information. [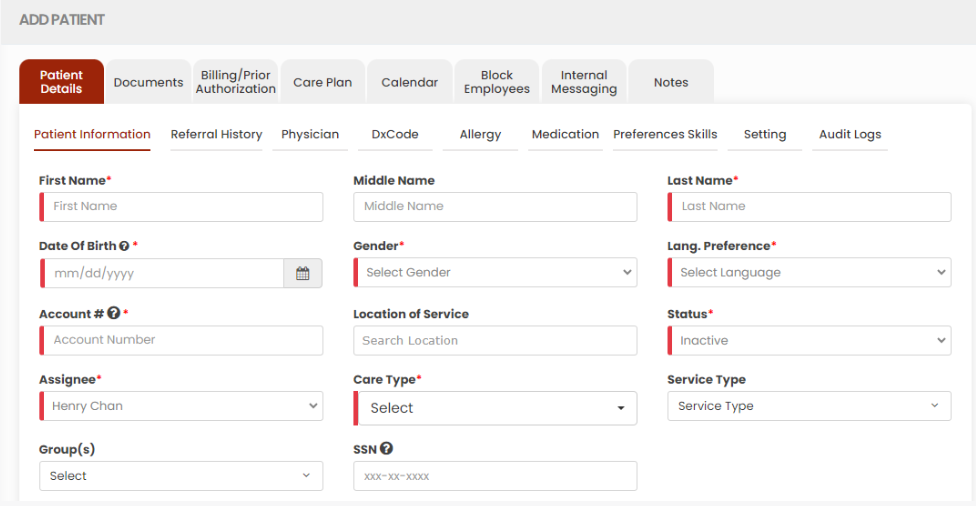](https://support.myezcare.com/uploads/images/gallery/2023-10/4QAimage.png) [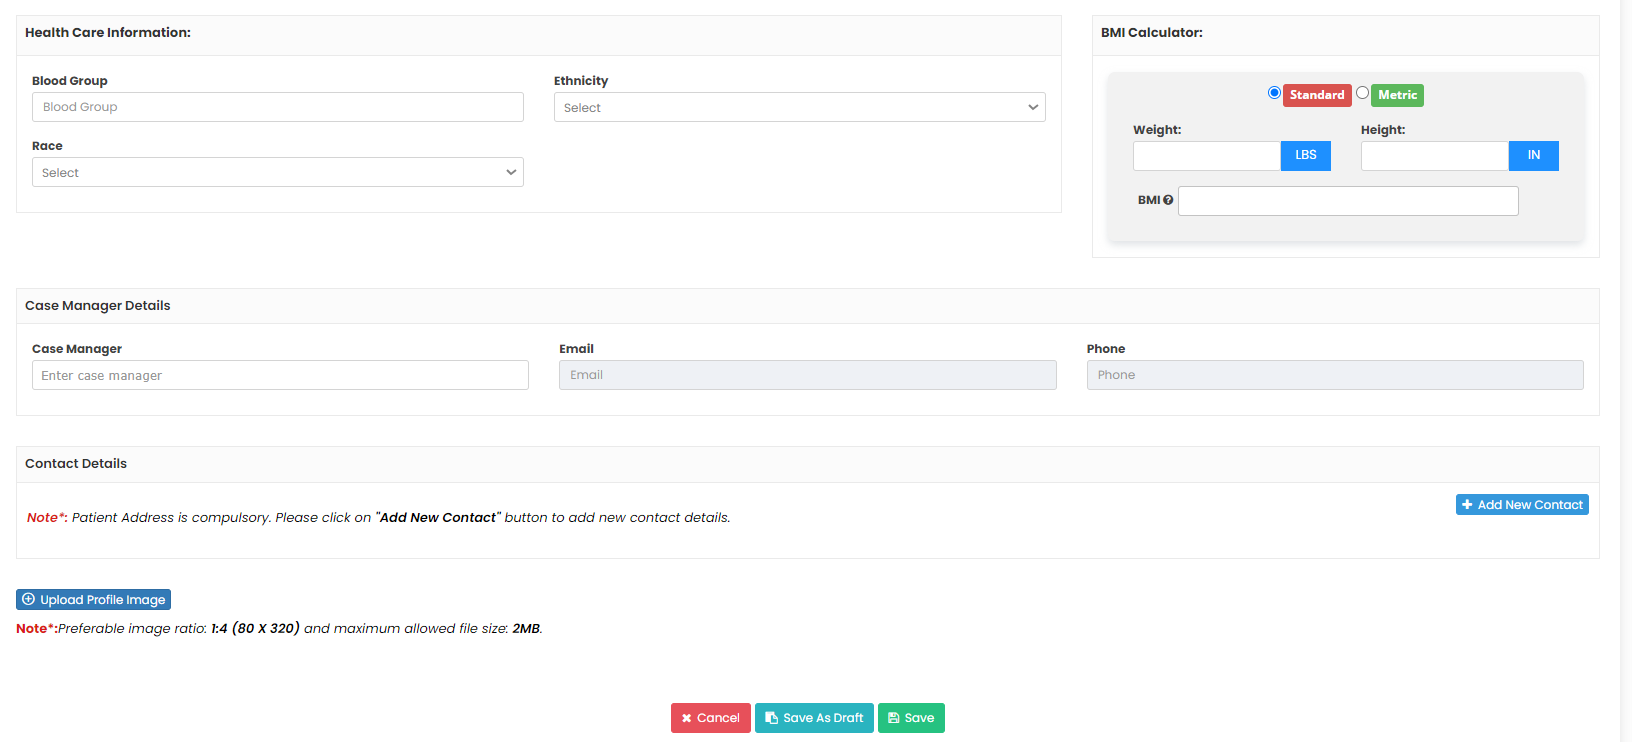](https://support.myezcare.com/uploads/images/gallery/2023-10/4VZimage.png) ### Editing New Patient The Patient information can be edited by selecting the patient from the list. The following screen appears to edit the required information of the Patient. Update the information and then Click Save.**Client >> List**
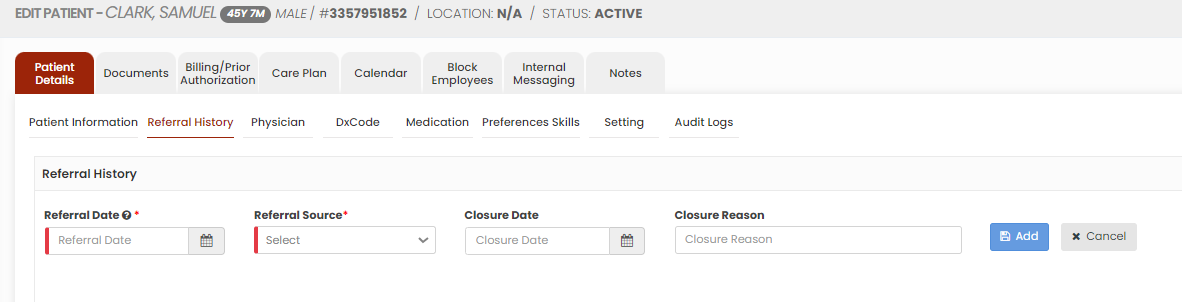
[](https://support.myezcare.com/uploads/images/gallery/2023-11/8mYimage.png) [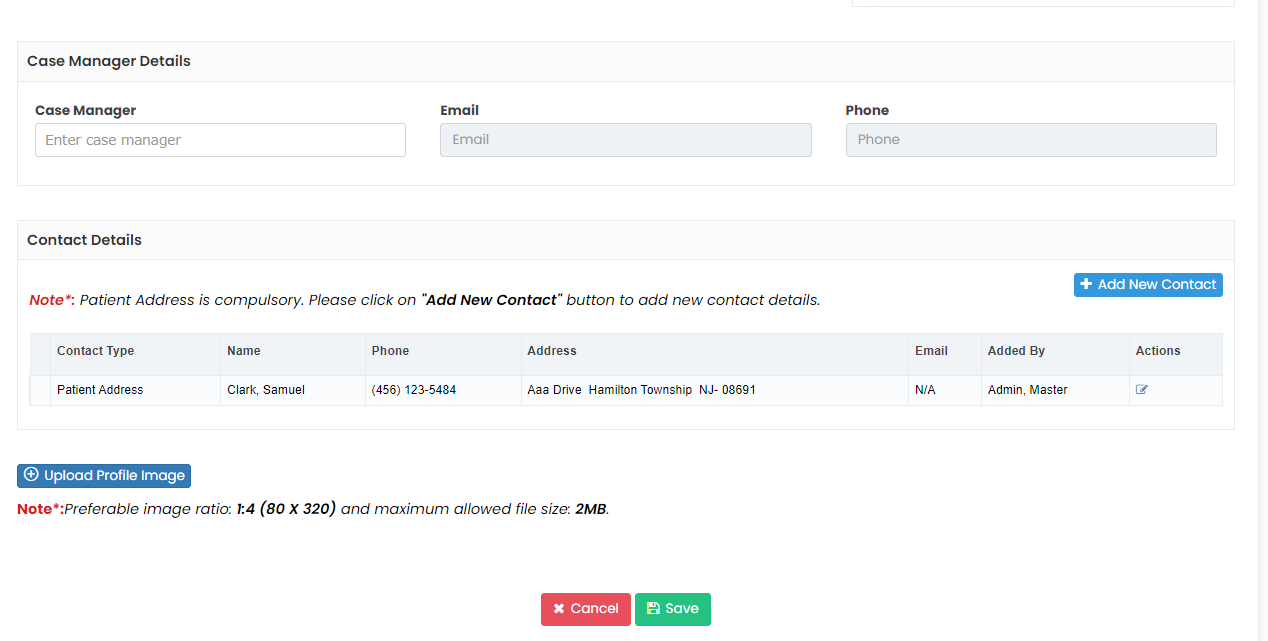](https://support.myezcare.com/uploads/images/gallery/2023-11/KMiimage.png) # Referral History, Physician, Dx code ### Adding Referral History The Referral History tracks the source and progression of recommendations and connections in the system. Enter the required information in the system and then Click Add option.**Client >> List>> Patient Name >> Referral History**
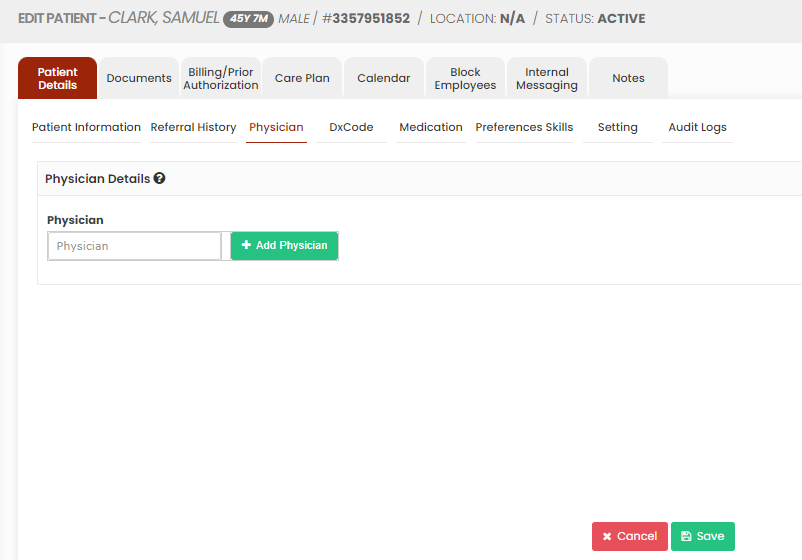
[](https://support.myezcare.com/uploads/images/gallery/2023-10/x9aimage.png) The added Referral History can be deleted by using the delete option under Action. [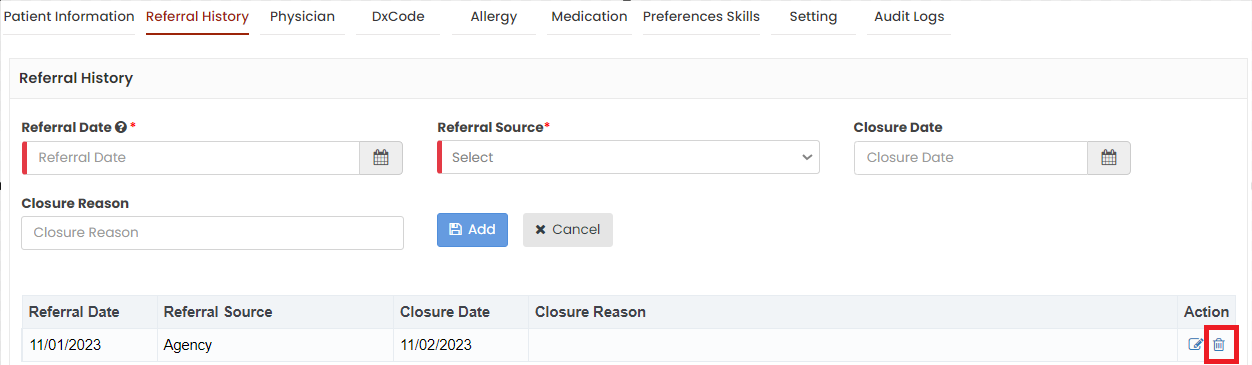](https://support.myezcare.com/uploads/images/gallery/2023-11/zulimage.png) ### Physician The Physician Details of the patient can be added by using the option Physician in Patient details. Click Add Physician option to update new Physician information.**Client >> List>> Patient Name >> Physician**
[](https://support.myezcare.com/uploads/images/gallery/2023-10/GpVimage.png) Now, enter the required details of the Physician and Click Save option. To update existing physician, search the physician name and Click save. [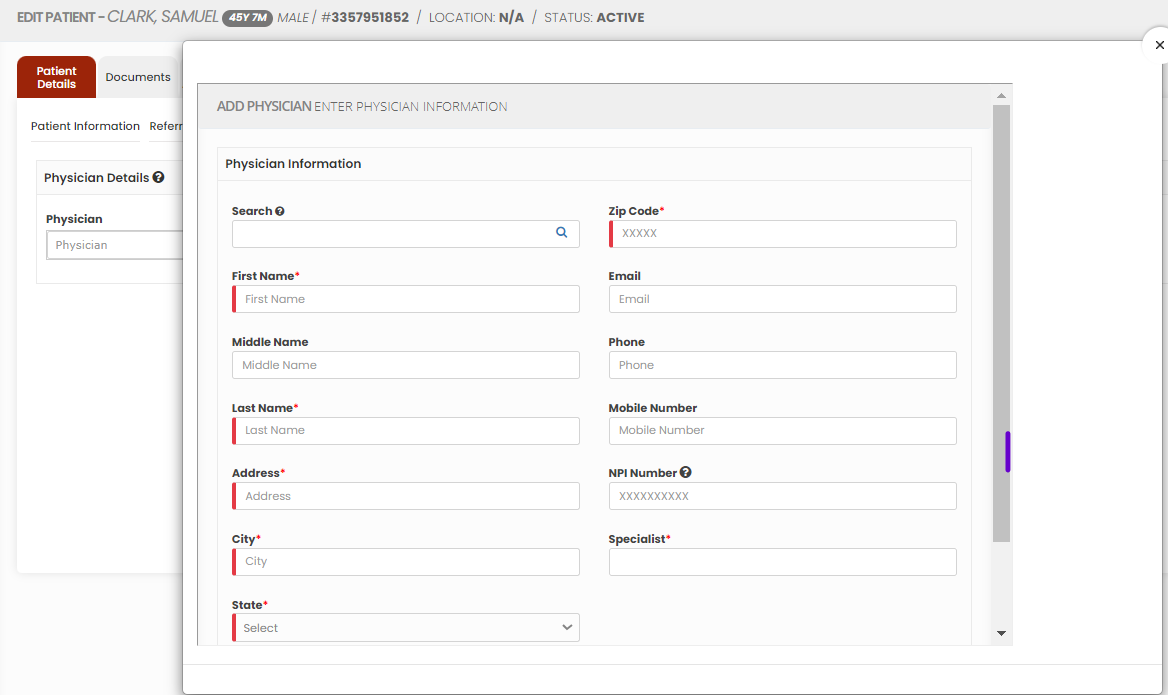](https://support.myezcare.com/uploads/images/gallery/2023-10/0r4image.png) The added physician can also be deleted by using the option x under Action. [](https://support.myezcare.com/uploads/images/gallery/2023-11/Ekhimage.png) ### Dx Code The diagnosis code, often referred to as an ICD code are essential to medical billing and insurance claims. Search the required Dx code and Click Add option.**Client >> List>> Patient Name >> Dx Code**
[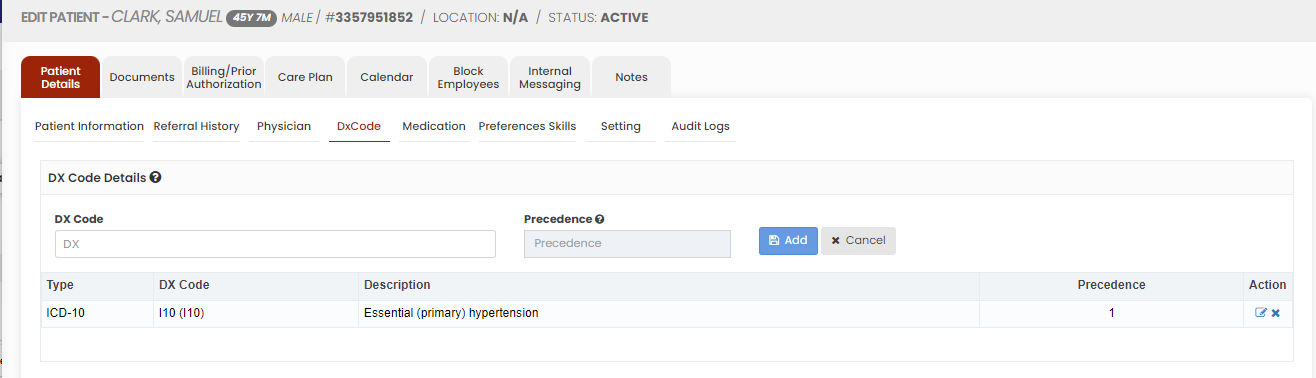](https://support.myezcare.com/uploads/images/gallery/2023-10/Phqimage.png) The added Dx code can also be deleted by using the option x under Action. [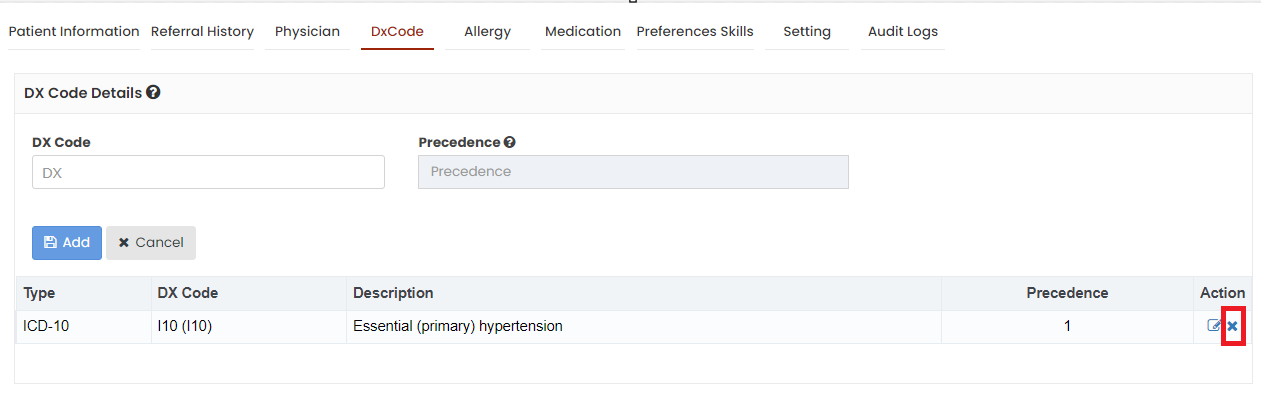](https://support.myezcare.com/uploads/images/gallery/2023-11/3y5image.png) # Medication, Preferences / Skills, Setting, Audit Logs - Medication plays a crucial role in modern healthcare, serving as a cornerstone of disease management and treatment. - Preference refers to the unique and individualized choices and needs of the patient. Skill refers to the specialized abilities and expertise of caregivers, including medical, nursing, and personal care skills, essential for providing quality in-home medical and non-medical assistance. - Access detail of the patient on web application is given under Setting Tab. - Audit logs in home health care refer to detailed records that track all electronic activities and modifications to patient information within the system. ## Medication The medication details of the patient can be entered in Medication option under Patient Details. Update the medication details in the required field and Click Save option.Note: All Fields marked with \* are mandatory and must be filled out, otherwise the system will generate an error indicating that the required information is missing.
**Client>>List>>Patient Name>>Medication**
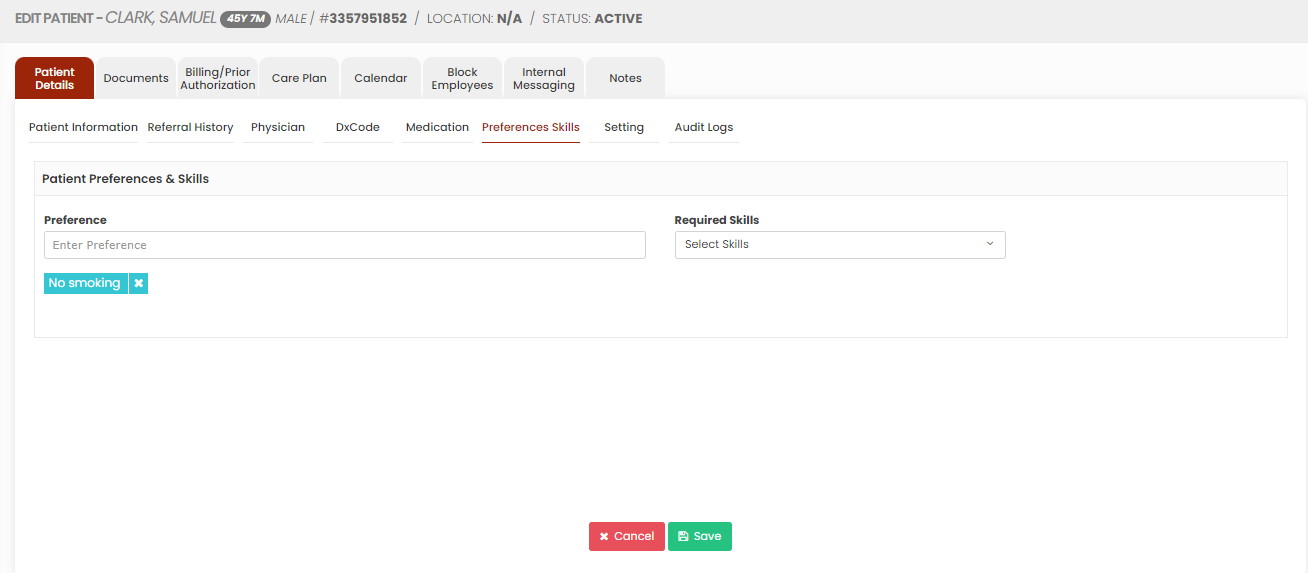
[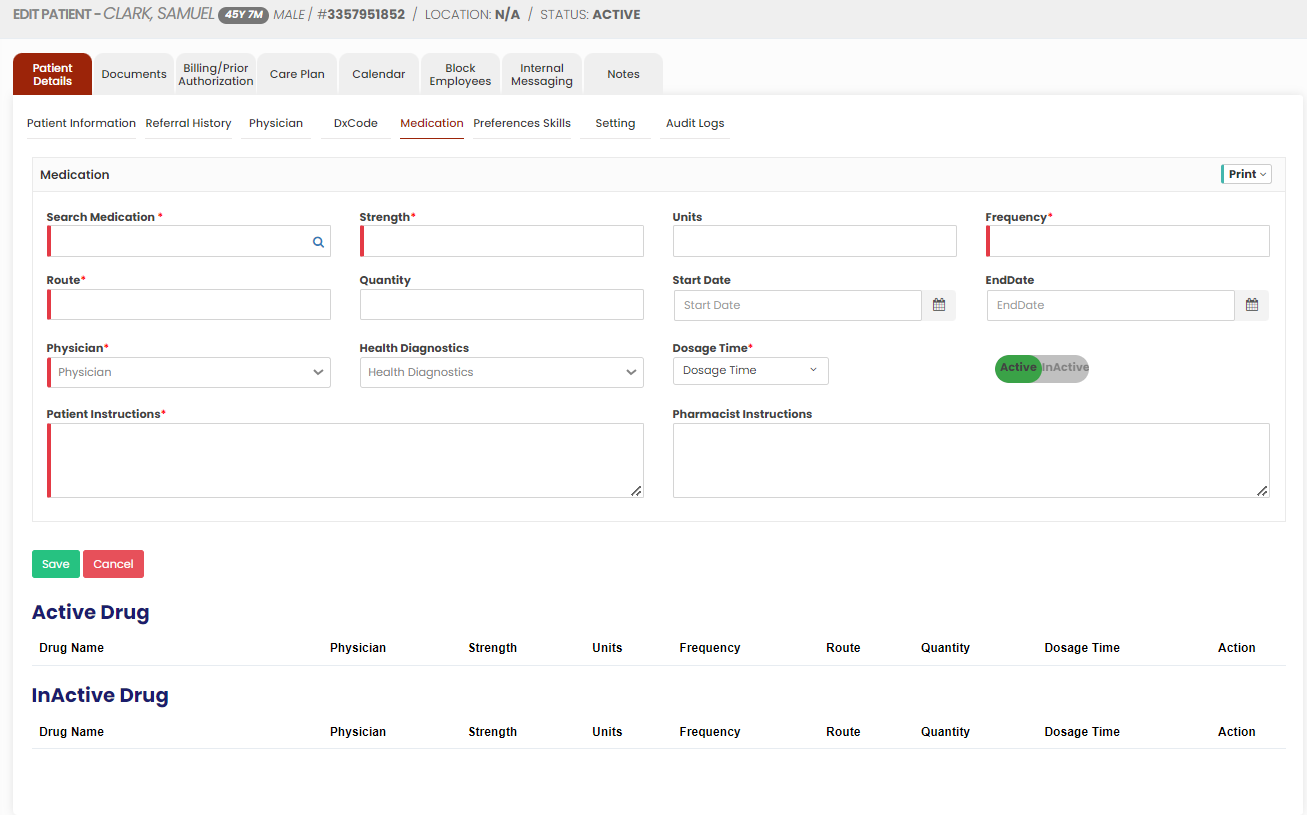](https://support.myezcare.com/uploads/images/gallery/2023-10/lwdimage.png) When the Active Drug reaches the end date, it will be automatically moved to Inactive Drug list. [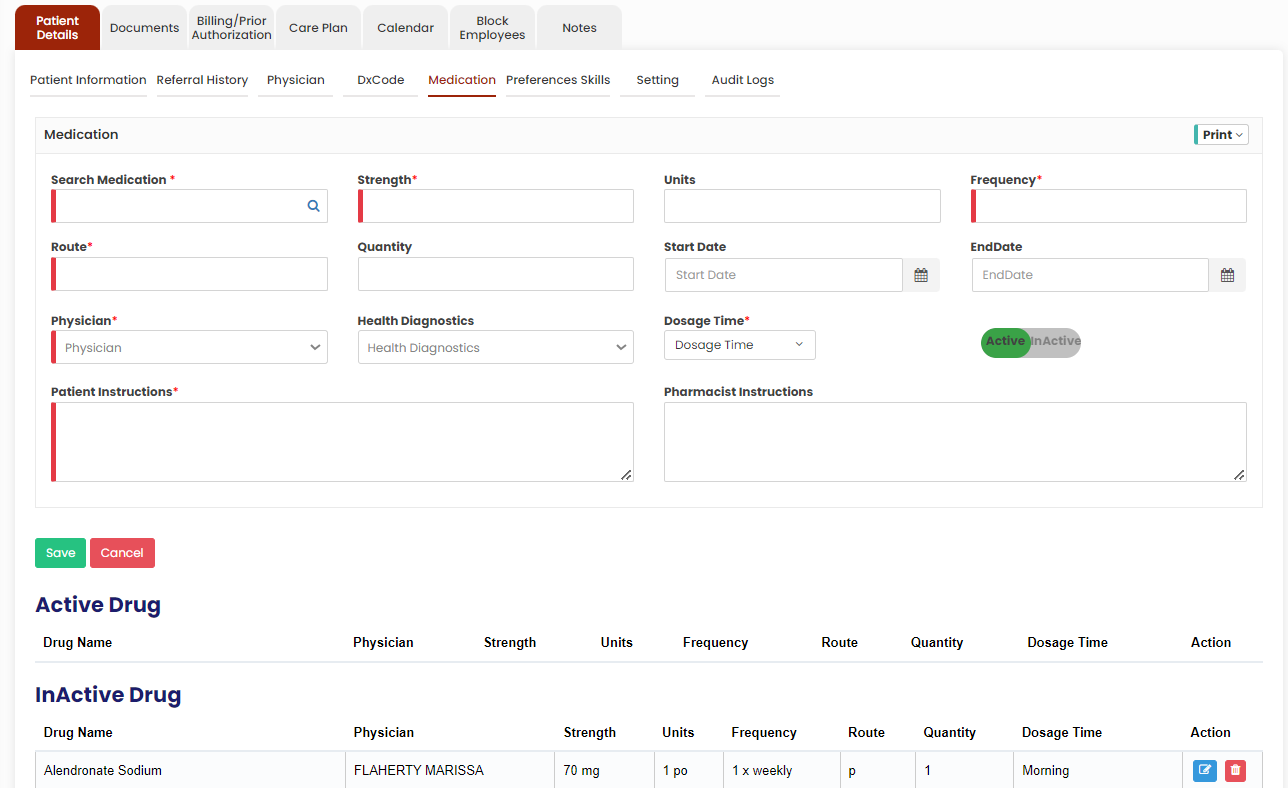](https://support.myezcare.com/uploads/images/gallery/2023-11/Sn3image.png) ## Preferences Skills Patient Preferences and skills can be updated in the system by using the option Preferences Skills under each client.**Client>>List>>Patient Name>>Preference Skills**
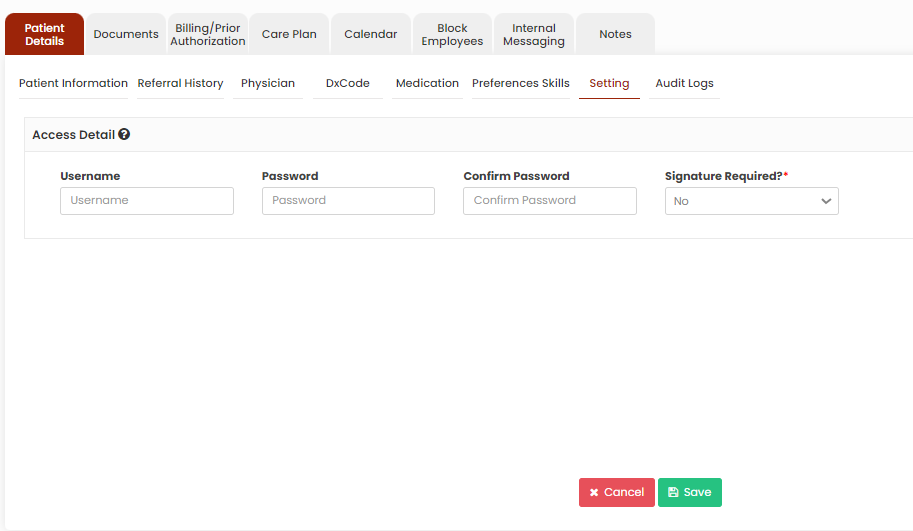
[](https://support.myezcare.com/uploads/images/gallery/2023-10/8fkimage.png) ## Setting The patient access details for the application can be added by using the option Setting under each patient.**Client>>List>>Patient Name>>Setting**
[](https://support.myezcare.com/uploads/images/gallery/2023-10/V7nimage.png) ## Audit Logs The user can check the audit details and the changes made in the software in Audit logs.**Client>>List>>Patient Name>>Audit Logs**
[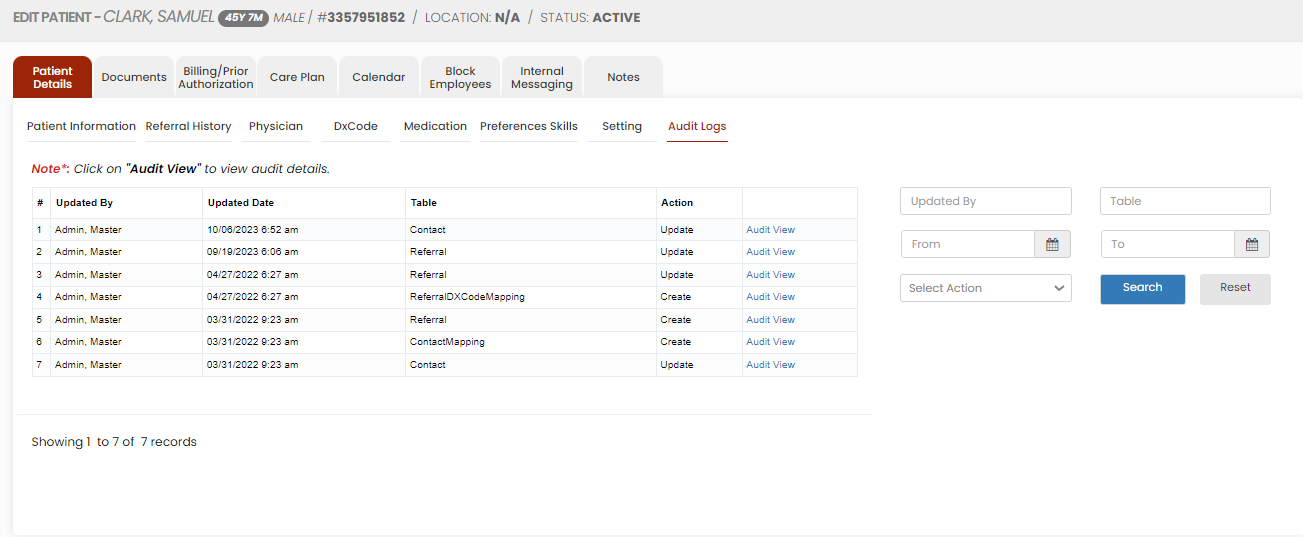](https://support.myezcare.com/uploads/images/gallery/2023-10/0xGimage.png) # Patient Document Patient document consist of essential medical records, treatment plans, and progress notes. These documents track the patient's health history, medications, diagnoses, and care schedules. #### Uploading Patient Documents The required documents of the patient can be uploaded in the system by using the option Patient Document.**Client >> List >> Select Patient >> Document**
[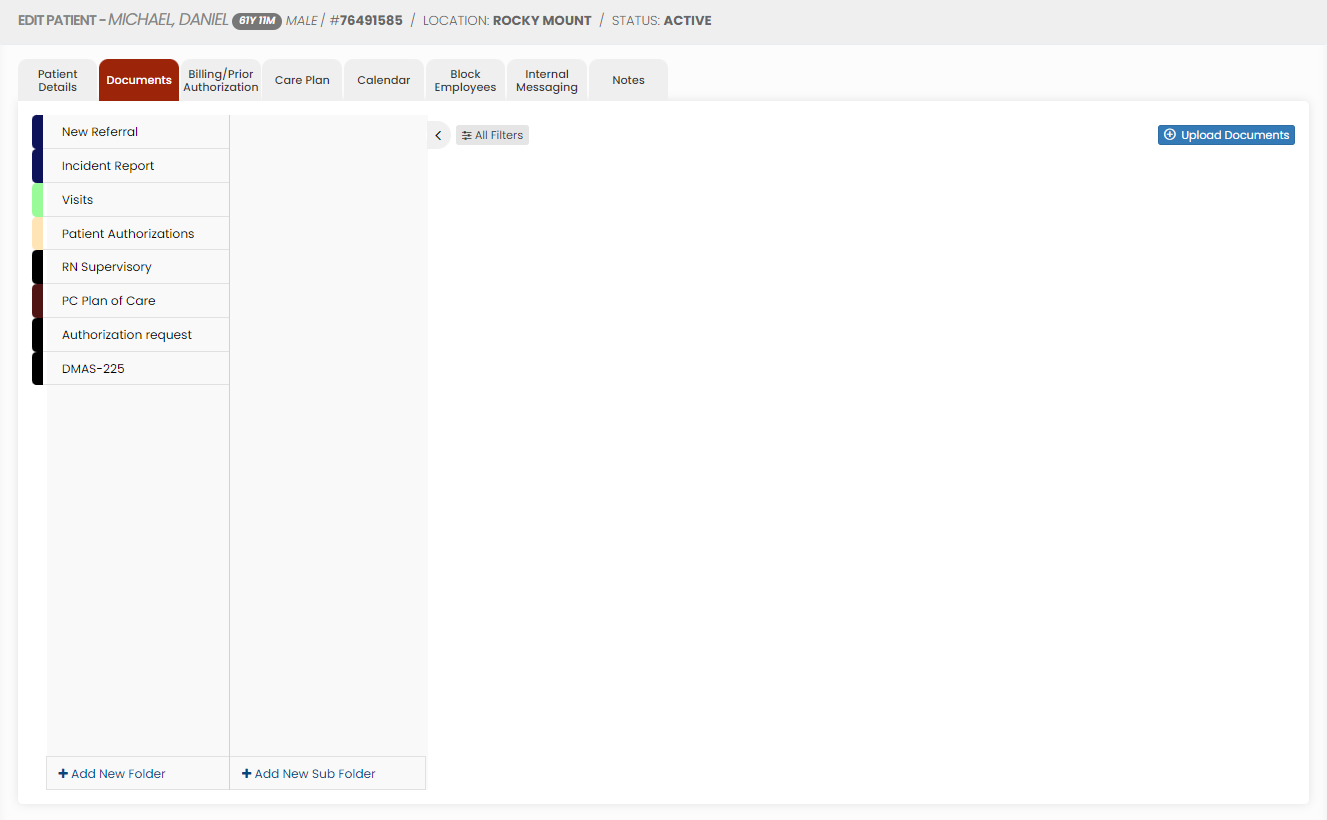](https://support.myezcare.com/uploads/images/gallery/2023-10/RkEimage.png) Select the type of document from the list and Click the Upload Documents option. The user can also Add New Folders and Subfolders to upload the documents. [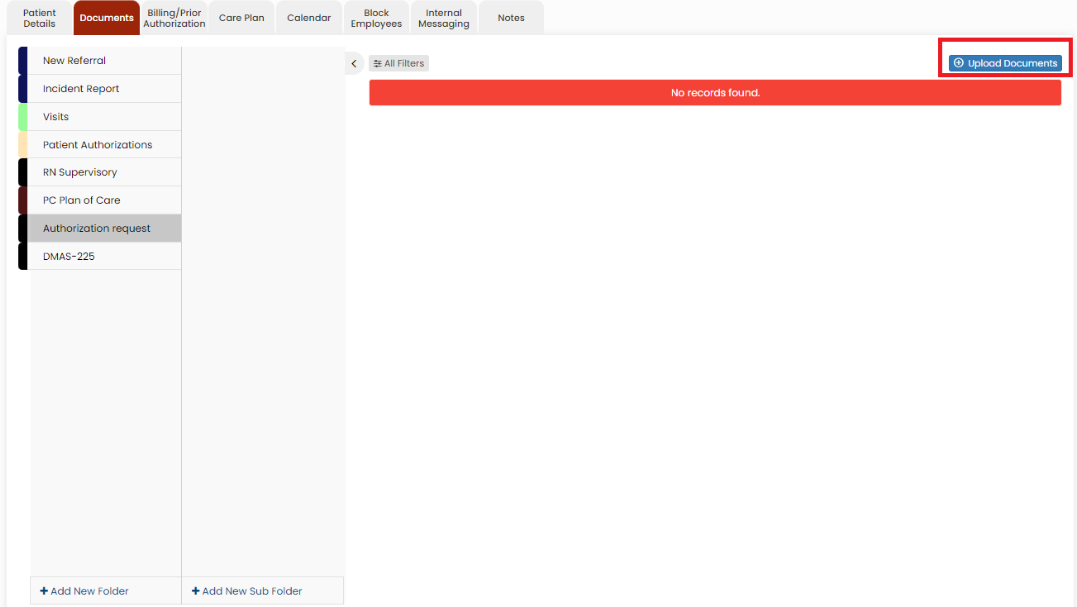](https://support.myezcare.com/uploads/images/gallery/2023-10/1fXimage.png) #### Adding New Folder Click + Add New Folder option in Patient document. The following screen appears, update the required information. Also in the option Show to All, if the user needs the folder name to be added for all the patient click Yes option. If the user wants the folder to be added only for the particular patient click No option and click Save. [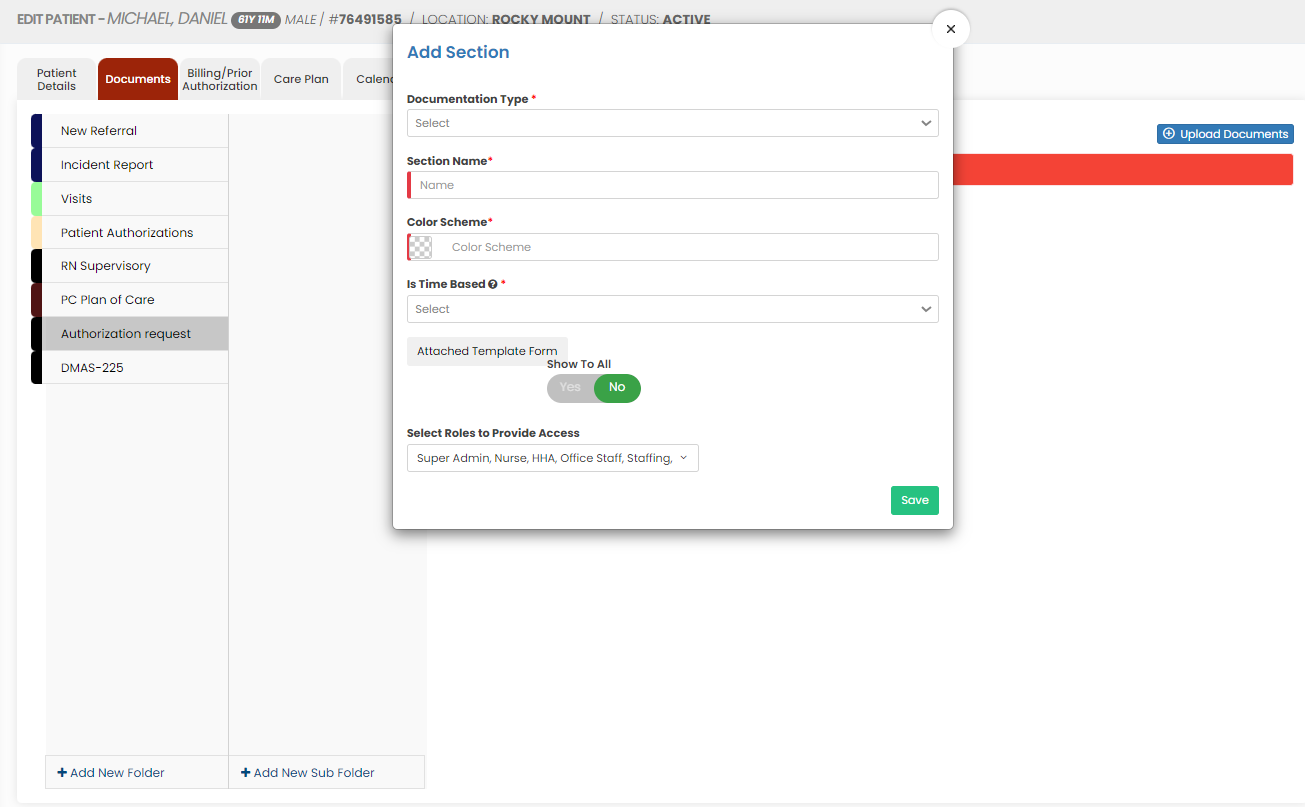](https://support.myezcare.com/uploads/images/gallery/2023-10/7Wlimage.png) The folder Documents is added successfully to upload the required documents of the patient. [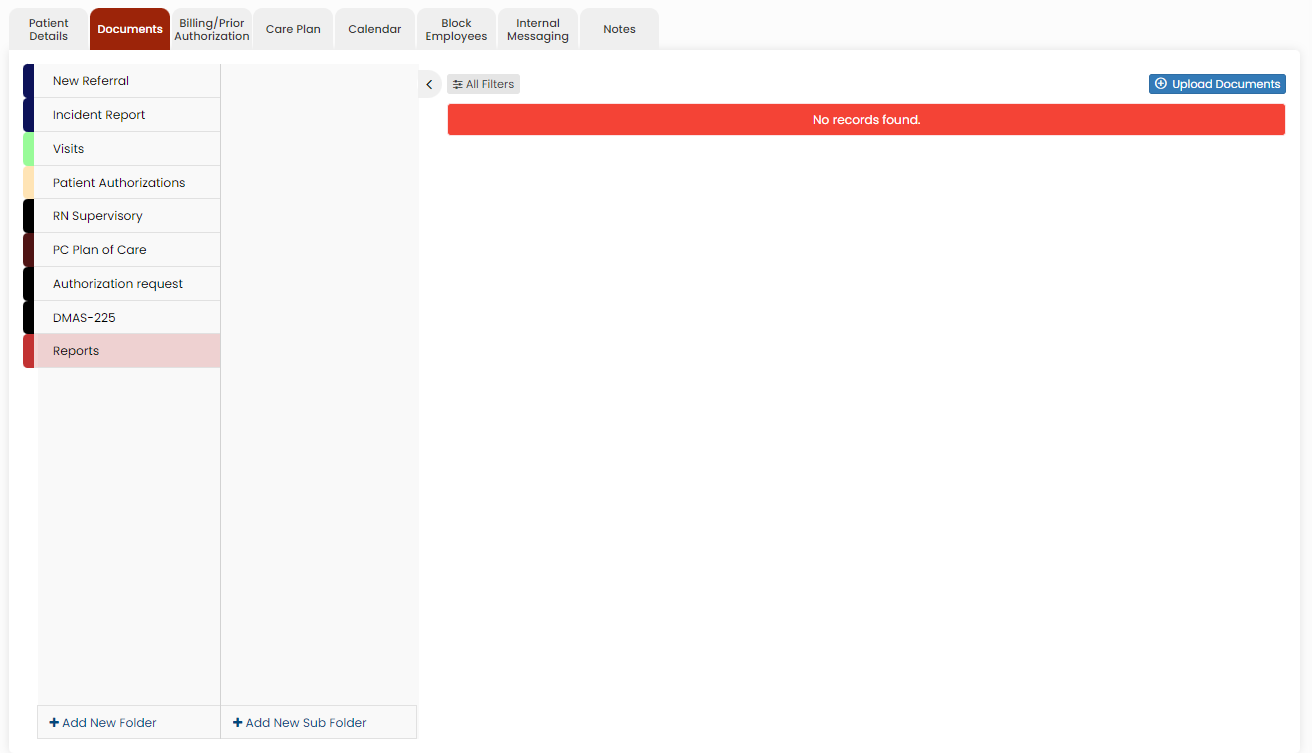](https://support.myezcare.com/uploads/images/gallery/2023-10/MiOimage.png) #### Adding New Sub Folder Select the folder name and click the option +Add New Sub Folder option. The following screen appears, update the required information. Also in the option Show to All, if the user needs the Sub folder name to be added for all the patient click Yes option. If the user wants the folder to be added only for the particular patient click No option and click Save. [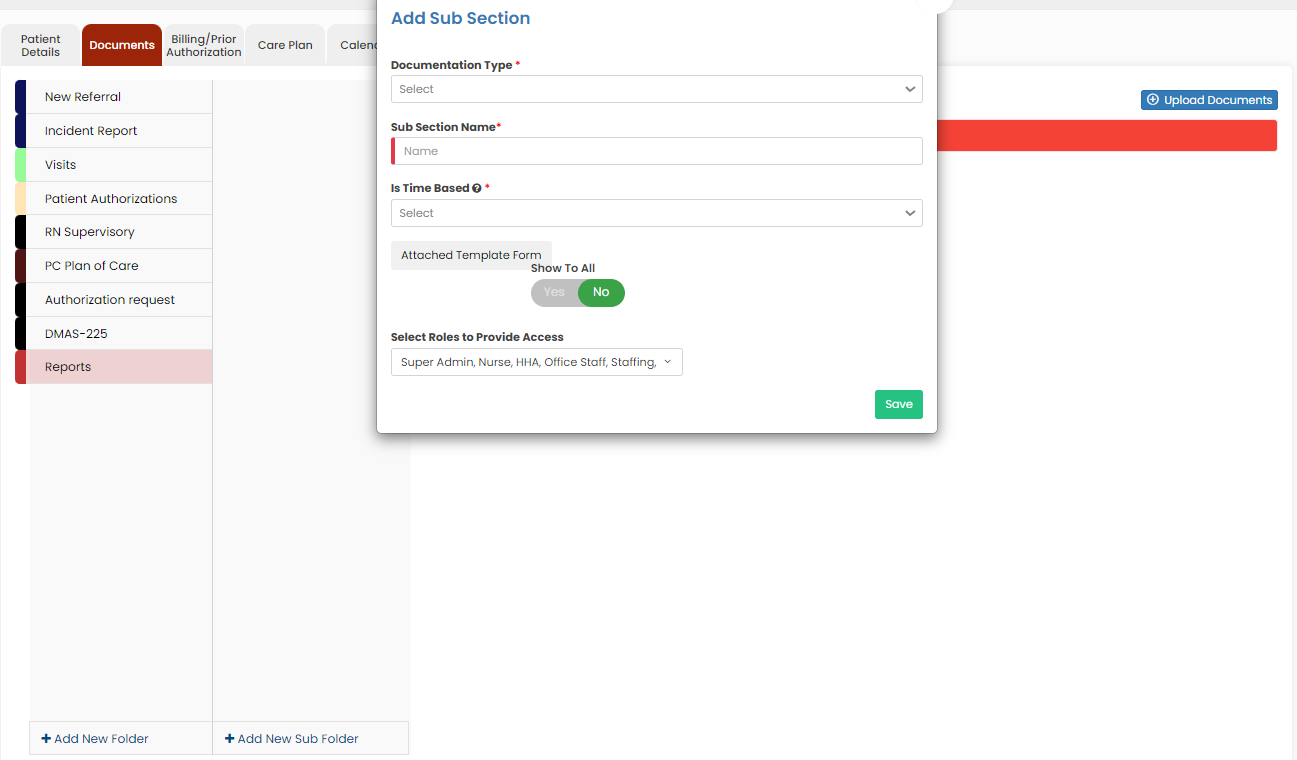](https://support.myezcare.com/uploads/images/gallery/2023-10/Aikimage.png) The Sub folder 2023 is now added under folder name Reports to upload the required documents of the Patient. [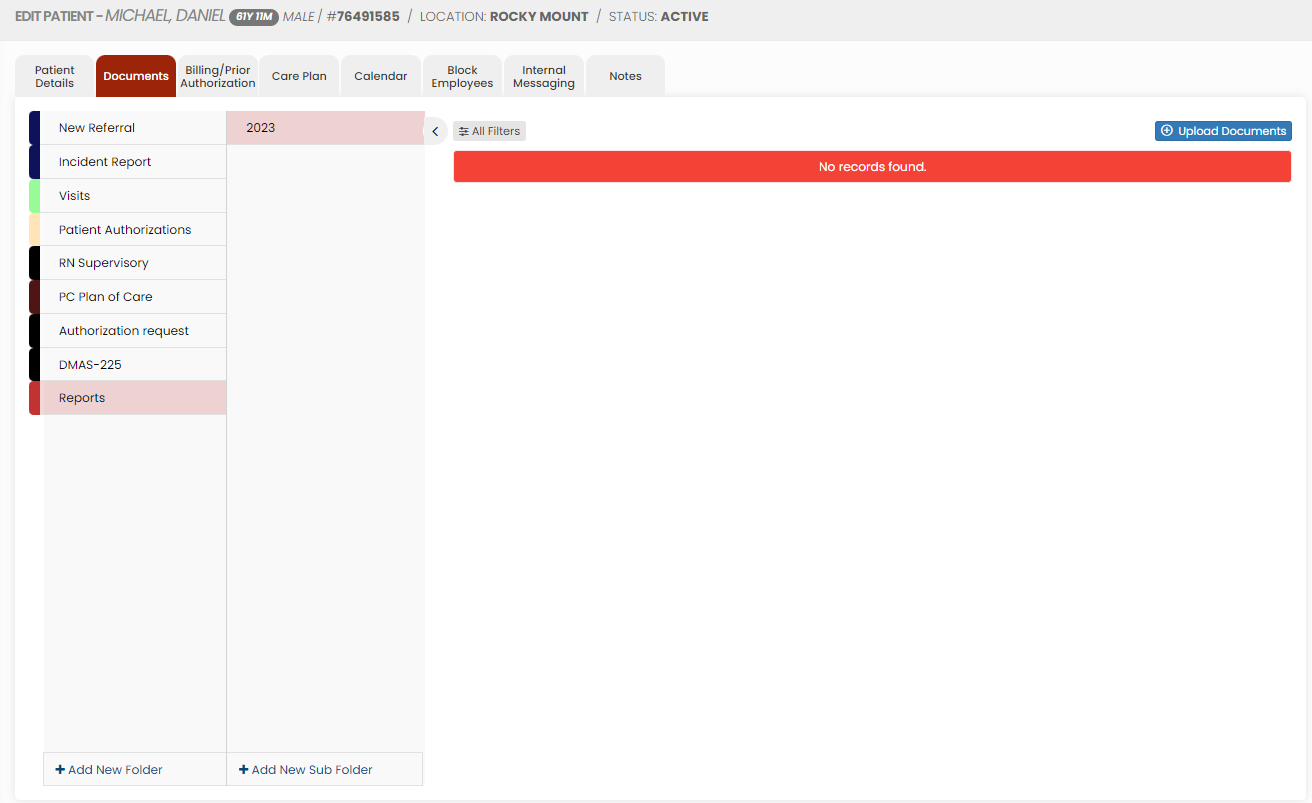](https://support.myezcare.com/uploads/images/gallery/2023-10/HzUimage.png) #### Uploading Documents To upload the documents, select the folder name and click Upload documents. When we click the option Upload Documents, the following screen appears, [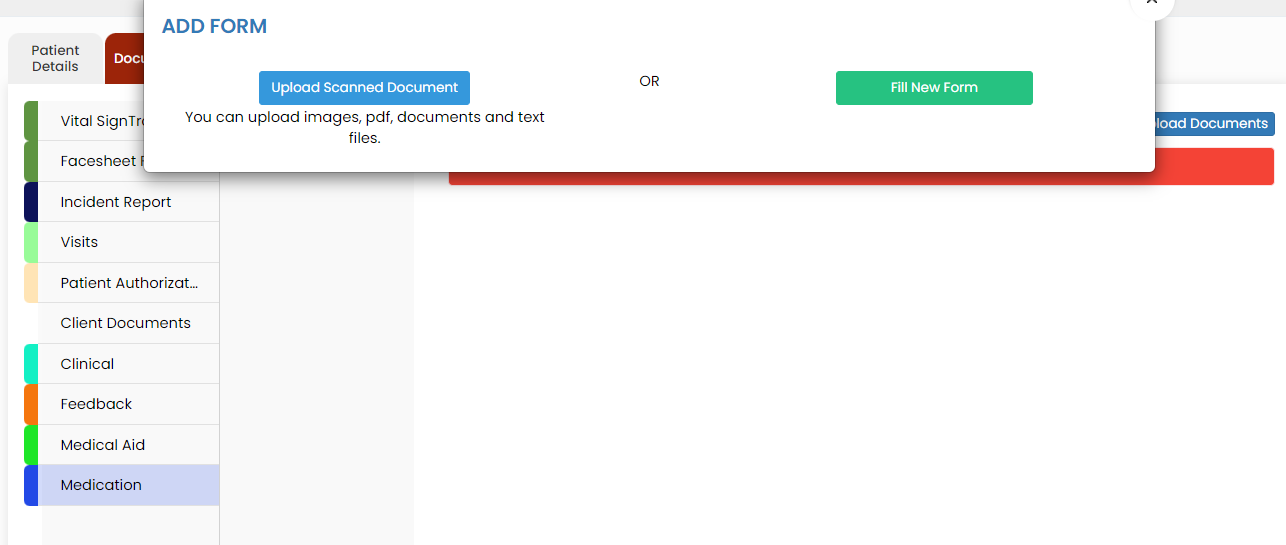](https://support.myezcare.com/uploads/images/gallery/2024-05/H4yimage.png) The Scanned documents can be uploaded using the option Upload Scanned Document. The Forms in the system can be uploaded using Fill New Form option. Under Actions we have the following features for the uploaded document. [](https://support.myezcare.com/uploads/images/gallery/2024-05/Hyeimage.png) **Archive option** Click the option Archive to delete the uploaded scanned document. The following pop-up appears. Click Yes Continue option. [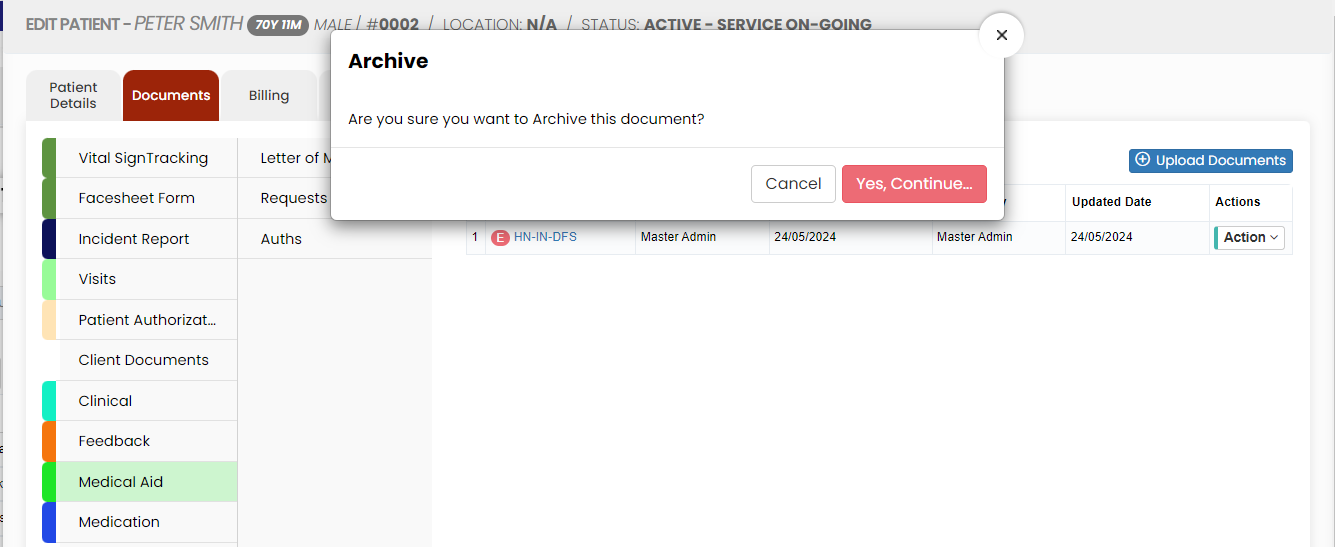](https://support.myezcare.com/uploads/images/gallery/2024-05/NW9image.png) The document is now deleted from the Active documents list. To view the deleted document, Click All Filters option and select the Status Archive. [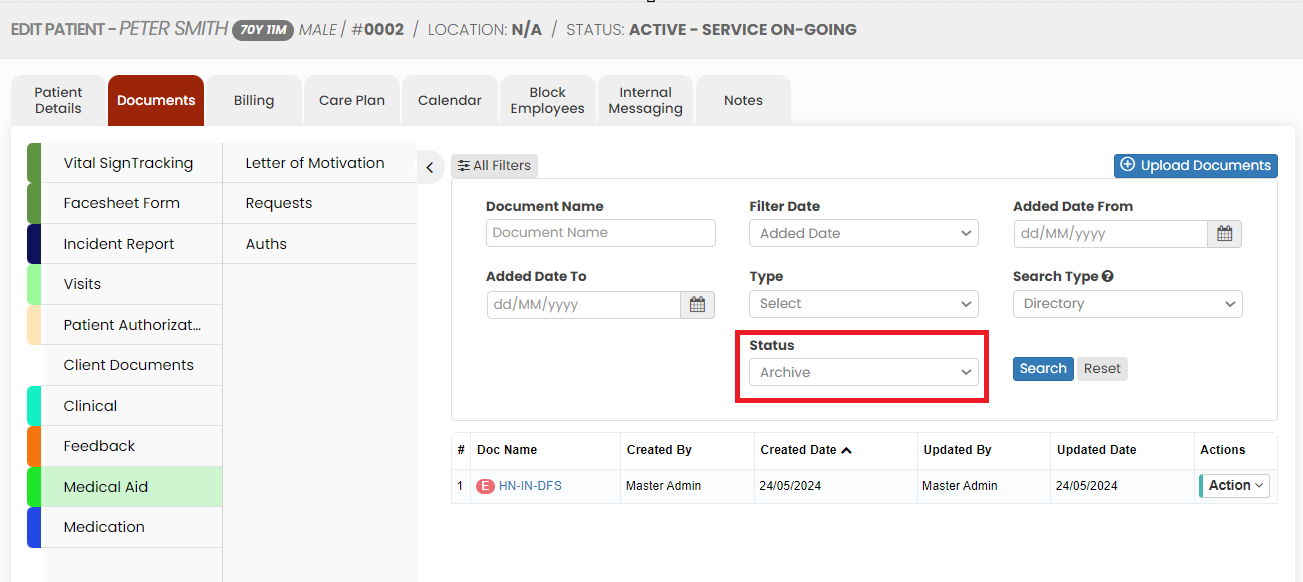](https://support.myezcare.com/uploads/images/gallery/2024-05/SNSimage.png) **Edit Option** Click Edit option to edit the required information in the uploaded forms. Also we can edit the Document name of the uploaded scanned document using the Edit option. [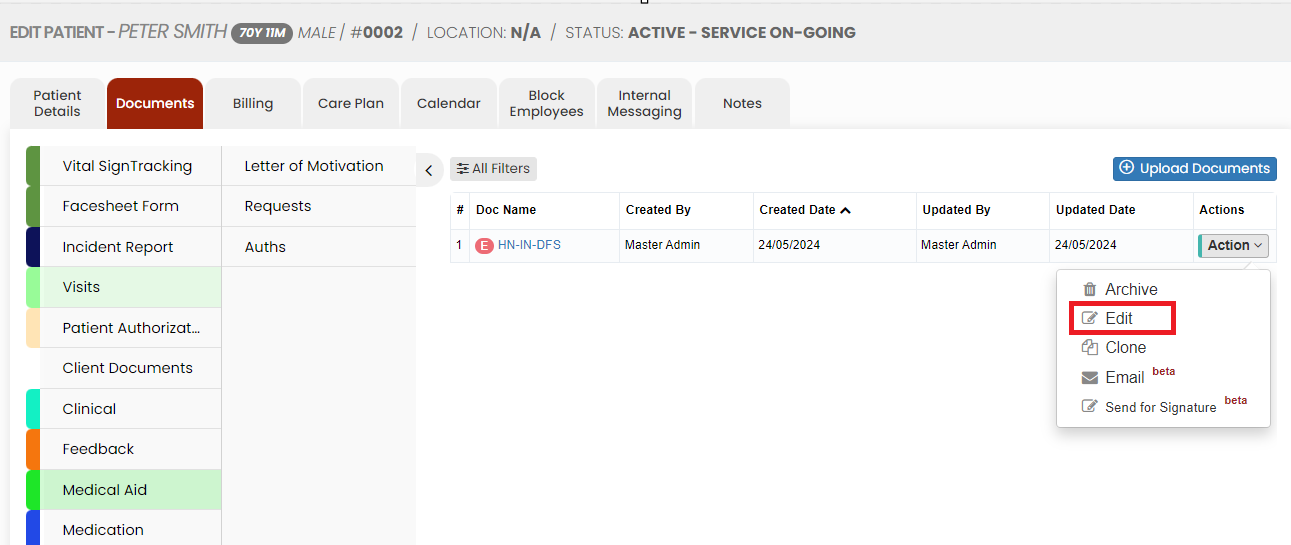](https://support.myezcare.com/uploads/images/gallery/2024-05/WxAimage.png) **Email Option** The uploaded scanned document can be sent through Email using the Email option. Click Email option under Actions of the scanned document. The following screen appears, update the Email address, Subject and content of the Email and click Send option. The Email will be sent along with the scanned document. We can also create templates for the Email under Settings >> Email Template option. The user can use the created email template by using the option Templates in the Email Screen. [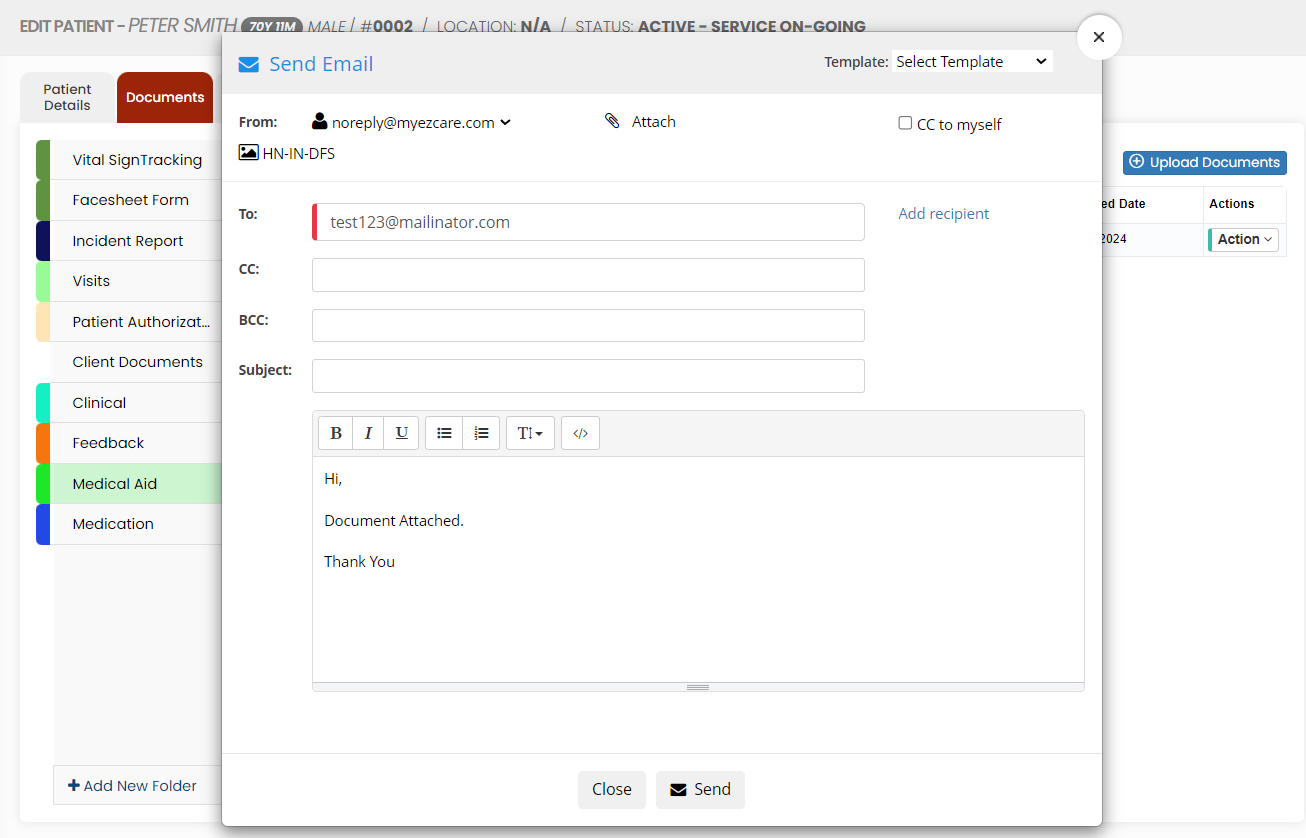](https://support.myezcare.com/uploads/images/gallery/2024-05/s82image.png) **Send for Signature option** The user can send the forms in the system to get the Electronic Signature from the Patient by using the option Send for Signature under Actions. [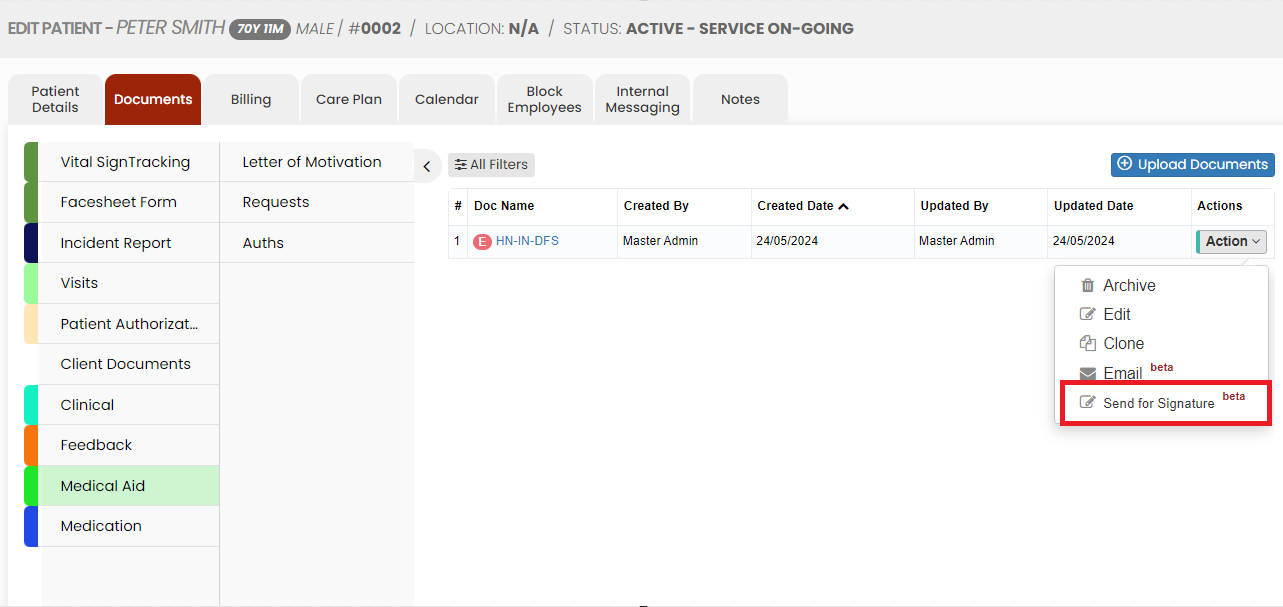](https://support.myezcare.com/uploads/images/gallery/2024-05/eMAimage.png) Click the option Send for Signature, the following screen appears, Update the required details and Click Send option. [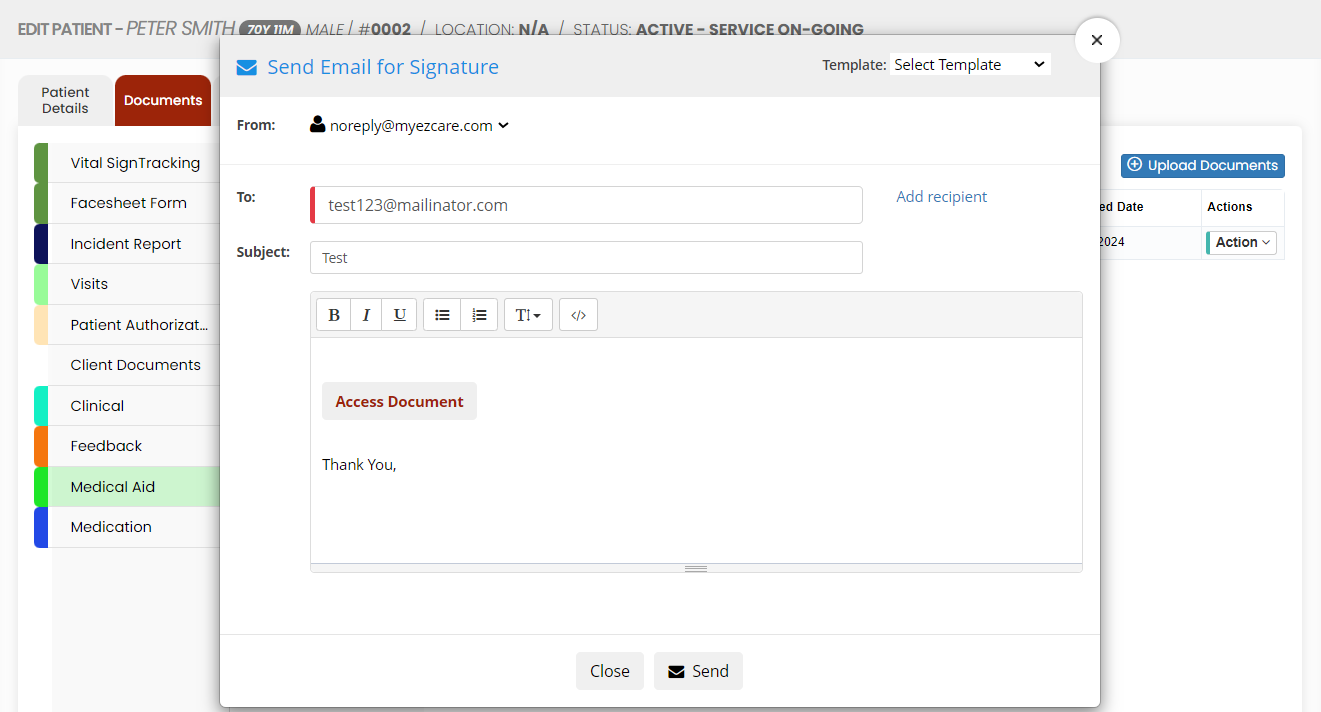](https://support.myezcare.com/uploads/images/gallery/2024-05/kjSimage.png) Now the email will be sent with the Document for signature. When the employee click on the Access Document, the following screen appears. On clicking the Send option, the patient will receive a 5 digit OTP for verification. Once the verification is completed, the Document automatically opens in which the patient can update their signature and save the document. [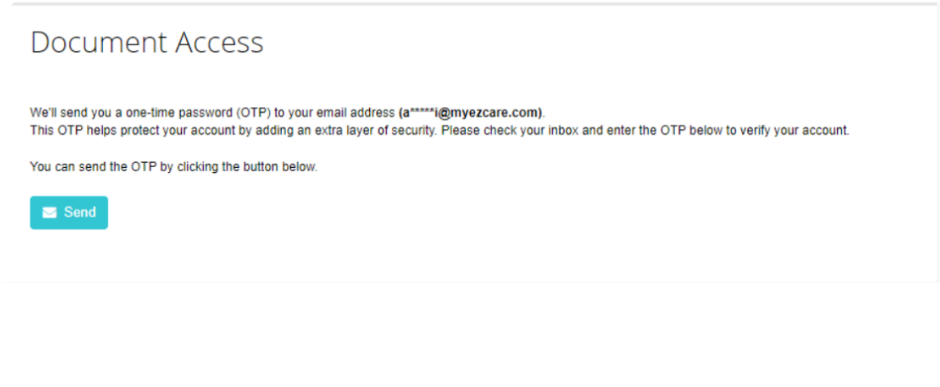](https://support.myezcare.com/uploads/images/gallery/2024-05/KECimage.png) The Signature updated document will be visible under the folders. [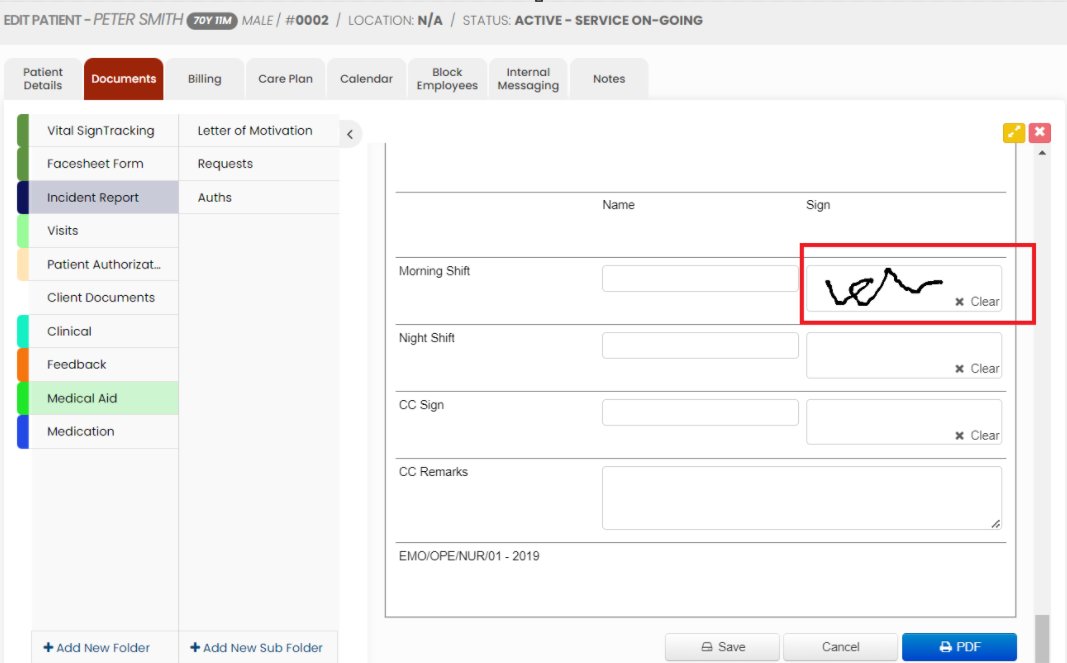](https://support.myezcare.com/uploads/images/gallery/2024-05/NU3image.png) # Billing / Prior Authorization - Payor information comprises essential data on the entities responsible for covering healthcare costs by government programs like Medicare or Medicaid, or patients themselves. - Prior authorization involves obtaining approval from insurance payors before providing specific medical services. ### Adding Patient Payors Healthcare payors play a crucial role in the healthcare system by providing financial coverage and helping individuals access necessary medical care. The Payor details of the patient can be added in the system by using the option Billing / Authorization. Select the Patient Payor and update the required Payor Information and Click Save.**Client >> List >> Select Patient from List >> Billing / Prior Authorization >> Payor**
[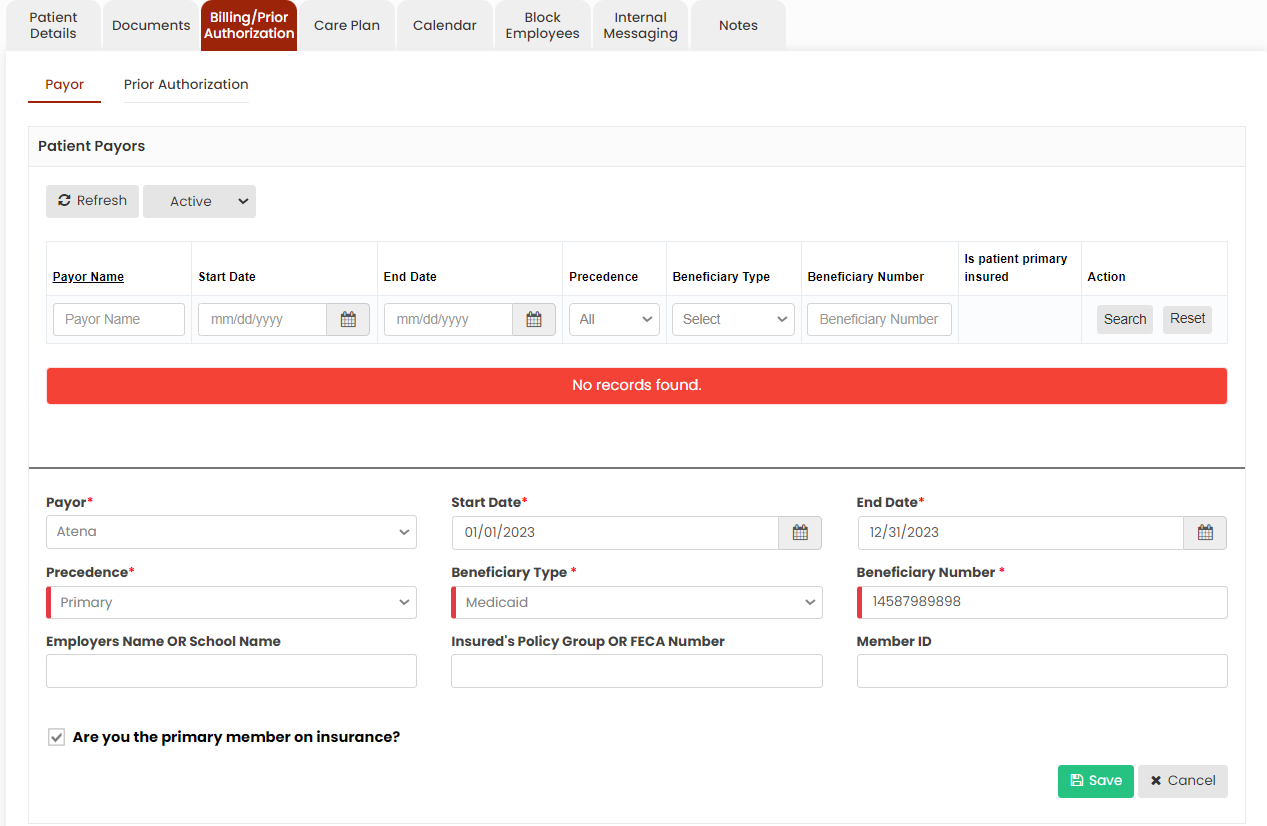](https://support.myezcare.com/uploads/images/gallery/2023-10/DGyimage.png) Now, the Payor details has been added successfully in the system. We can also edit the payor information using the edit option. [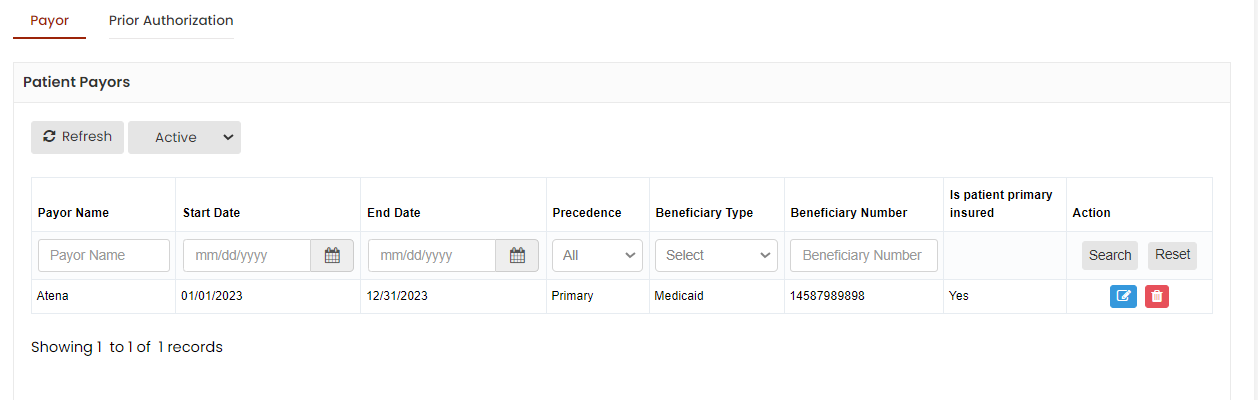](https://support.myezcare.com/uploads/images/gallery/2023-10/Z8mimage.png) ### Editing Patient Payors The Payor information of the patient can be edited by using the Edit option. Click the edit option, complete the required information and click Save.**Client >> List >> Select Patient from List >> Billing / Prior Authorization >> Payor**
[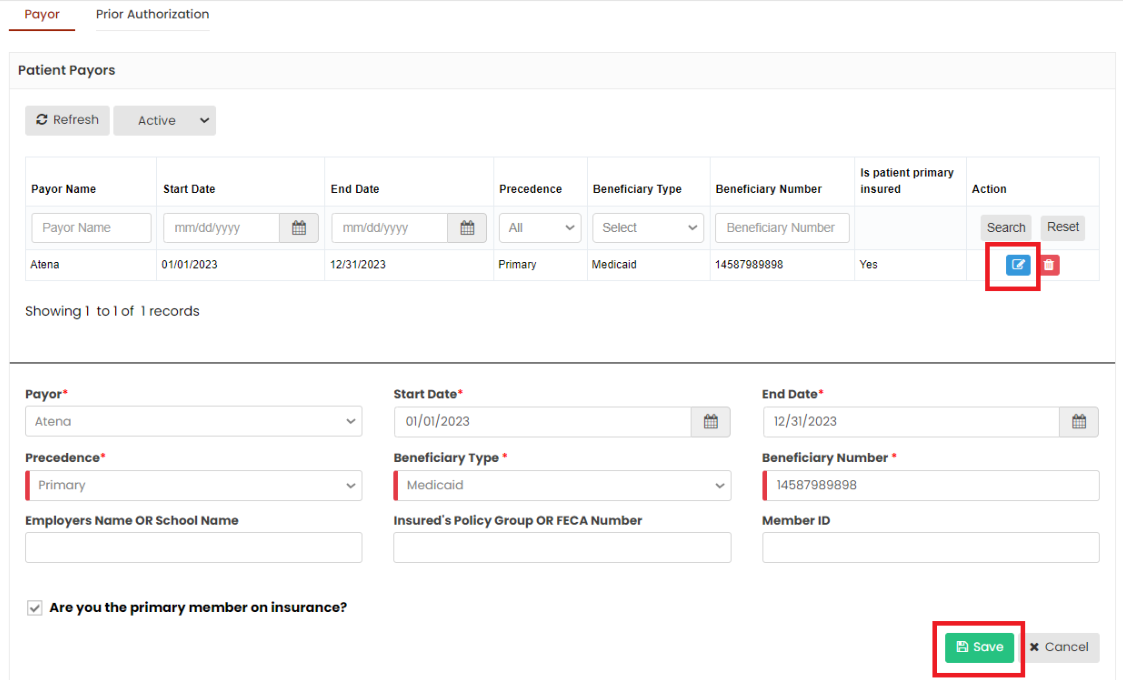](https://support.myezcare.com/uploads/images/gallery/2023-10/3Alimage.png) ### Delete Patient Payors**Client >> List >> Select Patient from List >> Billing / Prior Authorization >> Payor**
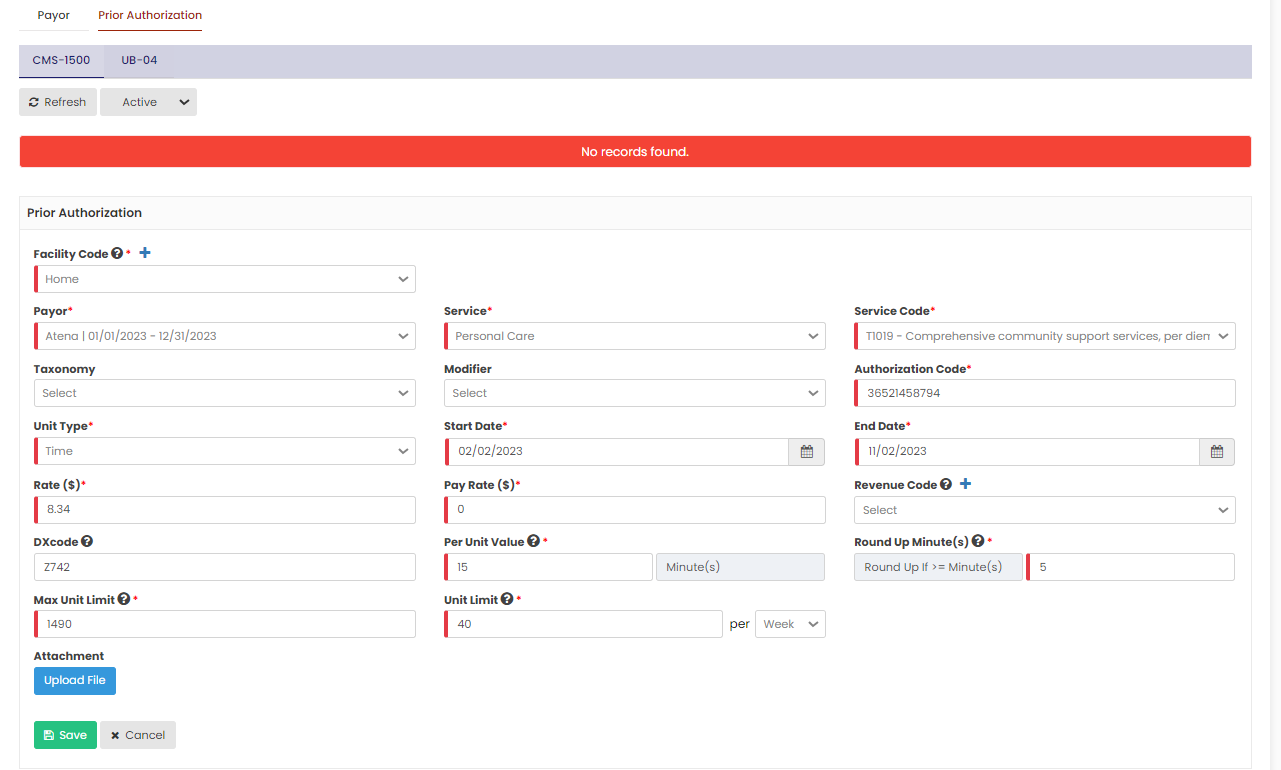
The Payor details can be deleted by using the option Delete on the right side of the payor under Action. [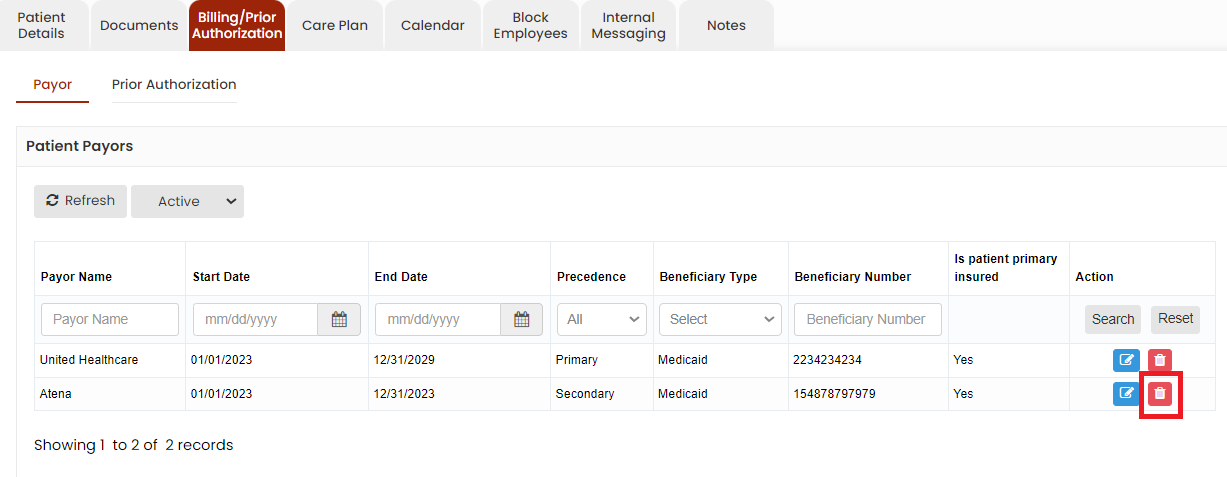](https://support.myezcare.com/uploads/images/gallery/2023-10/kXEimage.png) Now, the payor details gets deleted and we can view the payor under Deleted list. [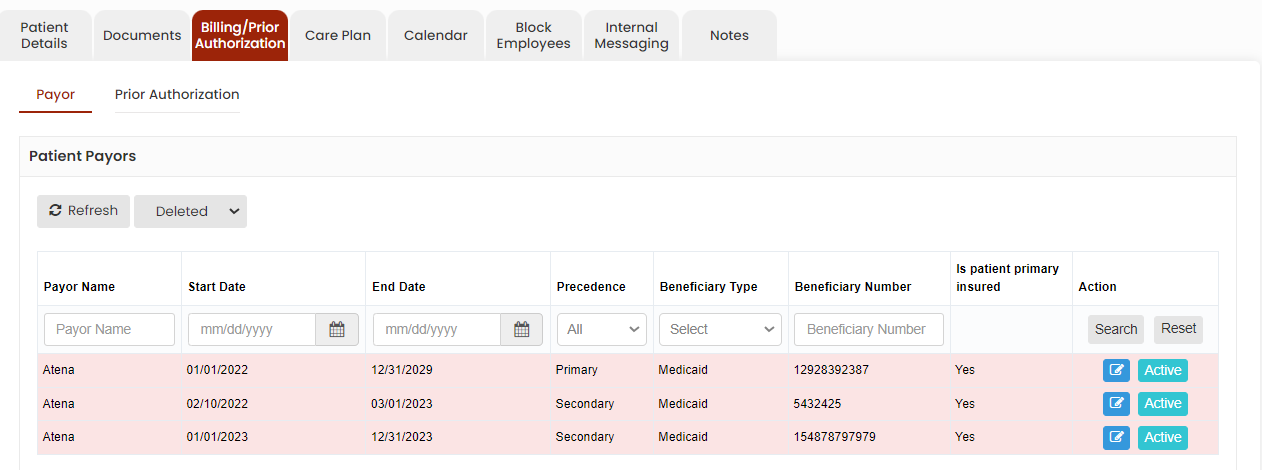](https://support.myezcare.com/uploads/images/gallery/2023-10/kJEimage.png) The user can also Activate the deleted payor by using the option Active on the right side of the screen. [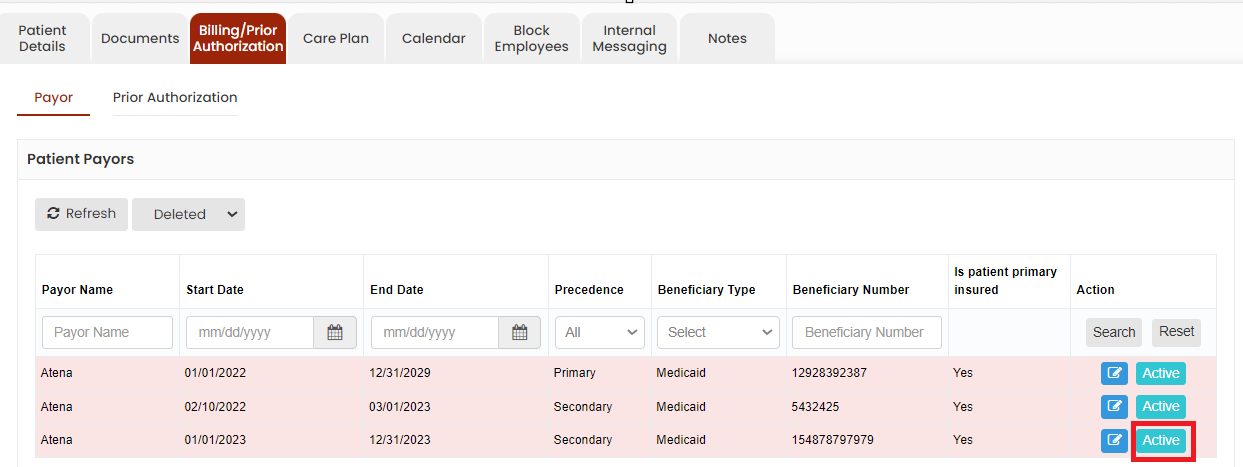](https://support.myezcare.com/uploads/images/gallery/2023-10/9yRimage.png) ### Adding Prior Authorization The Prior Authorization details of the patient can be added in the system by using the option Prior Authorization. Update the required information with Prior Authorization code and click Save. The user can also upload file regarding the Authorization details.**Client >> List >> Select Patient from List >> Billing / Prior Authorization >> Prior Authorization**
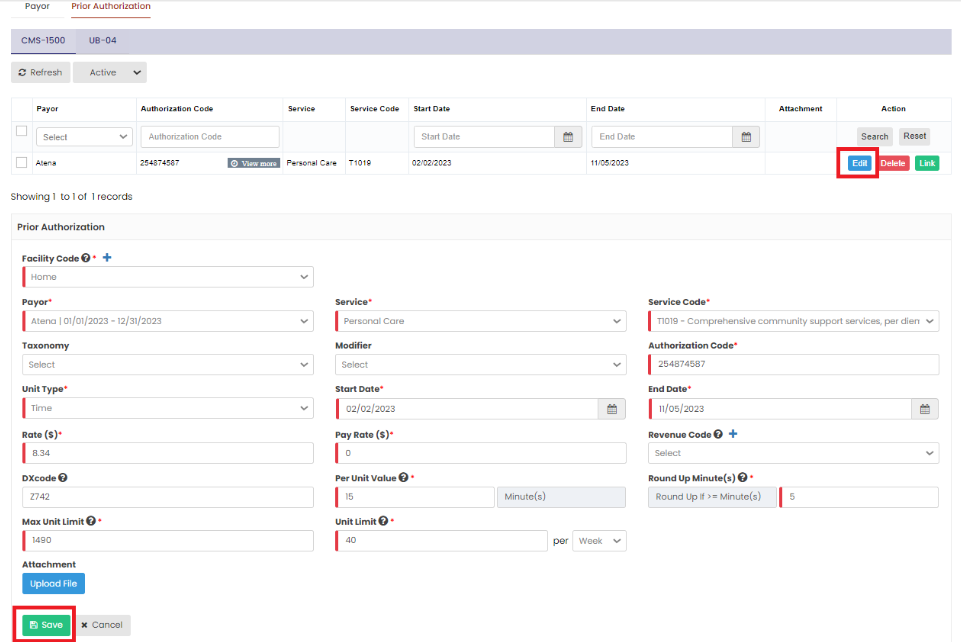
[](https://support.myezcare.com/uploads/images/gallery/2023-10/TAMimage.png) ### Editing Prior Authorization The Prior Authorization information of the patient can be edited by using the Edit option. Click the edit option, complete the required information and click Save.**Client >> List >> Select Patient from List >> Billing / Prior Authorization >> Prior Authorization**
[](https://support.myezcare.com/uploads/images/gallery/2023-10/EbPimage.png) ### Delete Prior Authorization**Client >> List >> Select Patient from List >> Billing / Prior Authorization >> Prior Authorization**
Select the expired Prior Authorization by using the check box and click Delete or Disable Selected option on the screen. [](https://support.myezcare.com/uploads/images/gallery/2023-10/JtBimage.png) Now, the Expired Prior Authorization details gets deleted and we can view the Authorization details under Deleted list. [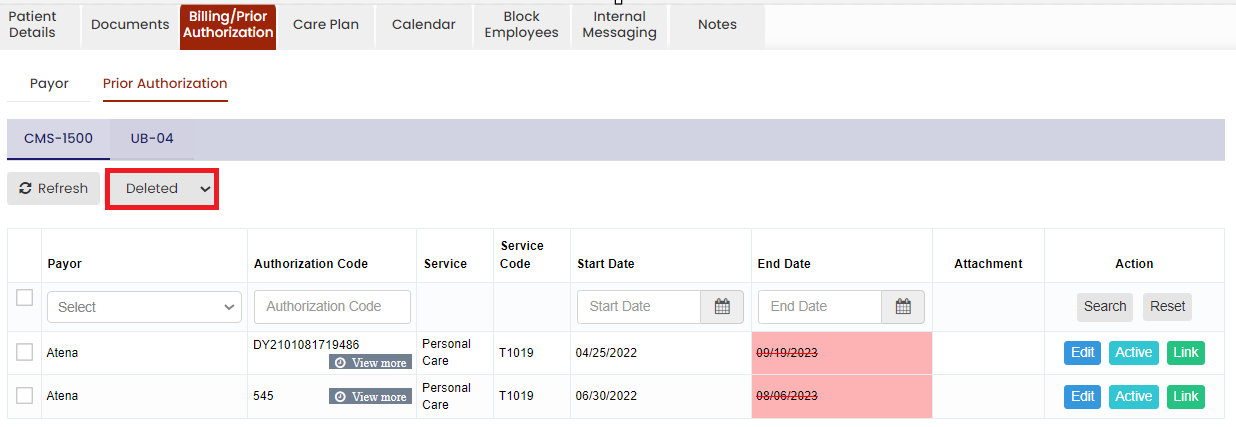](https://support.myezcare.com/uploads/images/gallery/2023-10/0f8image.png) ### **Link Past and Future Schedule** The Link option is used to link the Authorization code with the schedules which is created without Prior Authorization. If the user created the schedules without Prior Authorization for a patient and receives the Authorization details later, then the schedules without Authorization can be linked with the Authorization details added in the system for the past and future schedules.**Client >> List >> Select Patient from List >> Billing / Prior Authorization >> Prior Authorization**
Click Link option on the right side of the Authorization details under Action. [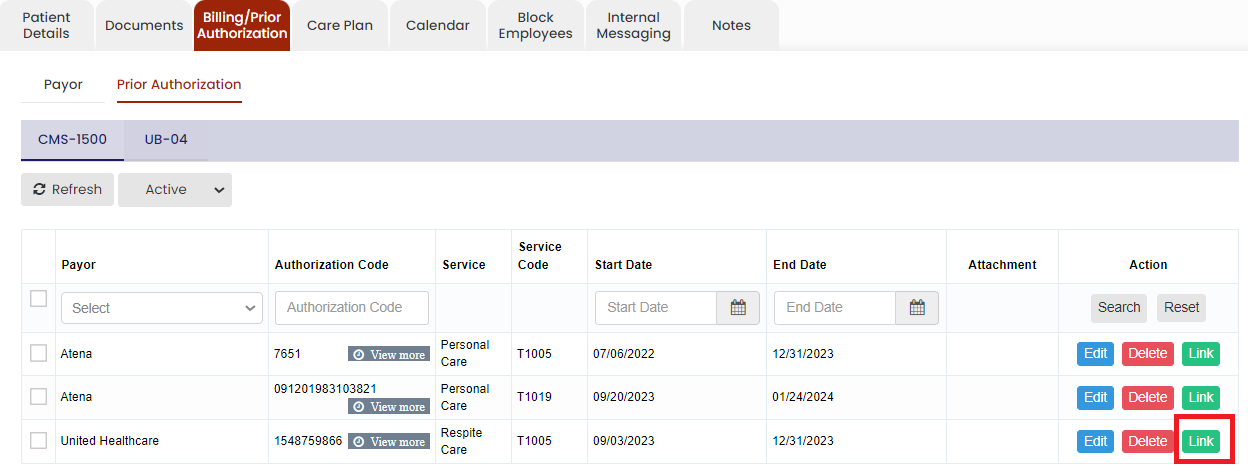](https://support.myezcare.com/uploads/images/gallery/2023-10/VMkimage.png) The following screen appears in which the user can click link option to update the Authorization code for the past and future schedules. Click Link button on the visits to link the Authorization code. [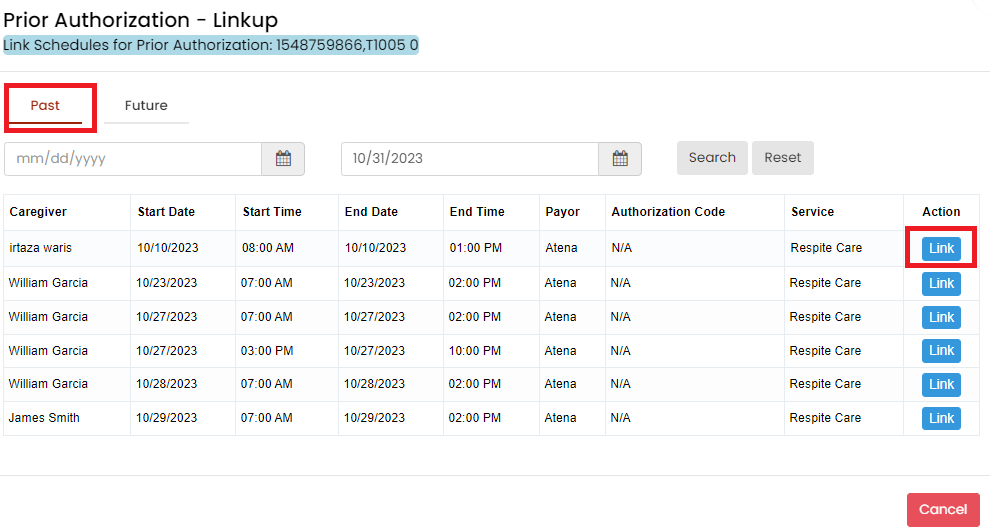](https://support.myezcare.com/uploads/images/gallery/2023-10/88Vimage.png) # Care Plan ### Task Mapping The visit task activities for care plan can be viewed in Task Mapping option.**Client >> List >> Select Patient from List >> Care Plan >> Task Mapping.**
The user can select the Task Activities for the Care type as required for the days of the week. [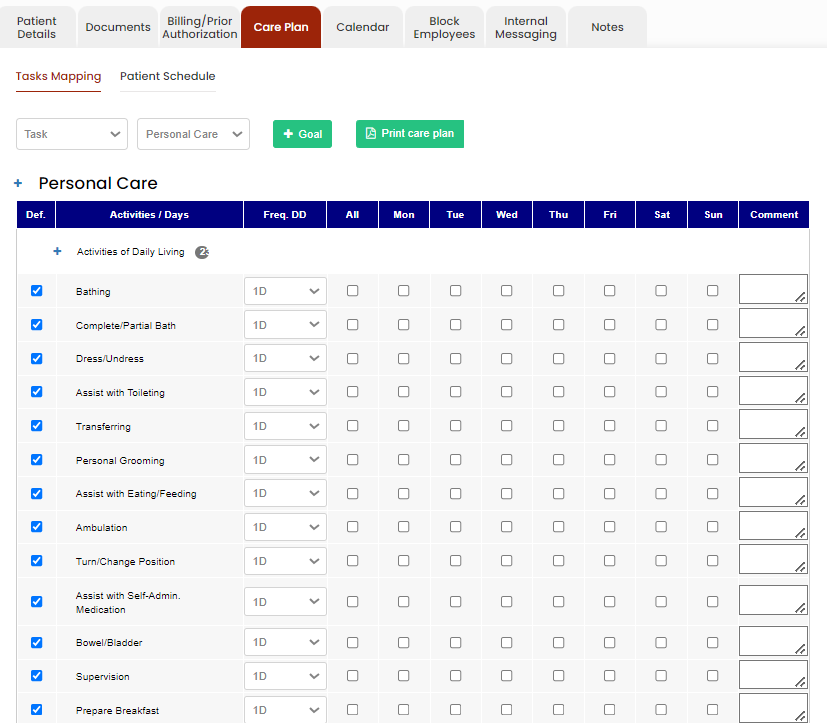](https://support.myezcare.com/uploads/images/gallery/2023-10/A3simage.png) ### Goal Management Goal Management is a feature that helps users create, track, and manage individual or program-based goals for clients. It allows setting measurable objectives, assigning responsible staff, monitoring progress, and updating outcomes — ensuring clients receive personalized and outcome-driven care. This feature promotes accountability, documentation, and ongoing evaluation of client progress.Client List >> Client >> Care Plan >> Goal Management
[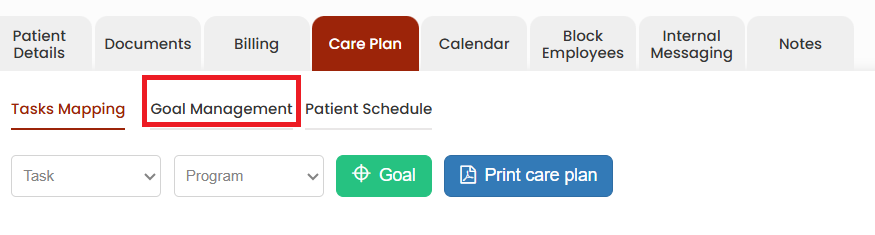](https://support.myezcare.com/uploads/images/gallery/2025-06/olVzOB30O1rJmo8d-image.png) Click the option "Goal Management", the following screen appears to add the Goals for the Services of the patient. Click "Add New Goal" option [](https://support.myezcare.com/uploads/images/gallery/2025-06/CnfpICFgJs5Z6PiP-image.png) Now, update the required fields for the Goals and Save the Goal. ### Patient Schedule The patient schedule can be added in the system by using the option +Add Patient Schedule option. Click schedule option under client.**Client >> List >> Select Patient from List >> Care Plan >> Patient Schedule or Client >> Schedule**
The patient schedule can be created in the system with Prior Authorization and also without Prior Authorization. Now lets update the Patient schedule With Prior Authorization. Click on the dropdown option under Contract / PA Details. Select the Authorization details and Click Save & Add Time Slot option. [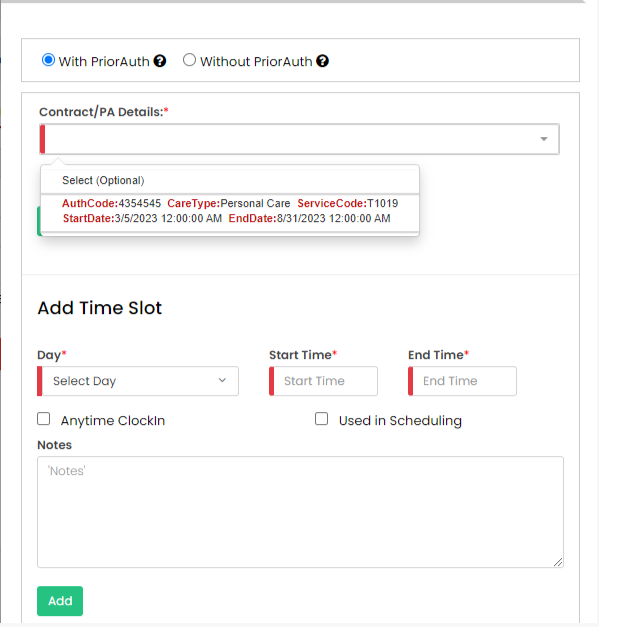](https://support.myezcare.com/uploads/images/gallery/2023-10/Cbgimage.png) [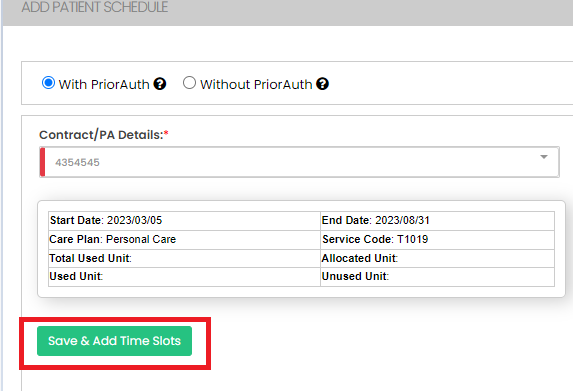](https://support.myezcare.com/uploads/images/gallery/2023-10/6AKimage.png) Select days under the Add Time Slot option, update the Start Time and End Time of the Schedule, Check the option Used in Scheduling and Click Add. Now the Time slot will be generated with Days, Time and Care Plan. [](https://support.myezcare.com/uploads/images/gallery/2023-10/BIMimage.png) If the Prior Authorization details are not available, the user can follow the above steps and create the Schedule without Prior Authorization for the Patient. [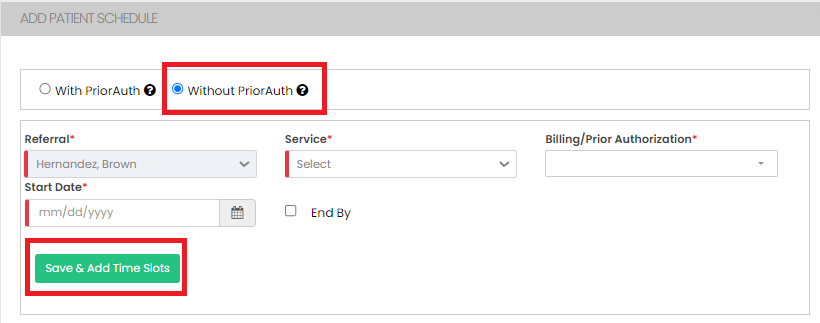](https://support.myezcare.com/uploads/images/gallery/2023-10/4GRimage.png) Select days under the Add Time Slot option, update the Start Time and End Time of the Schedule, Check the option Used in Scheduling and Click Add. Now the Time slot will be generated with Days, Time and Care Plan. [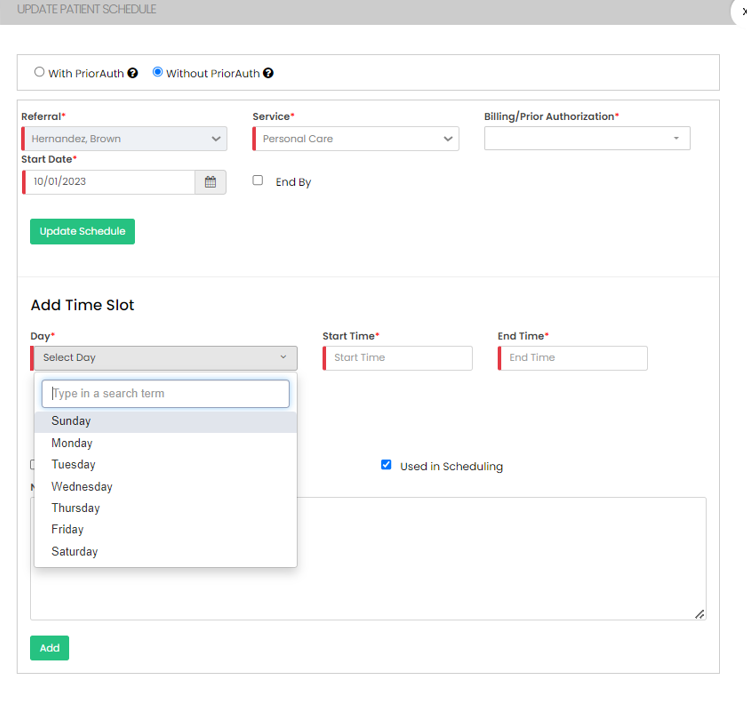](https://support.myezcare.com/uploads/images/gallery/2023-10/gf0image.png) Now, the Time Slot for the patient is successfully added with the required Days and Time. [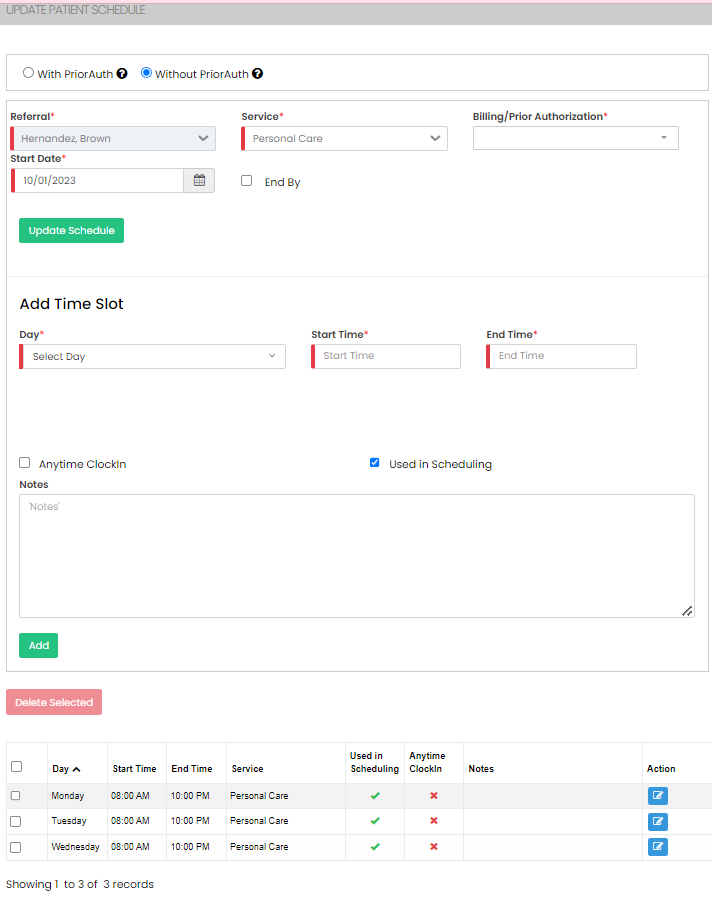](https://support.myezcare.com/uploads/images/gallery/2023-10/tjnimage.png) ### Scheduling Patient with Employee After creating the Timeslot for the patient, the user has to schedule the patient with the Employee. Click Add Patient Schedule option.**Client >> List >> Select Patient from List >> Care Plan >> Patient Schedule**
[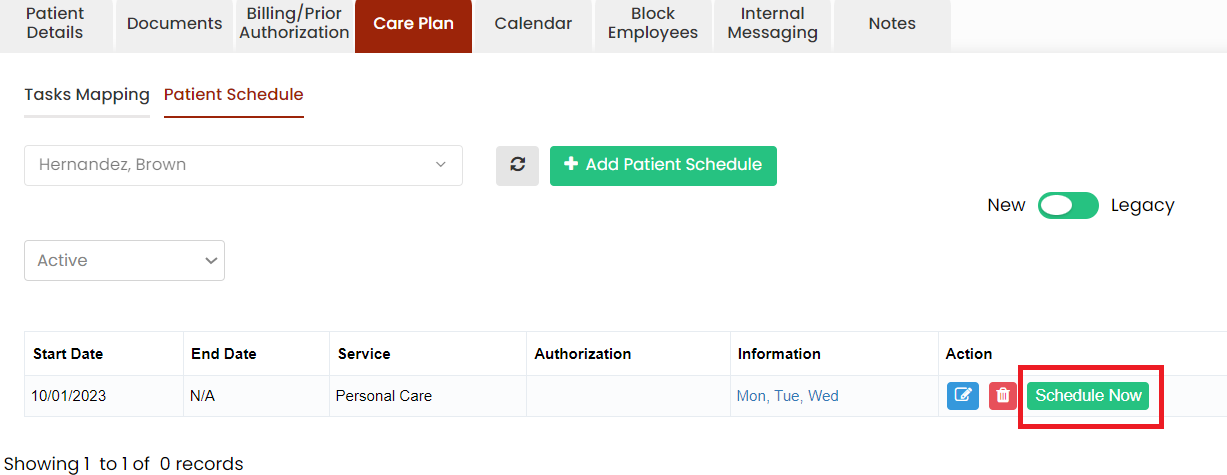](https://support.myezcare.com/uploads/images/gallery/2023-10/8jRimage.png) Select the Care Type, Start Date and End Date and days of the schedule. Now select the employee from the list to whom the patient has to be scheduled and click the Schedule option. [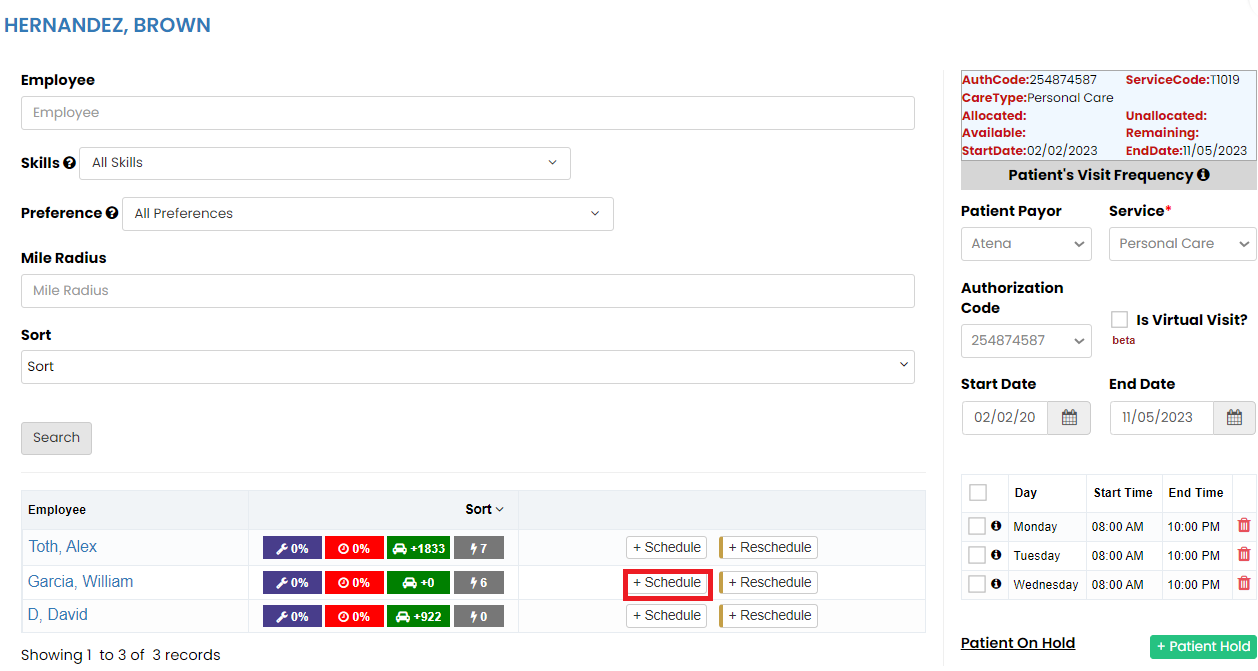](https://support.myezcare.com/uploads/images/gallery/2023-10/ZHgimage.png) The patient has been successfully scheduled with the employee and the Schedule has been created. ### Reassign Employee for the patient The Employee assigned for the patient can be reassigned with different employee in the system by using the Schedule Now option.**Client >> Schedule**
Select the patient from the list and click Schedule now option. When we click the day of the schedule, we can see the employee name who has been assigned to the patient for the day. [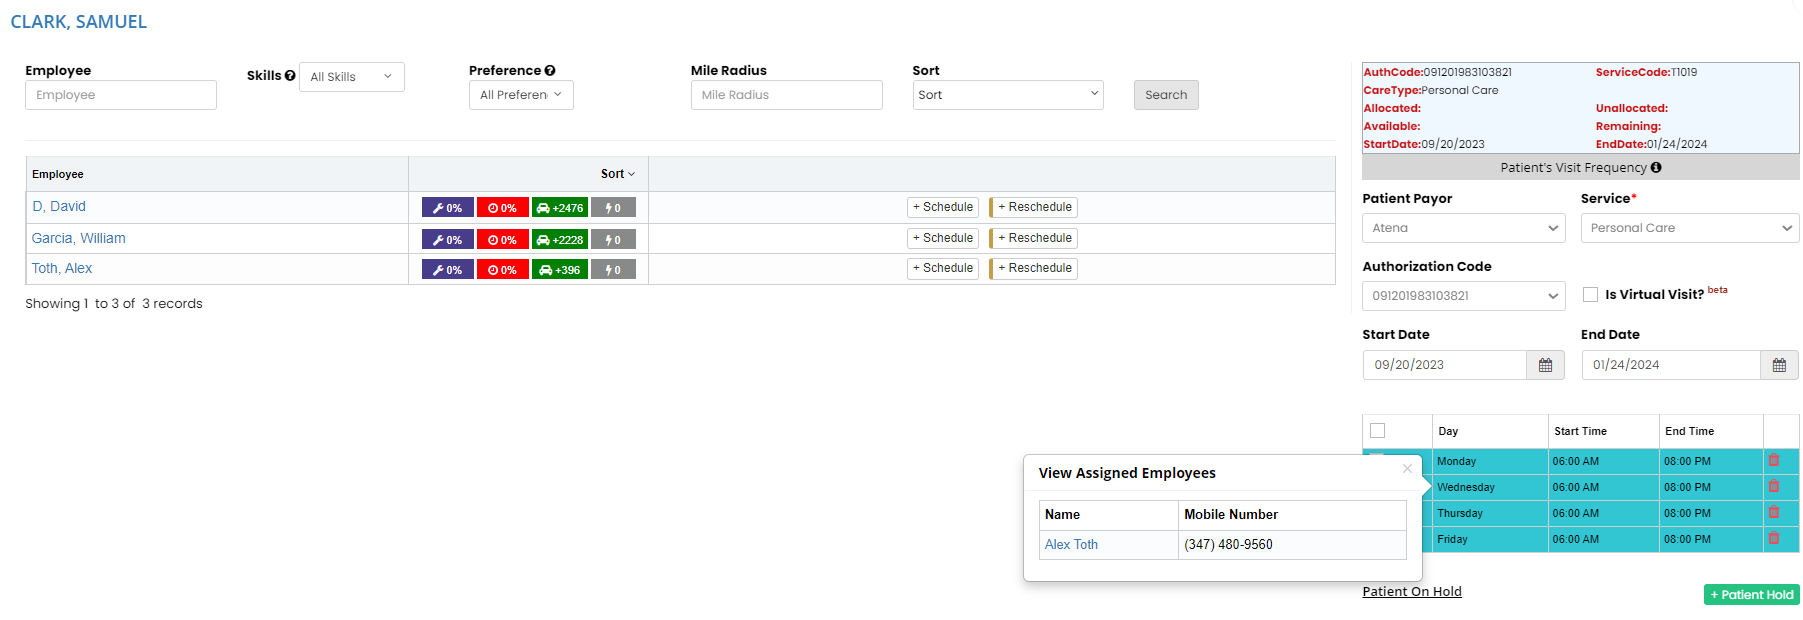](https://support.myezcare.com/uploads/images/gallery/2023-10/8gWimage.png) Now select the start date and end date of the schedule for which the employee has to be reassigned. Also click the check box to select the day for reassigning the employee and click unassign employee option on the right side of the day. The below screen appears, click yes continue option. The employee has been unassigned for the selected date range for that particular day. [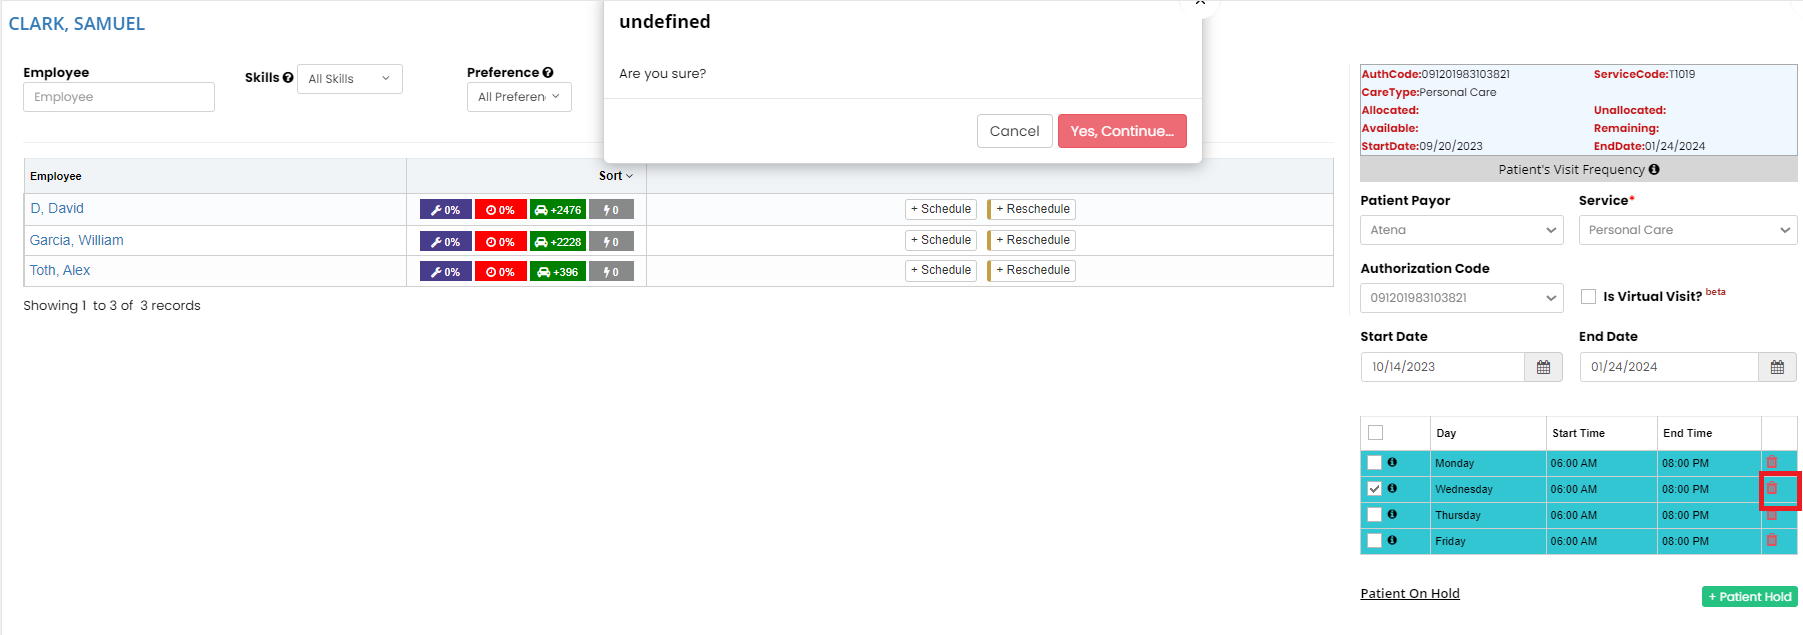](https://support.myezcare.com/uploads/images/gallery/2023-10/IVcimage.png) After the employee has been unassigned, click the check box for the day and click Schedule option on the right side of the employee who has to be scheduled for the patient. [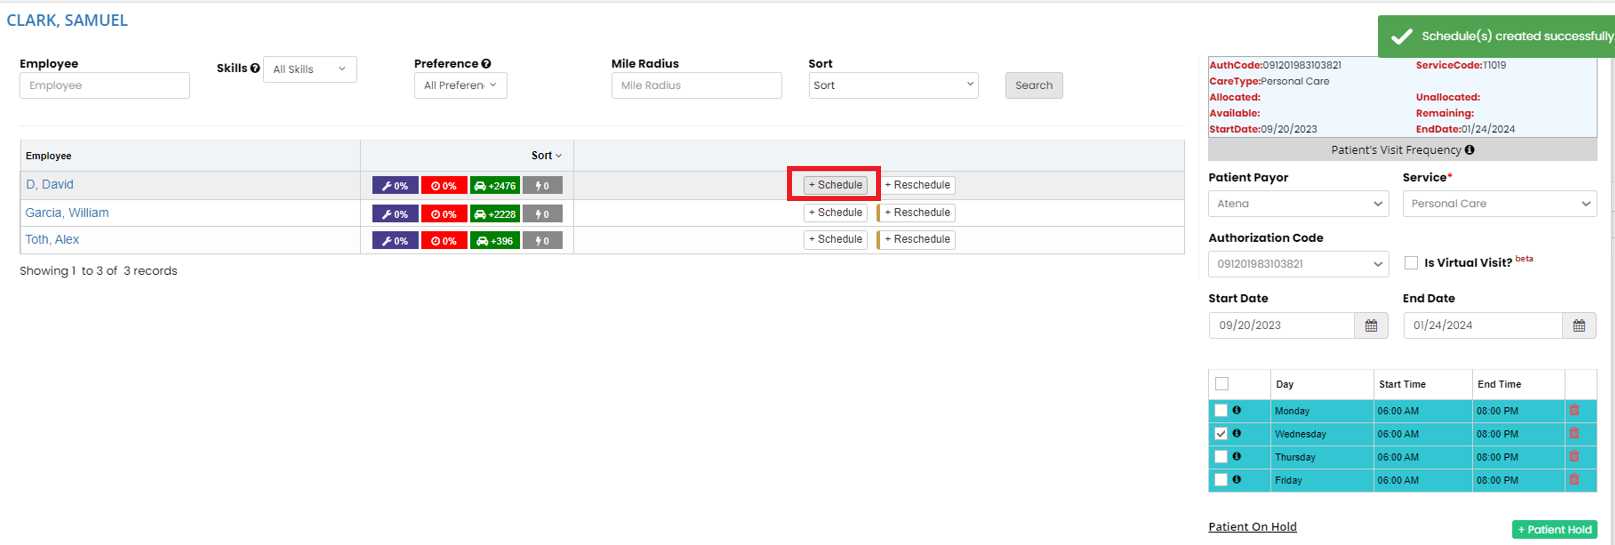](https://support.myezcare.com/uploads/images/gallery/2023-10/yagimage.png) ### Patient on Hold The user can keep the patient on hold for the day by using the option +Patient Hold. [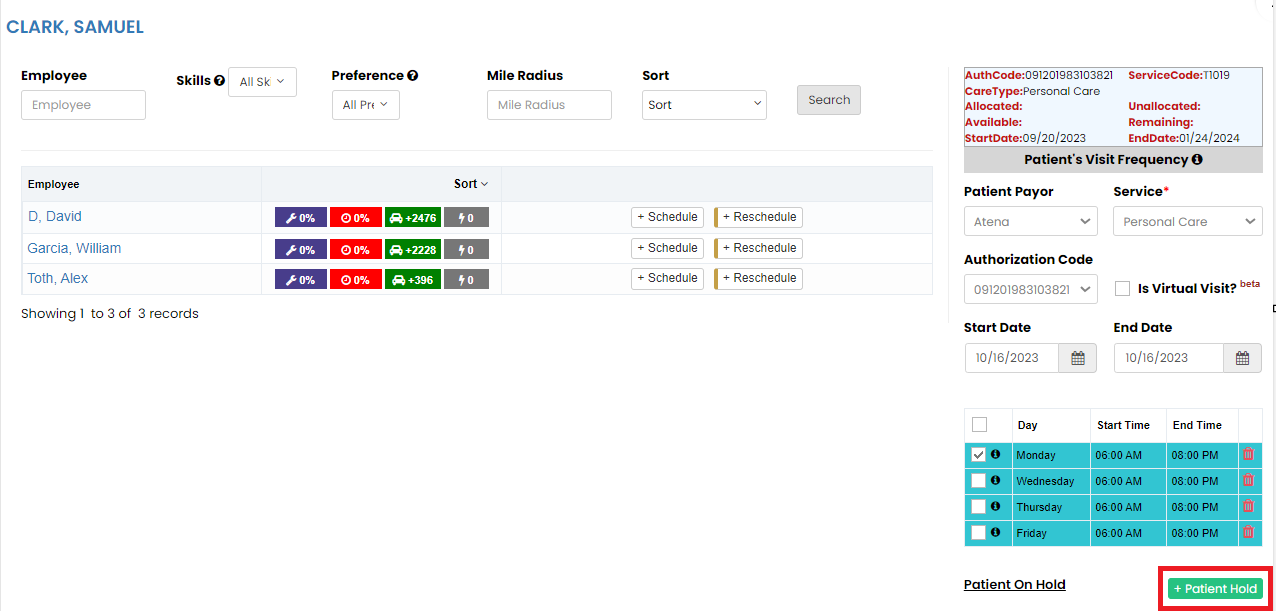](https://support.myezcare.com/uploads/images/gallery/2023-10/6CPimage.png) Now Click +Patient Hold option, the following screen appears, update the start date, end date, reason for hold and click Save option. The notification will be sent to the employee to hold the patient for the day. [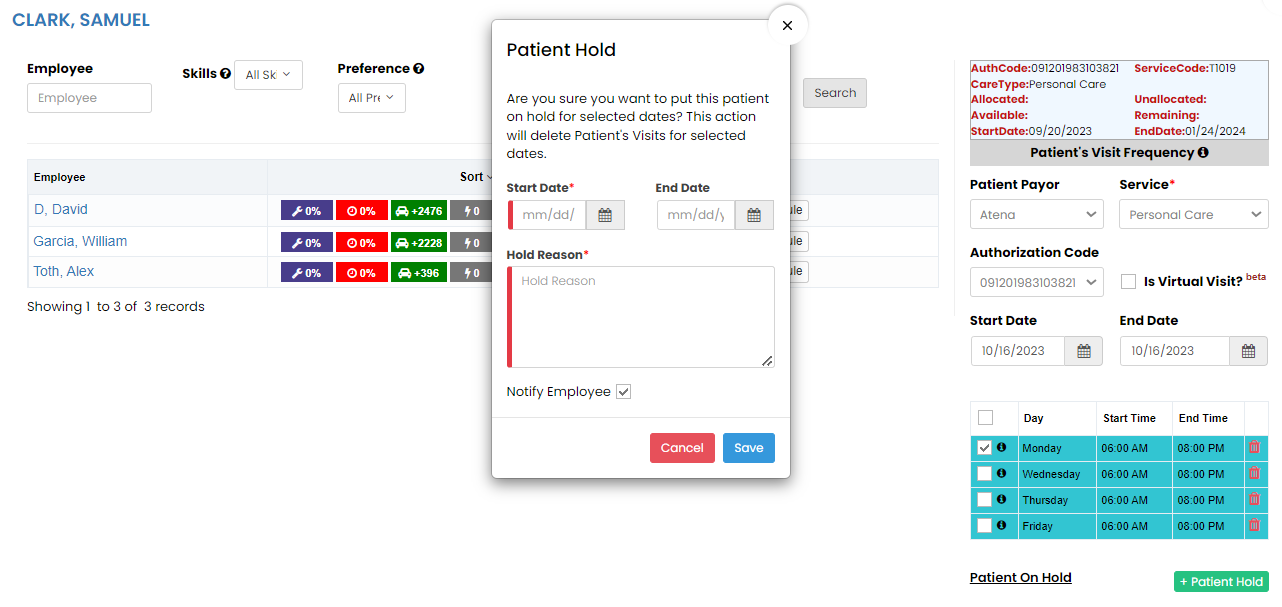](https://support.myezcare.com/uploads/images/gallery/2023-10/Bh7image.png) The user can see days on the screen for which the patient is on hold. [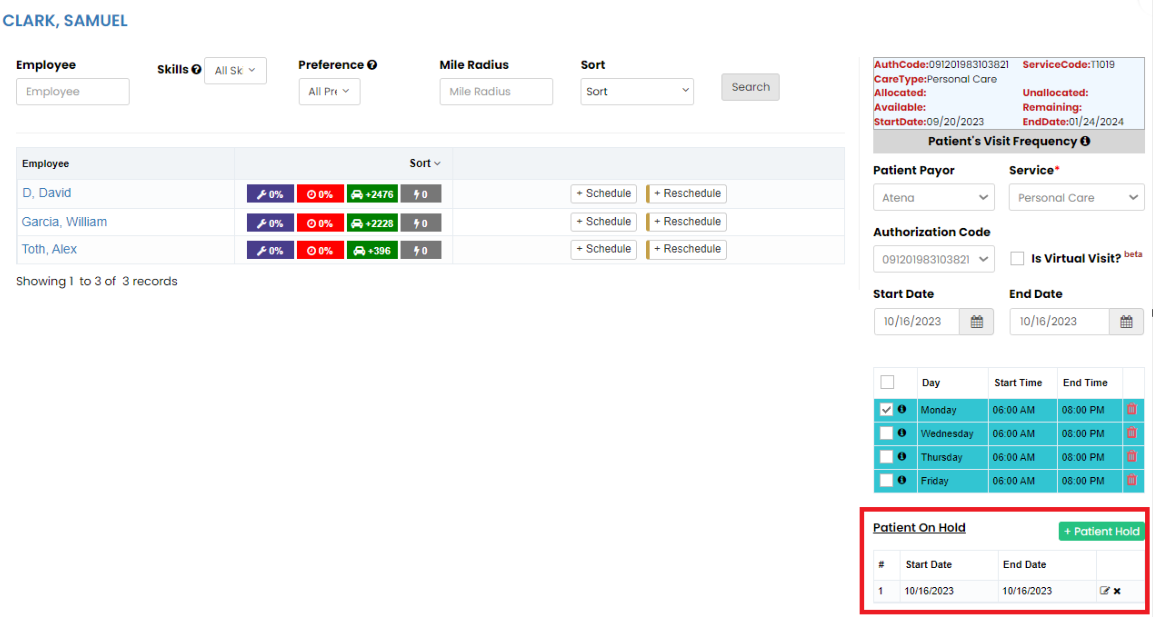](https://support.myezcare.com/uploads/images/gallery/2023-10/owvimage.png) ### Virtual Visit**Client >> Schedule**
For creating the Virtual Visit of the patient with employee, follow these steps. - Click the schedule now option. - Select the Patient Payor, Service and check the option Is Virtual Visit. - Select the days of the schedule for Virtual Visit. - Click Schedule option for the required employee in the list. [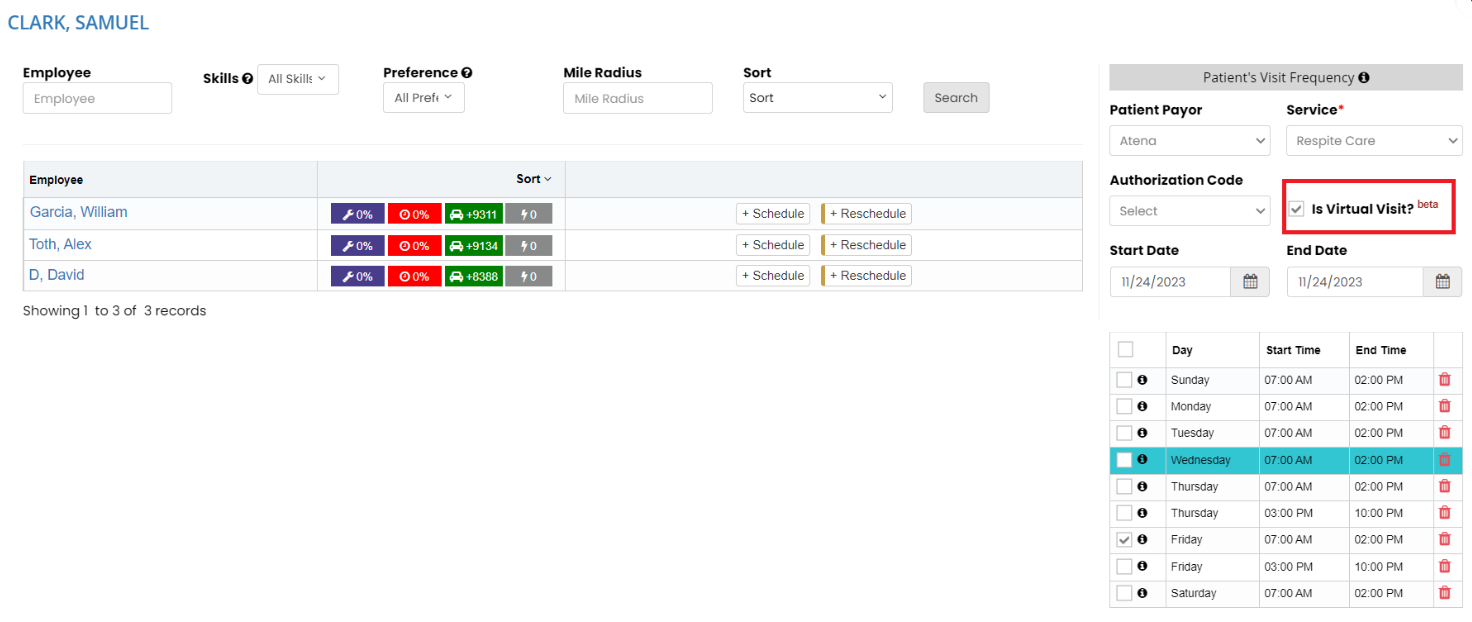](https://support.myezcare.com/uploads/images/gallery/2023-10/Zkgimage.png) ### Delete Schedule**Client >> Schedule**
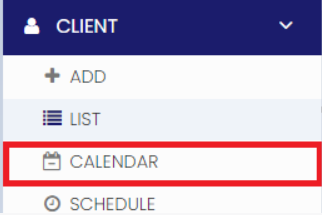
Click the Delete button before Schedule Now option to Delete the schedules created with wrong information. [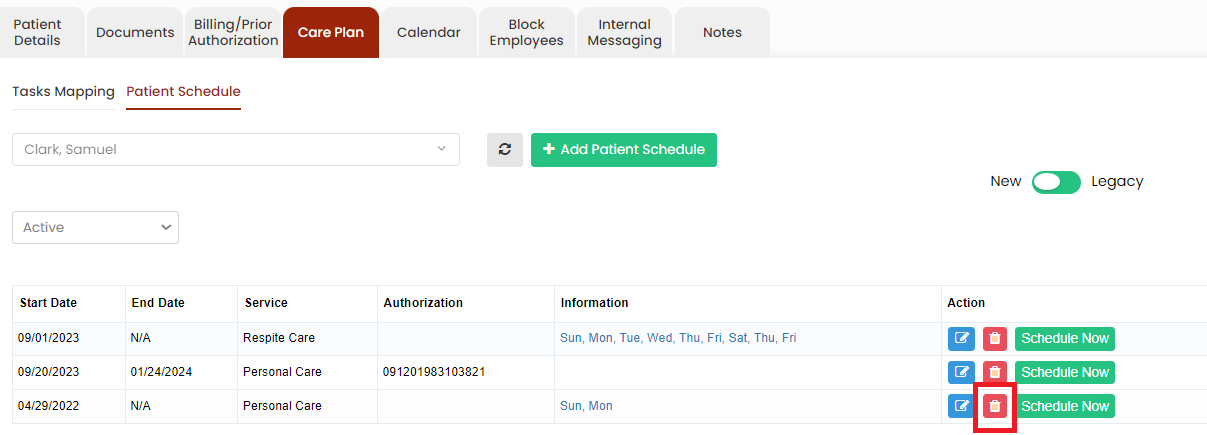](https://support.myezcare.com/uploads/images/gallery/2023-10/1Wrimage.png) The Deleted schedules can be viewed under Deleted option on the screen. [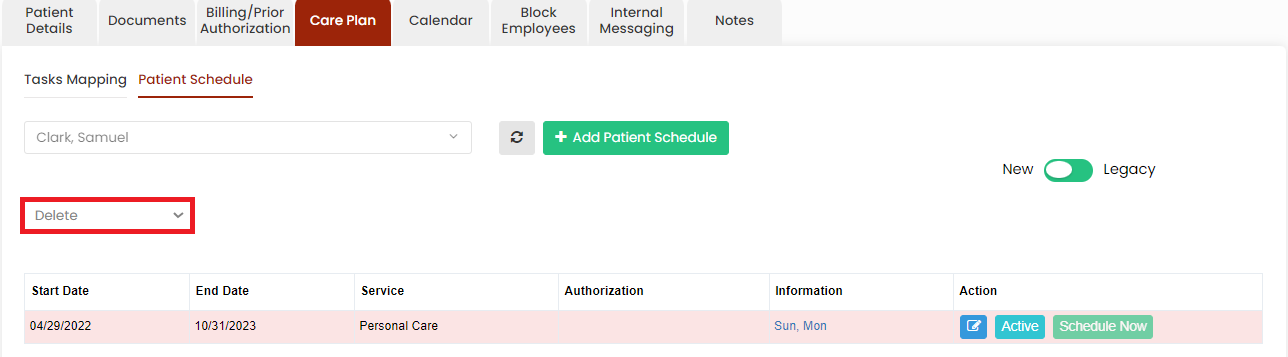](https://support.myezcare.com/uploads/images/gallery/2023-10/7zFimage.png) The user can also Activate the Deleted schedules by using the option Active. [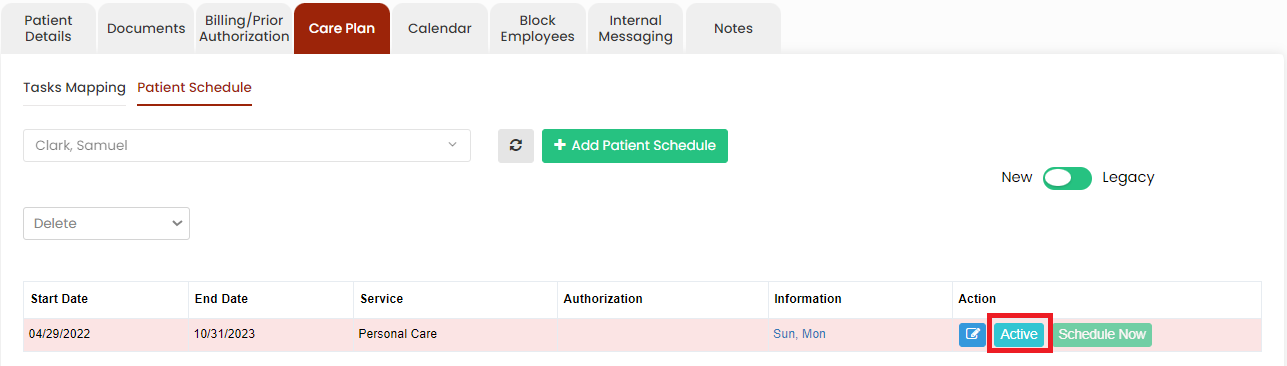](https://support.myezcare.com/uploads/images/gallery/2023-10/iKJimage.png) # Calendar, Block Employees ### Calendar The user can view the Patient calendar for their scheduled visits. The Patient calendar has the details of the employee name, Care type and the scheduled time.**Client >> Calendar**
[](https://support.myezcare.com/uploads/images/gallery/2023-10/vojimage.png) Select the Patient name, Month and Click Search option to view the Patient Calendar for the month. [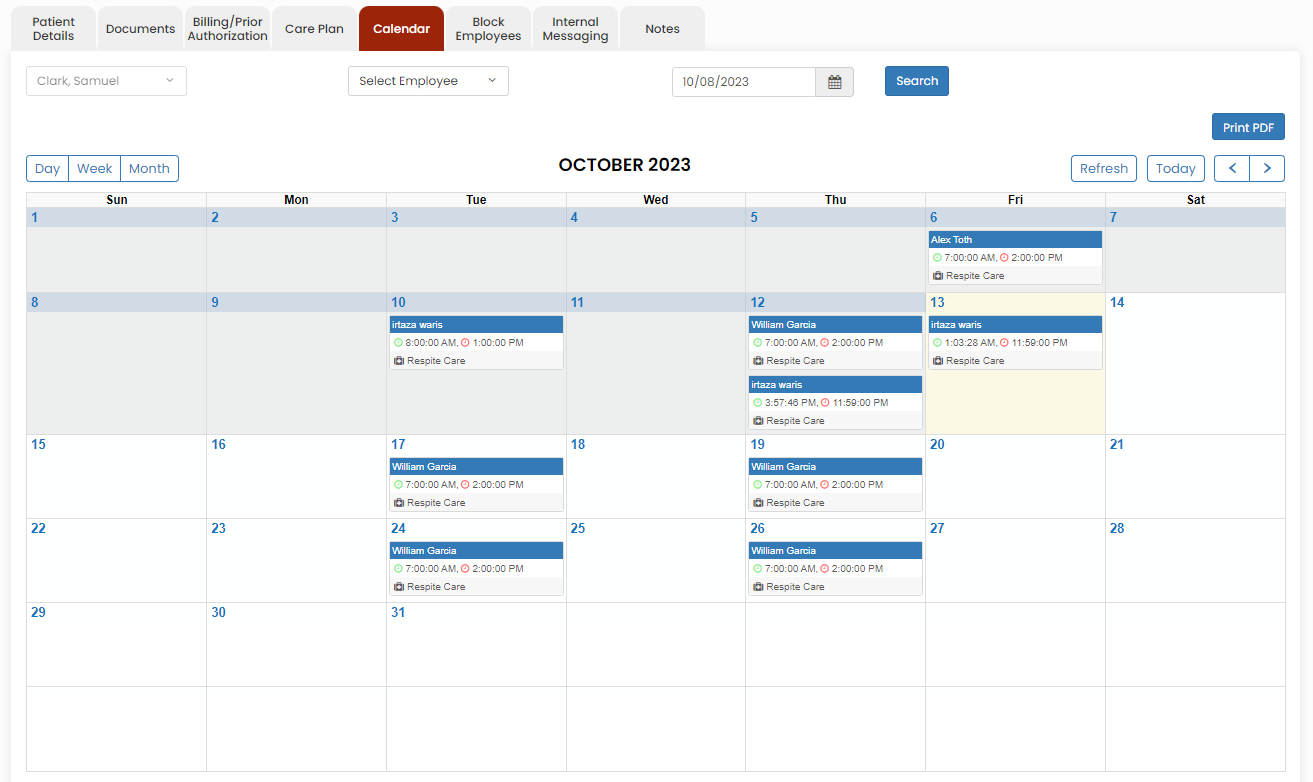](https://support.myezcare.com/uploads/images/gallery/2023-10/Ndeimage.png) ### Block employees Block Employee is a feature where the patient does not want a certain employee to visit him/her, they can be blocked using this option.**Client >> List >> Select Employee Name >> Block Employees.**
[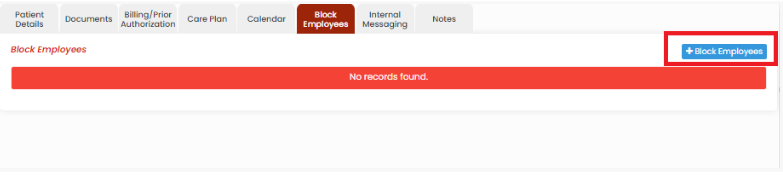](https://support.myezcare.com/uploads/images/gallery/2023-10/9YQimage.png) Update the Employee Name, Blocking requested by and the Blocking reason in the system. Click Save option to save the information. [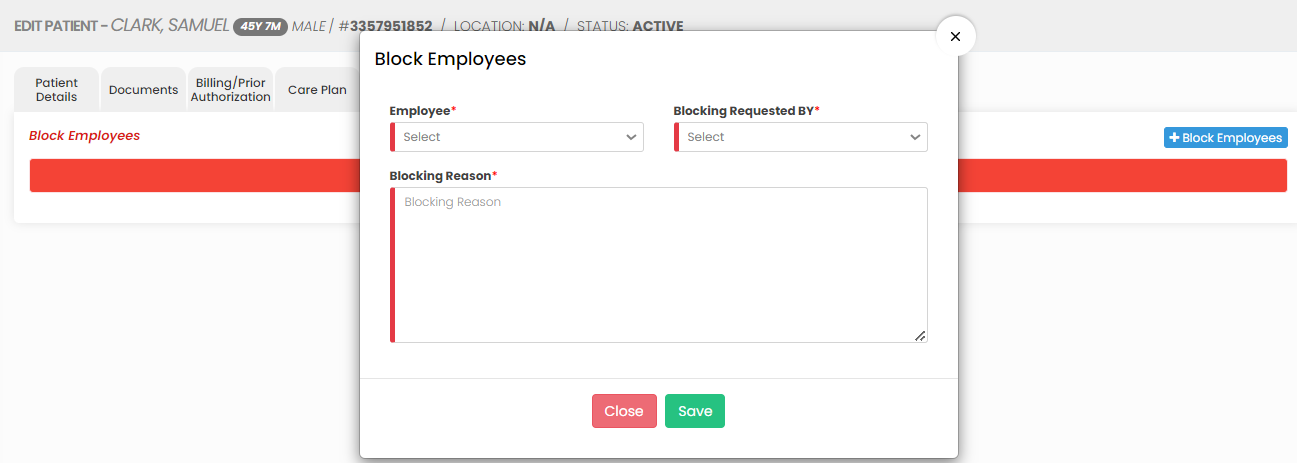](https://support.myezcare.com/uploads/images/gallery/2023-10/ccKimage.png) Click Delete option under Action to Delete the Block Employees details in the system. [](https://support.myezcare.com/uploads/images/gallery/2023-11/P2Oimage.png) # Internal Messaging / Notes Internal messaging tools enable caregivers, nurses, and administrators to coordinate patient care, share vital information, and manage schedules efficiently. ### Internal Messaging The Internal Messaging option is used to send internal messages from the patient to the employee. The user has to click +Add New Message option to send the messages.**Client >> List >> Select Patient from List >> Internal Messaging**
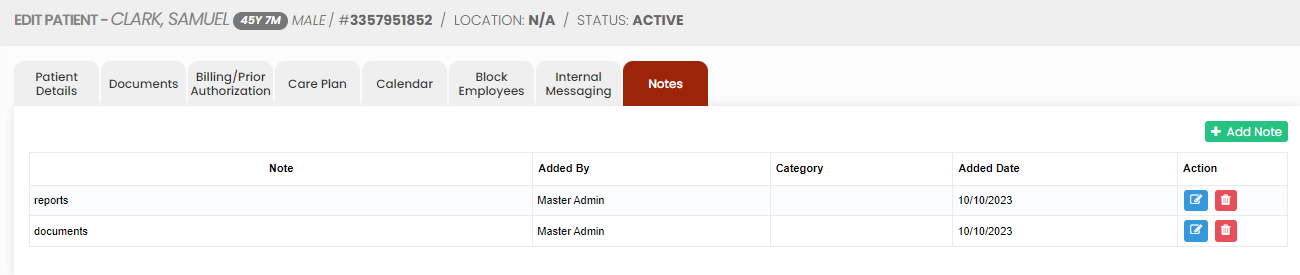
[](https://support.myezcare.com/uploads/images/gallery/2023-10/VPJimage.png) Select the Employee name and enter the message for the employee in the system. Click Save option to send the message. [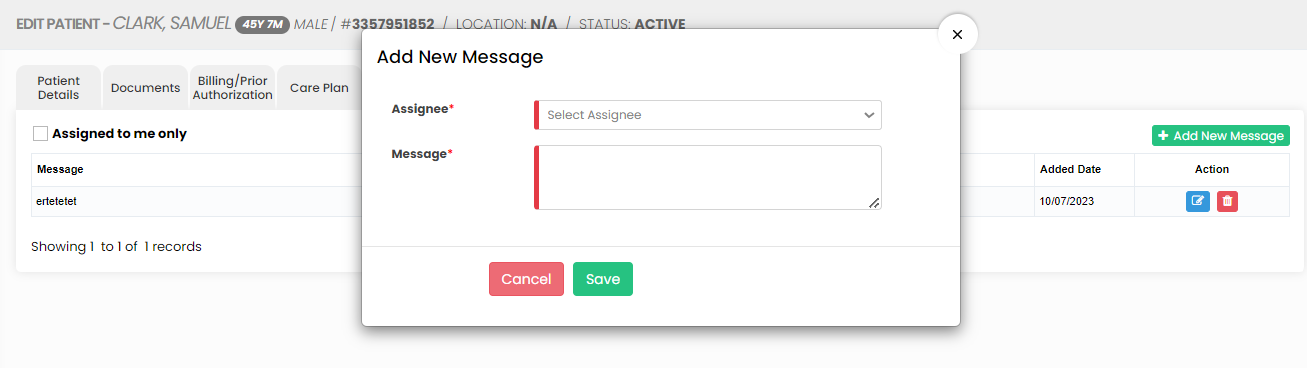](https://support.myezcare.com/uploads/images/gallery/2023-10/v8pimage.png) ### Notes The Notes Tab is used to update the internal notes for the patient in the system. Click +Add Note option to enter the notes.**Client >> List >> Select Patient from List >> Notes**
[](https://support.myezcare.com/uploads/images/gallery/2023-10/viXimage.png) Now, update the notes for the patient and click Save option. [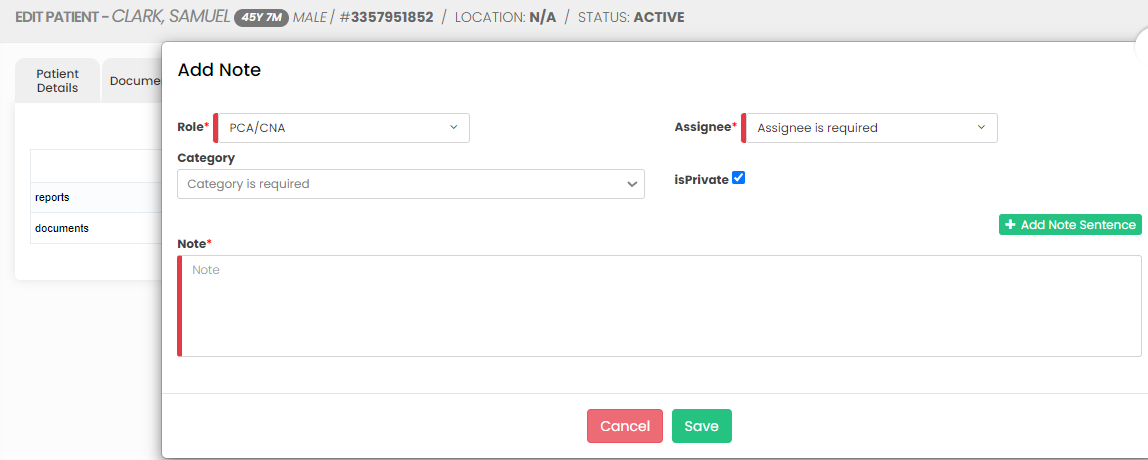](https://support.myezcare.com/uploads/images/gallery/2023-10/tOrimage.png) Click Delete option under Actions in the system to Delete the Notes. [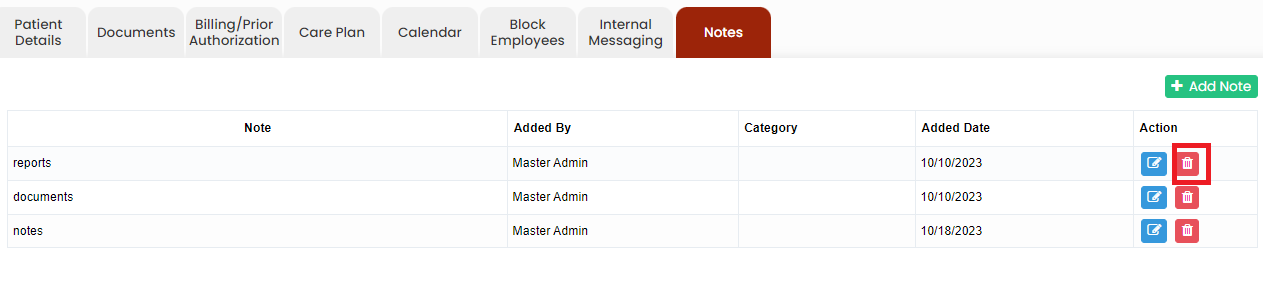](https://support.myezcare.com/uploads/images/gallery/2023-11/tREimage.png) # Client List The Client List contains the list of homecare patients in the system.**Client >> List**
#### Referral Details Click the option  in client list before each patient name to view the referral details of the patient in the system. [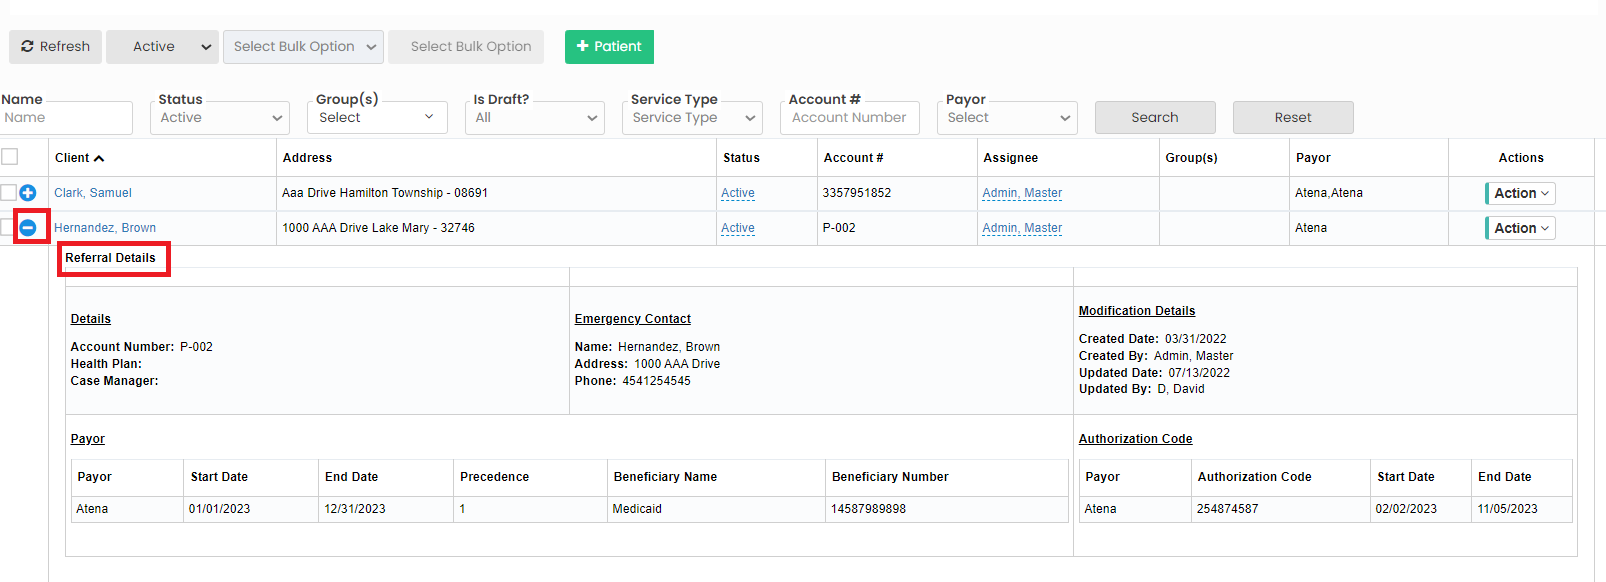](https://support.myezcare.com/uploads/images/gallery/2023-10/GPcimage.png) #### Delete Patient The Patient can be deleted from the system by using the option Disable Selected in Patient List. Select the Patient name by using the check box and click Disable Selected option. [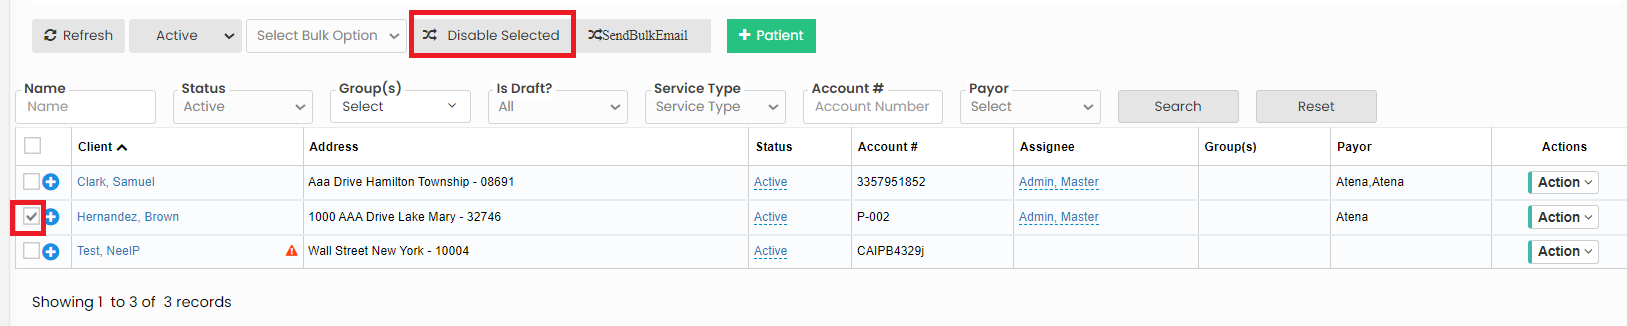](https://support.myezcare.com/uploads/images/gallery/2023-10/7KXimage.png) **Restore Deleted Patient** The Deleted Patient can be activated by using the option Enable Selected in Deleted Patient List. Select the Patient name by using the check box and Click Enable Selected option. [](https://support.myezcare.com/uploads/images/gallery/2023-10/Nw3image.png) #### Bulk update Patient Group The user can bulk update the patient group by using the option Set Bulk Group in patient list. Select the Patient name by using the check box and click Group under Select bulk option. Now select the Group code to be updated and click Set Bulk Group in patient list. Likewise we can Bulk update Assignee and Status for the patient. [](https://support.myezcare.com/uploads/images/gallery/2023-10/9QIimage.png) #### Features under Action The following features are uploaded for the patient under Action in client list. - Edit - Delete - Client Face Sheet - Incident Report - Add Notes - Vital Sign Tracking [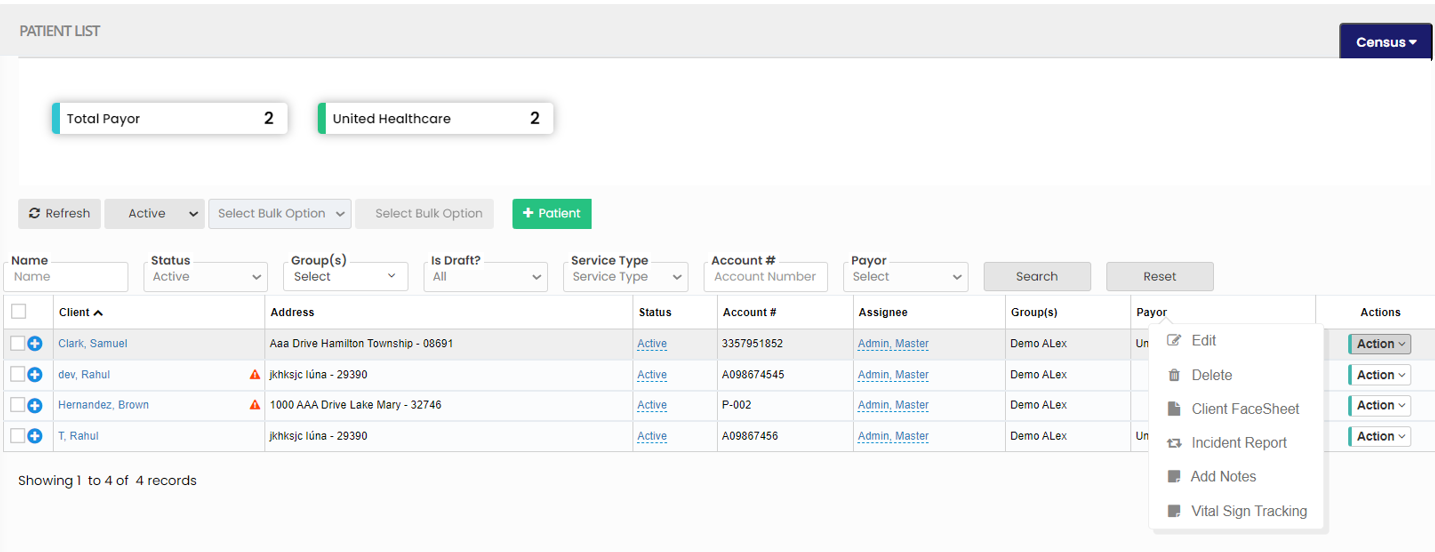](https://support.myezcare.com/uploads/images/gallery/2023-10/yF8image.png) The forms updated in Client Face sheet, Incident Report and Vital Sign Tracking are uploaded in Face Sheet folder under patient documents. #### Census The number of Payor for the list of patients can be viewed by using the option Payor under Census. [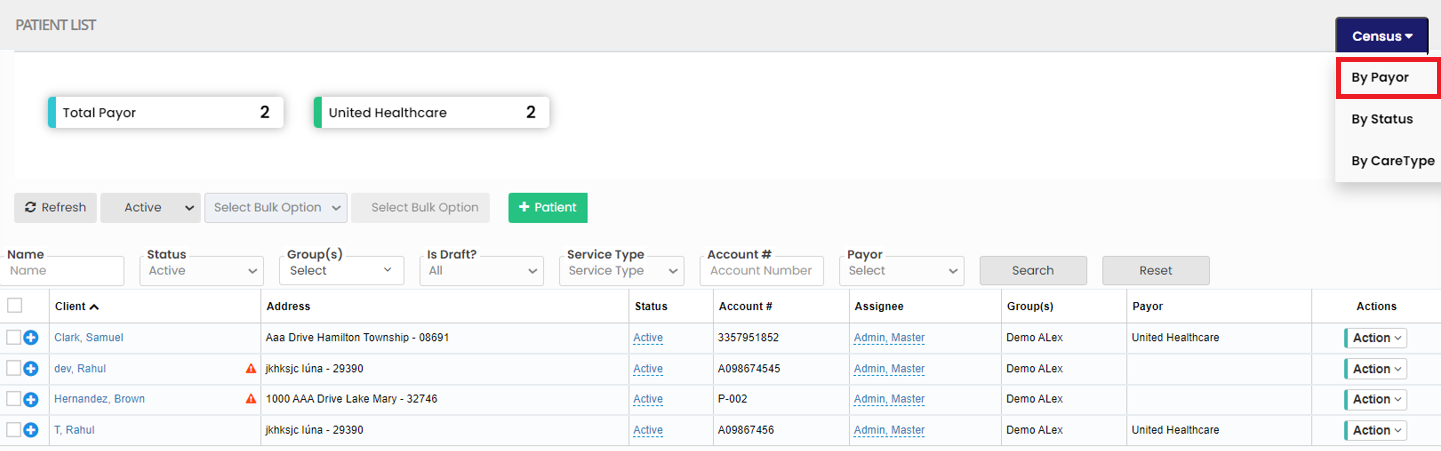](https://support.myezcare.com/uploads/images/gallery/2023-10/la3image.png) The number of patients according to their Status can be viewed by using the option By Status in Census. [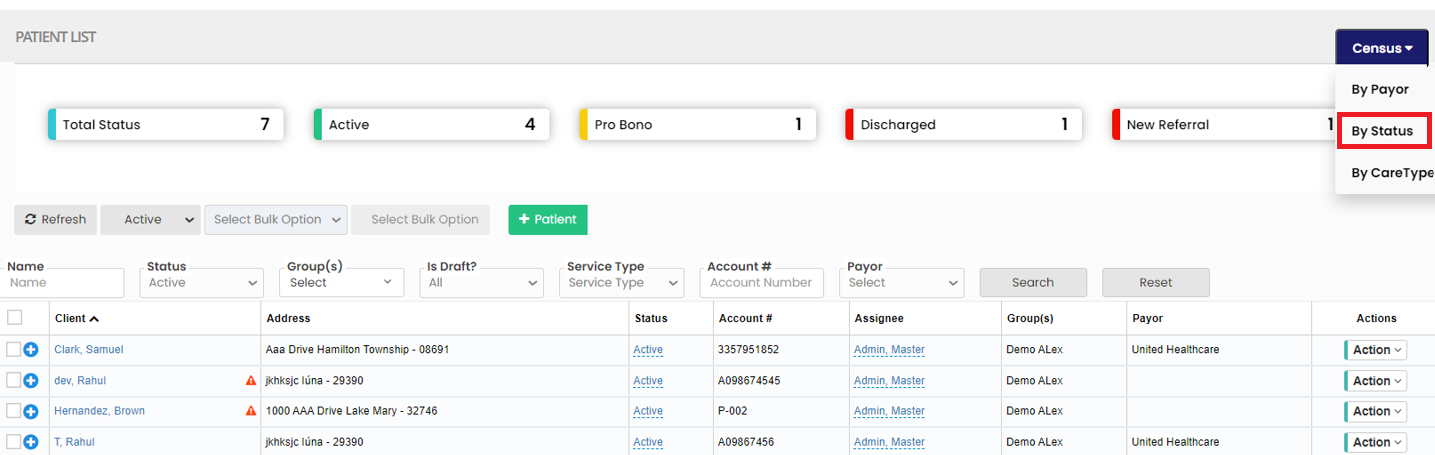](https://support.myezcare.com/uploads/images/gallery/2023-10/7FAimage.png) The user can sort the number of patient in the list according to their Care type by using the option By Care Type in Census. [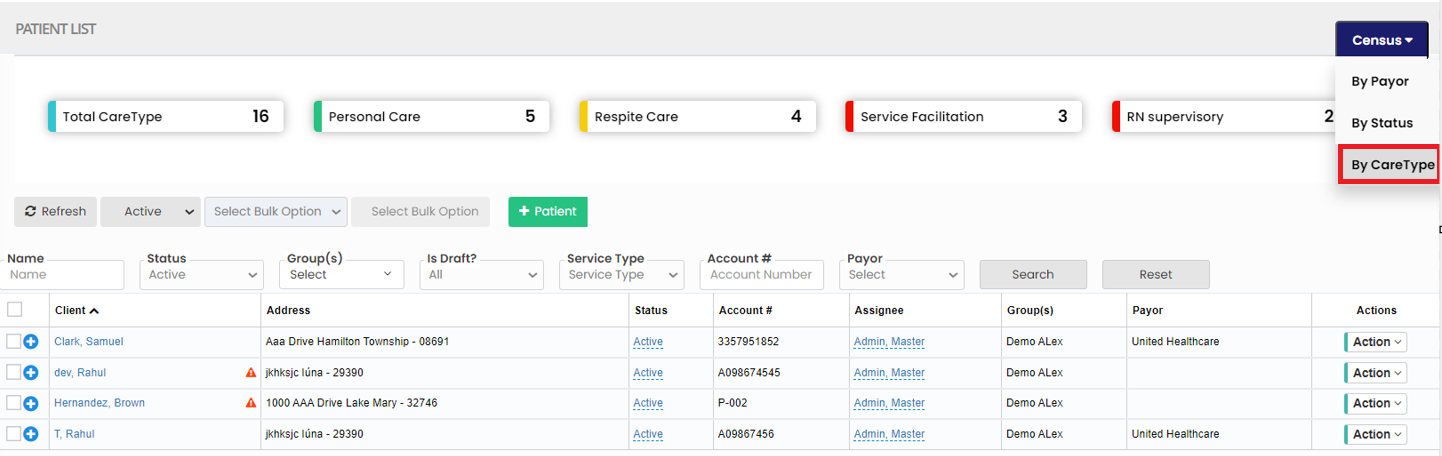](https://support.myezcare.com/uploads/images/gallery/2023-10/g22image.png) ### Bulk Upload Prior AuthClients >> Clients List
[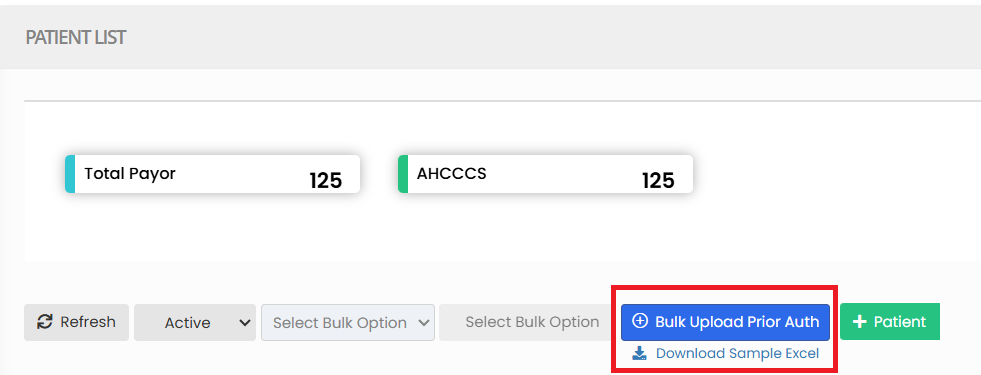](https://support.myezcare.com/uploads/images/gallery/2025-06/LZx8jgIhzxditUWS-image.png) - Download Template: The system provides a standard Excel template format with required fields (e.g., Patient ID, Authorization Number, Start Date, End Date, Units, Payer, etc.). - Fill in Data: Users populate the Excel file with the necessary authorization details. - Upload File: The completed file is uploaded into the system through the Bulk Upload interface. # Scheduling Scheduling in home healthcare refers to the process of planning and organizing the delivery of healthcare services to patients in their own homes. This involves creating a structured timetable for healthcare professionals, such as nurses, therapists, and caregivers, to visit patients and provide the necessary medical, or supportive care. # Calendar A scheduling calendar is used to manage and coordinate appointments, visits, and care plans for patients in their homes. A scheduling calendar typically displays dates in a monthly or weekly grid format, with each day divided into time slots. This makes it easy to view and plan activities over a specific time frame.**Scheduling Tab >> Calendar**
The user can view the schedules of all the patients in this calendar. [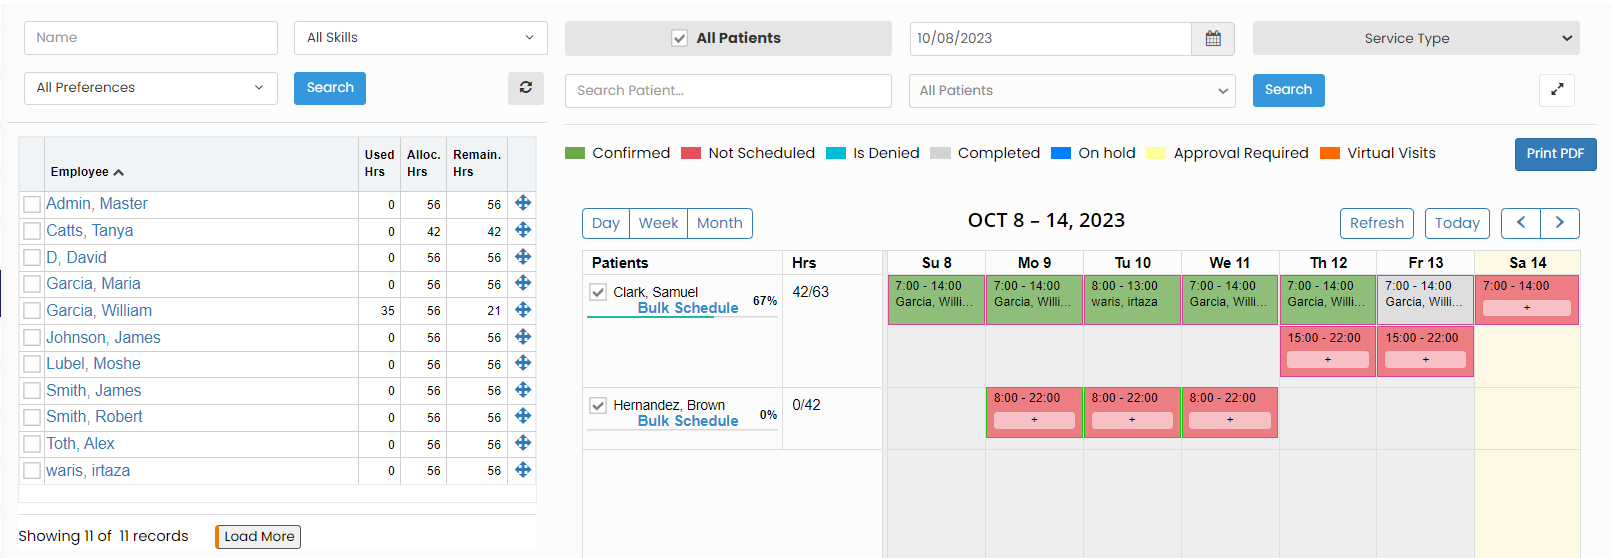](https://support.myezcare.com/uploads/images/gallery/2023-10/V5rimage.png) The color in the calendar represents whether the schedules has been completed, confirmed, not scheduled, etc., as per the color indicator above the calendar on the screen. ### Change Schedule For changing the schedules for any particular day, the user can click on the schedule time, the following screen appears, Click Change Schedule option. [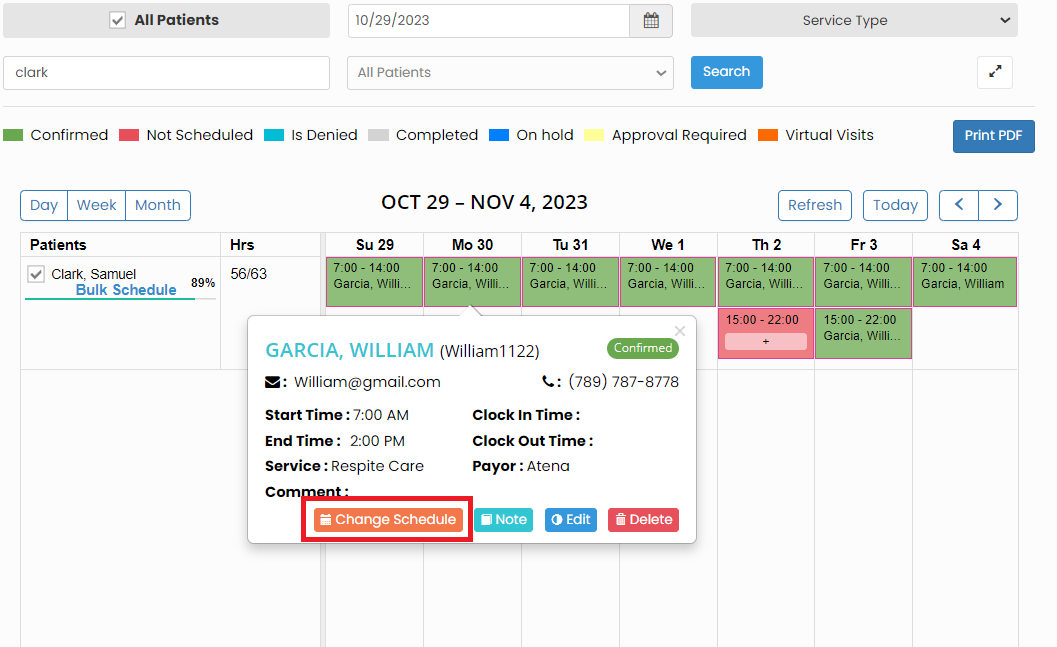](https://support.myezcare.com/uploads/images/gallery/2023-10/oQRimage.png) Now, change the Employee name and the scheduled time if required and click Save option. [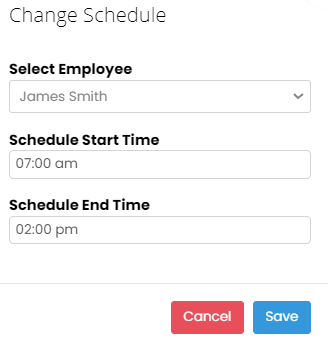](https://support.myezcare.com/uploads/images/gallery/2023-10/Oibimage.png) The selected Employee is now scheduled with the patient for the particular day and notification will be sent to the Employee. [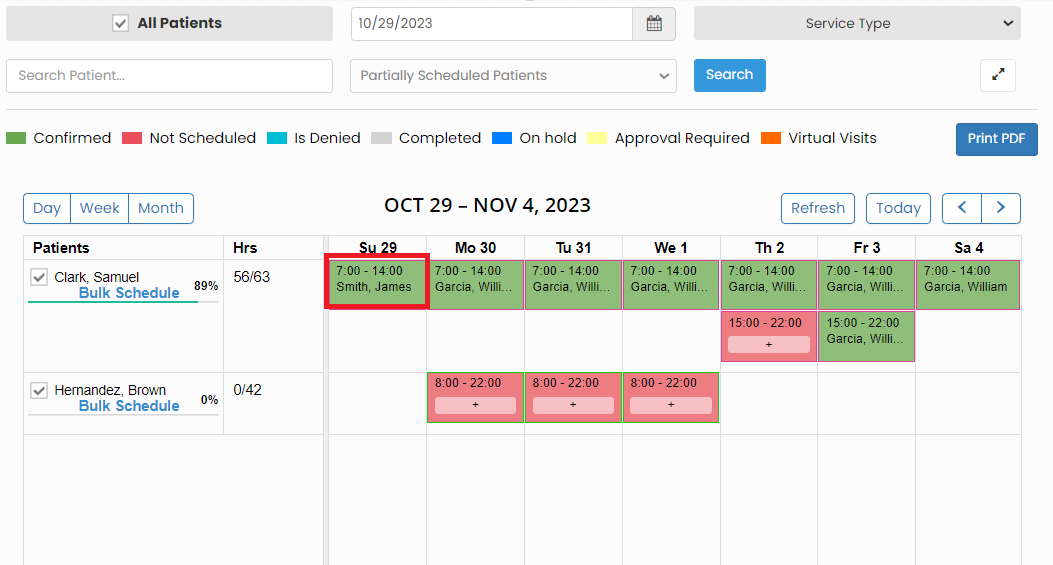](https://support.myezcare.com/uploads/images/gallery/2023-10/Z0Himage.png) ### Patient Denied Service**Scheduling Tab >> Calendar**
The patient denied service can be updated in the Scheduling calendar by simply clicking on the schedules of the day. The following screen appears, click Note option. [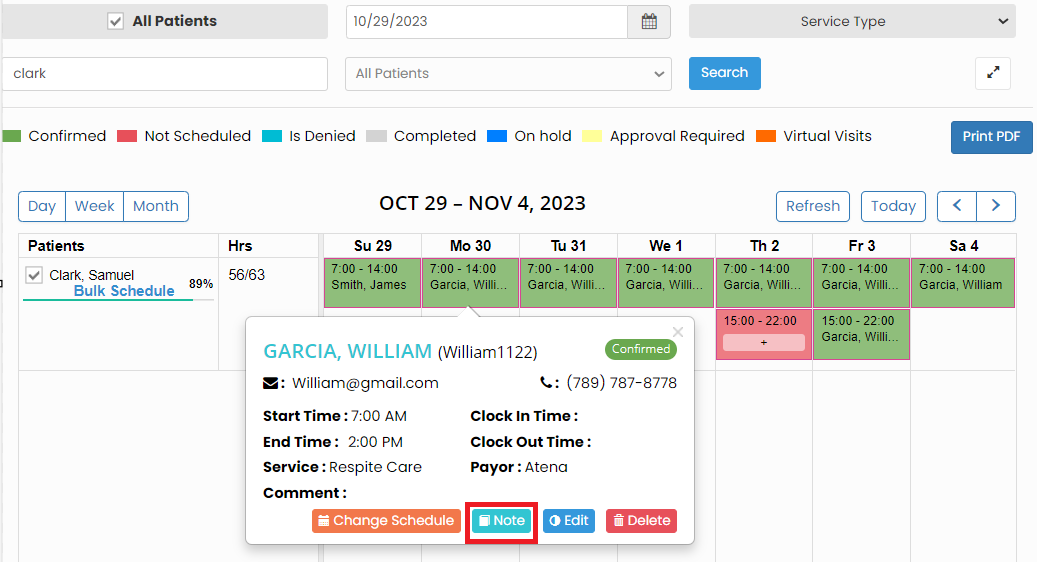](https://support.myezcare.com/uploads/images/gallery/2023-10/6j4image.png) Now, click on the check box and update the Note for the denied service and click save option. [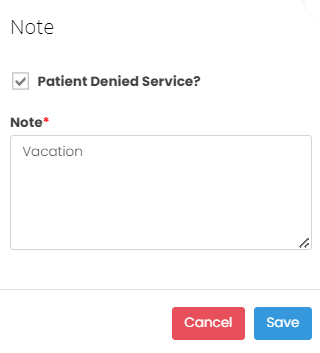](https://support.myezcare.com/uploads/images/gallery/2023-10/5TZimage.png) The patient denied service details has been updated in the Scheduling calendar and we can view the details as Do not Schedule on the particular day. [](https://support.myezcare.com/uploads/images/gallery/2023-10/nDHimage.png) ### Delete Schedule**Scheduling Tab >> Calendar**
The Schedules for a particular day can be deleted in the system. Click on the schedule, the following screen appears, click Delete option. [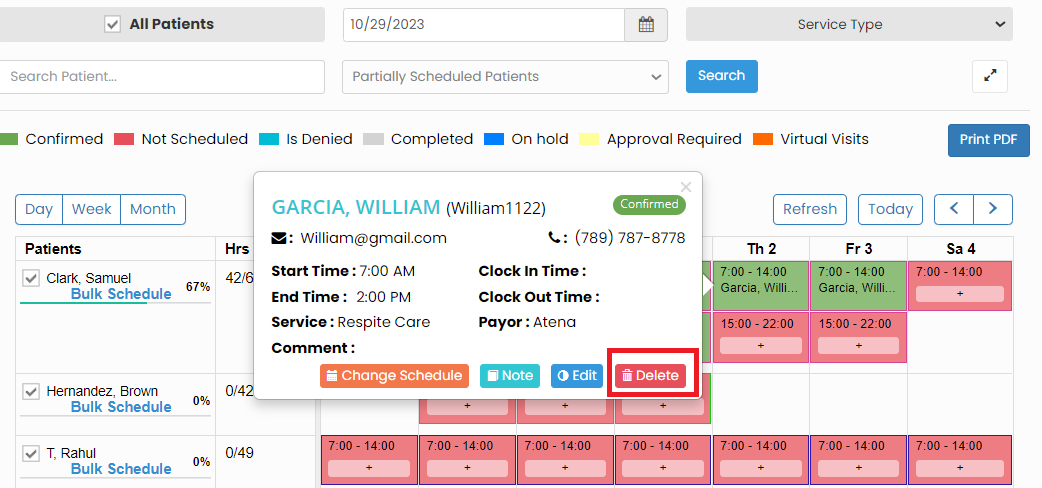](https://support.myezcare.com/uploads/images/gallery/2023-10/W7limage.png) The schedule with the employee gets deleted from the Timeslot and we can reassign the schedules to different employee in the system. [](https://support.myezcare.com/uploads/images/gallery/2023-10/qpmimage.png) # Nurse Calendar A nurse calendar is a tool for managing the schedules of home care nurses. It helps to coordinate patient visits, track medication schedules, and plan caregiver shifts. This calendar ensures timely and personalized care for patients in the comfort of their homes while optimizing nurse staffing.Note: All Fields marked with \* are mandatory and must be filled out, otherwise the system will generate an error indicating that the required information is missing.
### Adding Nurse Schedule**Scheduling >> Nurse Calendar**
Click Add Schedule option to update the schedule for the Nurse on the calendar. [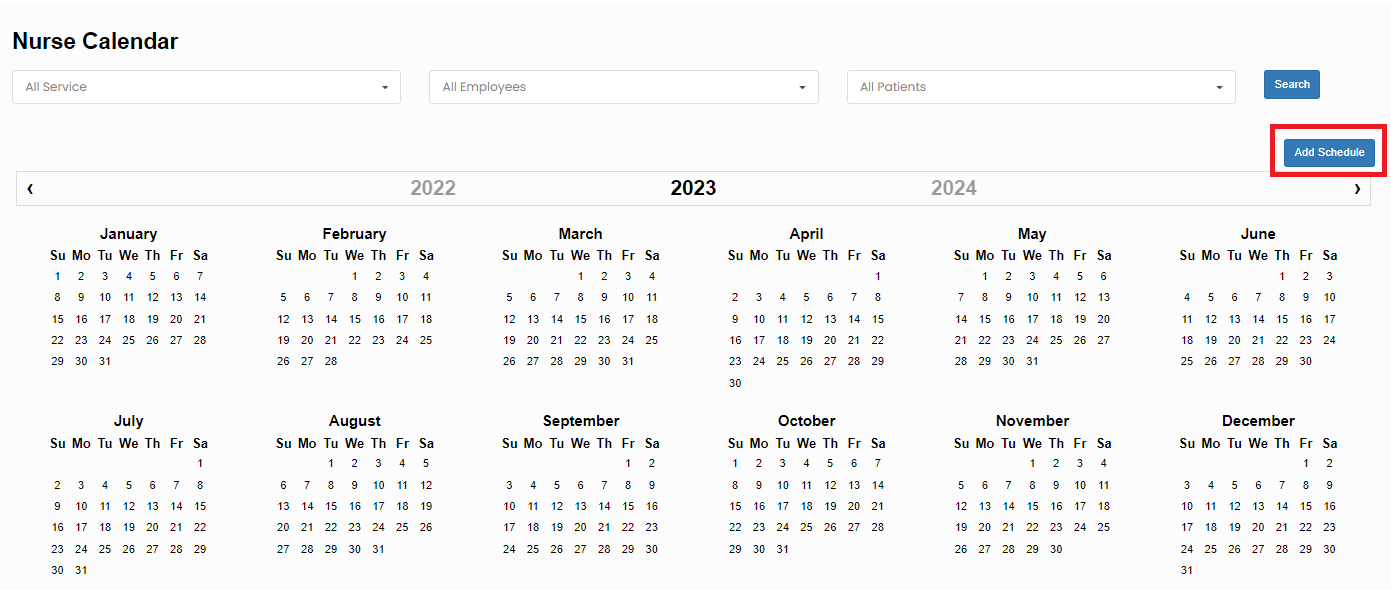](https://support.myezcare.com/uploads/images/gallery/2023-10/XJkimage.png) Now the following screen appears, update the required information and click Save option. The details of the Visit will be updated in the Nurse calendar. [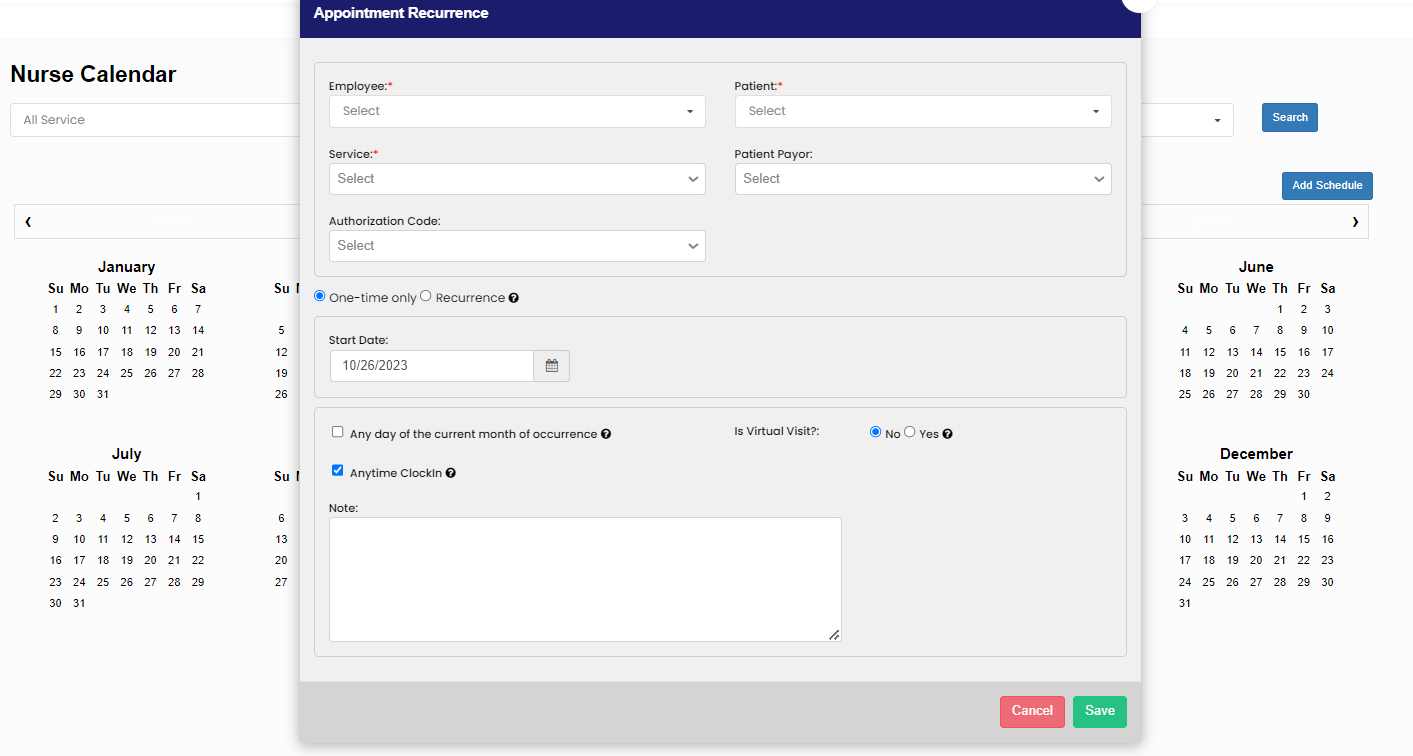](https://support.myezcare.com/uploads/images/gallery/2023-10/1bEimage.png) # Schedule Log A Schedule Log is a structured record keeping system that tracks confirmed schedules of the patient. It includes patient details, care type, caregiver details and the dates of confirmed schedules. ### View Confirmed Schedule**Scheduling >> Schedule Log**
The user can view the list of confirmed schedules of the patients in the system. [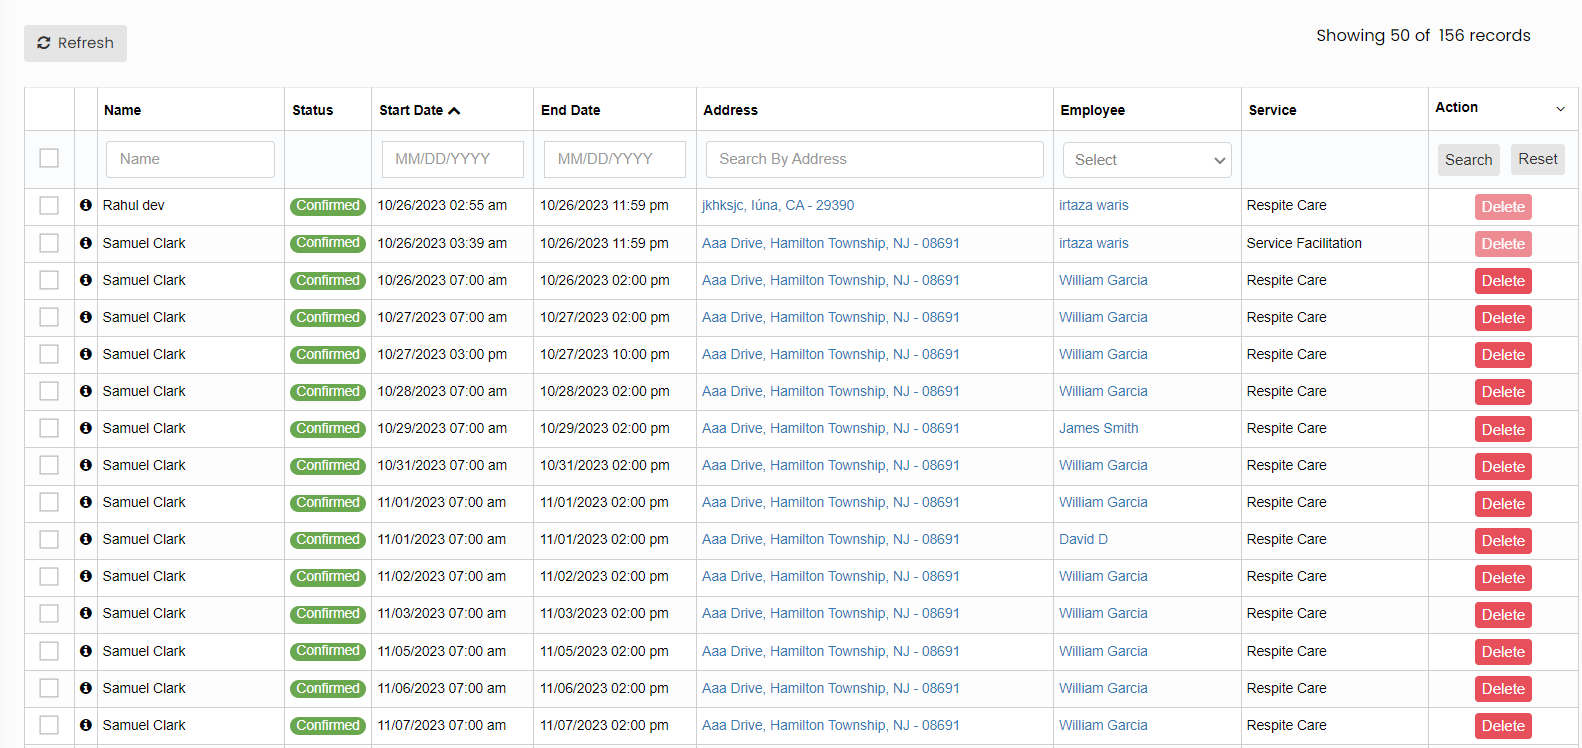](https://support.myezcare.com/uploads/images/gallery/2023-10/SY8image.png) ### Delete Schedule**Scheduling >> Schedule Log**
To delete the schedules in the Schedule Log, click on checkbox of the schedules and click Delete option. [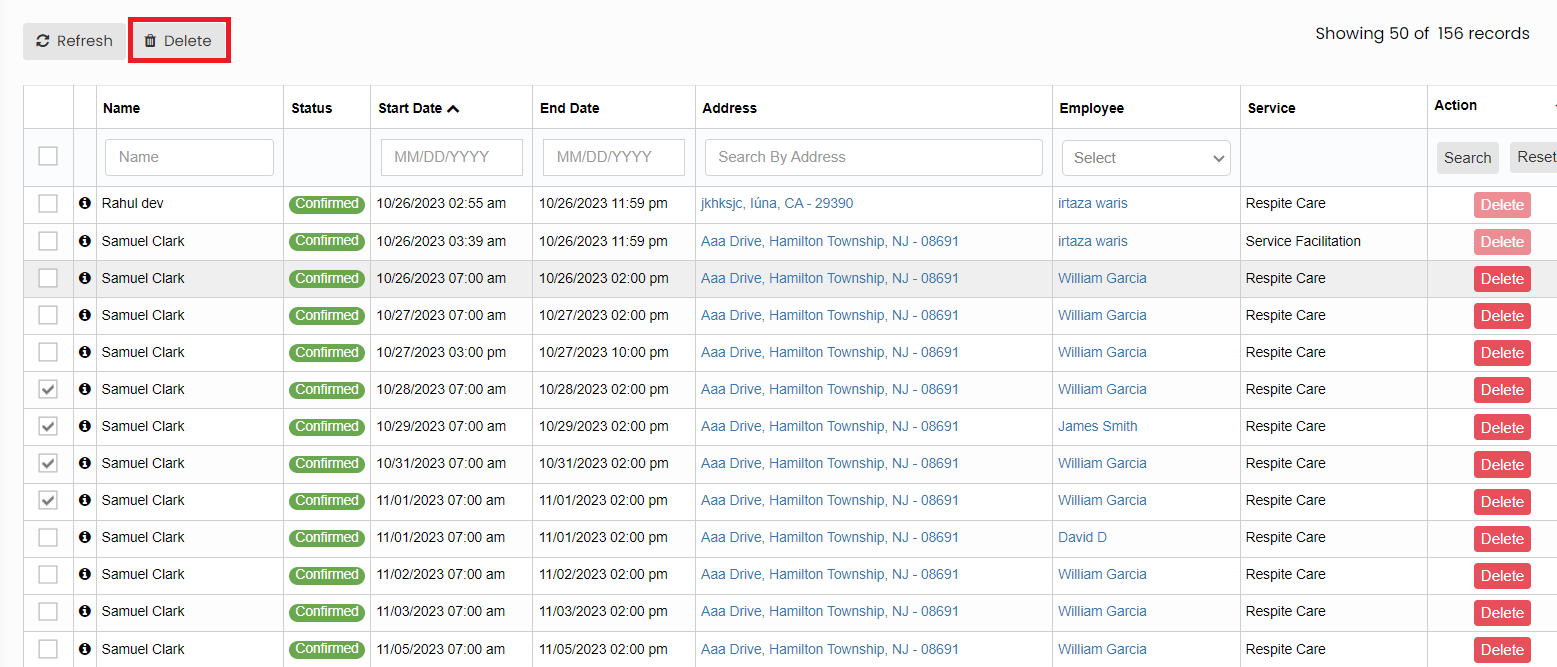](https://support.myezcare.com/uploads/images/gallery/2023-10/JMzimage.png) # Aggregator Log, Pending Schedules and Virtual Visit - An Aggregator log is a centralized data that collects and consolidates information from various sources, including healthcare records. It facilitates real-time monitoring, data analysis, and secure storage, helping healthcare providers make informed decisions and manage patient care effectively. - Pending schedules refer to planned patient visits and tasks waiting for completion. Proper management of these schedules is crucial for ensuring timely and effective care for patients in their homes. - A virtual visit is a remote healthcare consultation using digital technology, like video conferencing. It allows professionals to assess, consult, and educate patients in their homes. Virtual visits enhance accessibility and reduce the need for in-person appointments, benefiting those with mobility constraints or remote locations. ### Aggregator Log**Scheduling >> Aggregator Logs**
To view the Visit Status, enter the Patient name, Start Date, End Date and the Aggregator Name in the system and click search option. [](https://support.myezcare.com/uploads/images/gallery/2023-10/oN6image.png) The following screen appears, and we can view the status of the Visits. [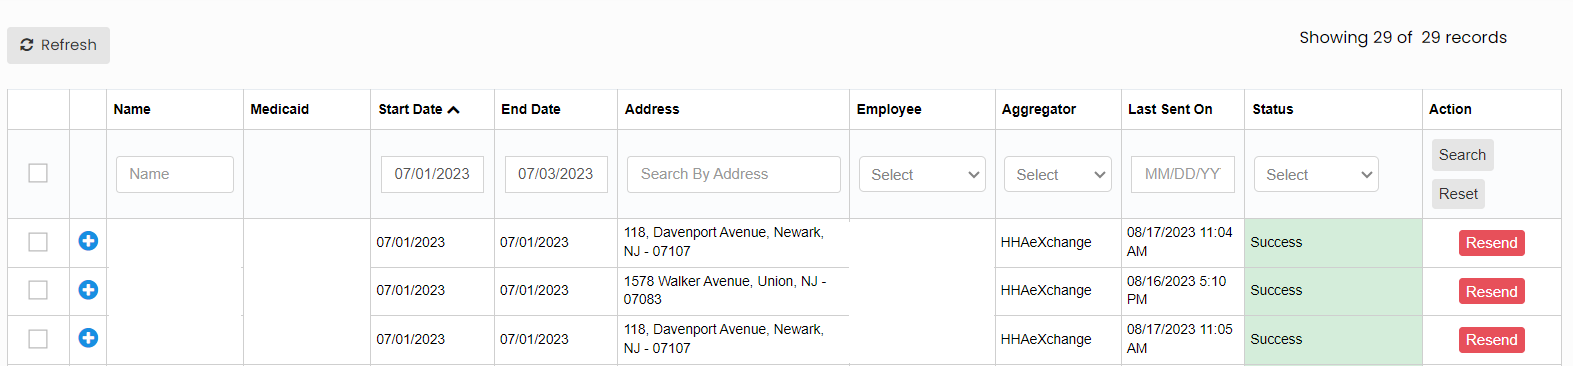](https://support.myezcare.com/uploads/images/gallery/2023-11/70kimage.png) If the Status of the Visit is failed, then check for the reason and make necessary correction in the system and Resend the claims. [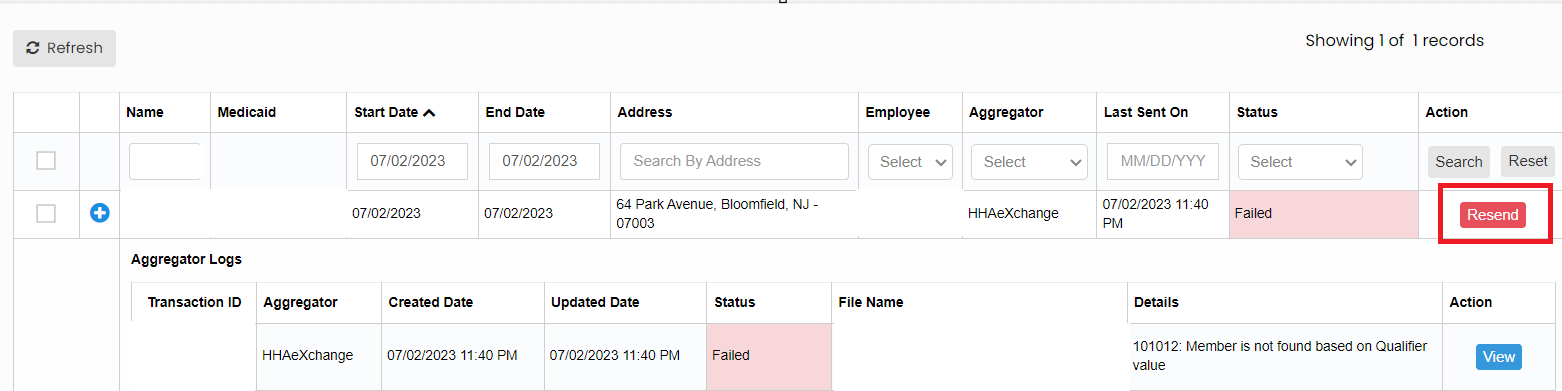](https://support.myezcare.com/uploads/images/gallery/2023-11/7ldimage.png) ### Pending Schedules**Scheduling >> Pending Schedules**
To view the pending schedules, enter the patient name, employee name and click Search option. [](https://support.myezcare.com/uploads/images/gallery/2023-10/iD0image.png) ### View Virtual Visits**Scheduling >> Virtual Visits**
The user can view the Future Visits, Past Visits and Today's Virtual Visit of the patient in the system. [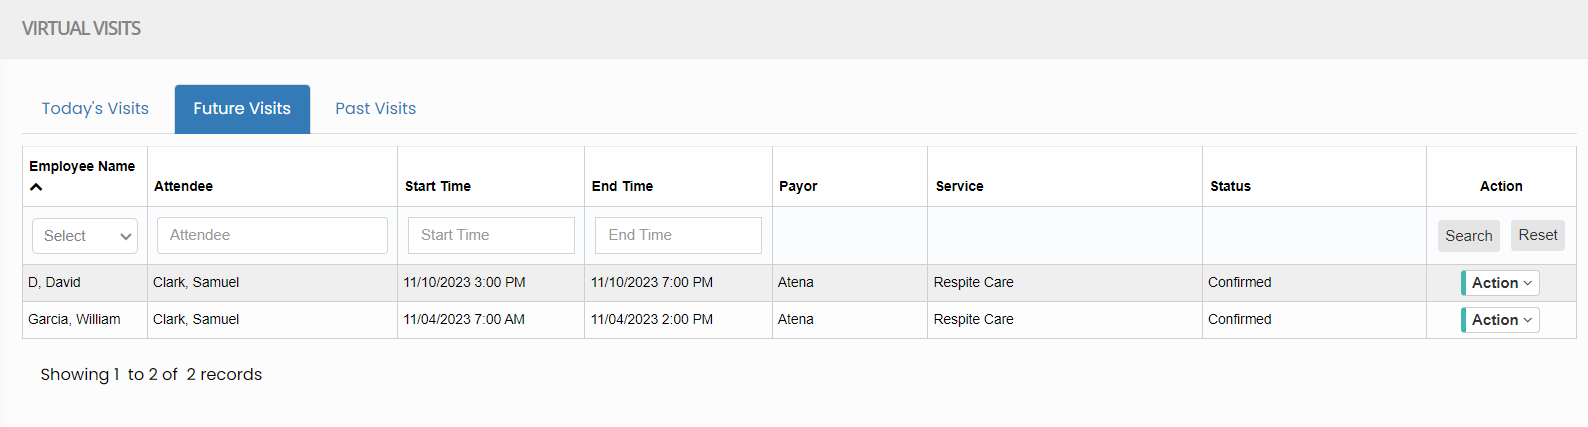](https://support.myezcare.com/uploads/images/gallery/2023-10/tirimage.png) Click Action on the right side of screen. The list of Action will appear to Send SMS Reminder, Send Email Reminder, Change Schedule, Cancel Visit and View Note. [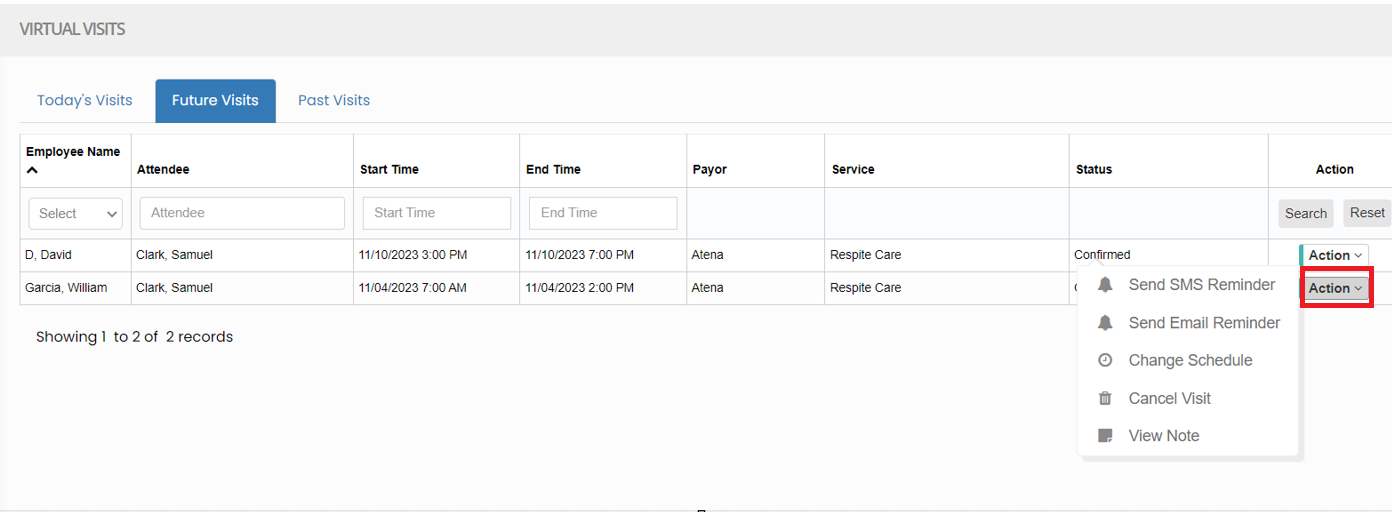](https://support.myezcare.com/uploads/images/gallery/2023-10/SSzimage.png) Click Change Schedule option to change the Employee for the Virtual Visit. Select the Employee from list and update the Start time and End time of the schedule and Click Save option. To Delete the Virtual visit of the patient select the option Cancel Visit under Action. [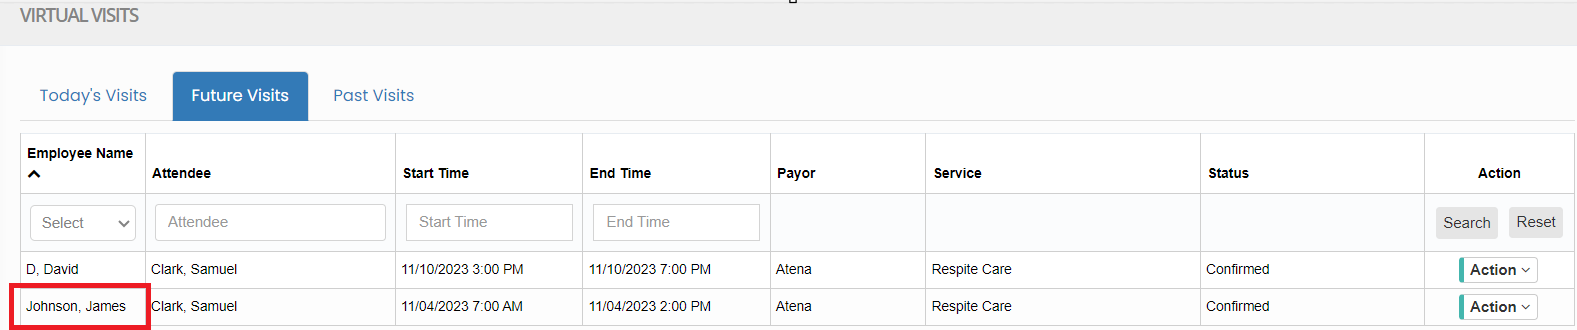](https://support.myezcare.com/uploads/images/gallery/2023-10/WdXimage.png) # TimeSheet A timesheet is used to track the hours worked by caregivers, while providing care to patients in their homes. It records Clock-in time and Clock-out time of the visits, Task activities performed by the caregiver, Patient details, Authorization details etc., # Employee Billing Report Employee billing hours refer to the number of hours worked by caregivers providing services to patients in their homes. These hours are vital for calculating employee compensation, compliance with labor laws, and accurate documentation of care, ensuring proper reimbursement and quality patient care.**Timesheet >> Employee Billing Report**
To run the Employee Billing Report, the user can select the Employee from list and update the Start Date and End Date and click Search option. The Employee working hours, Over time hours and pay details can be viewed in this screen. [](https://support.myezcare.com/uploads/images/gallery/2023-10/49Qimage.png) The user can set the Pay Frequency for paying the Employee for their visits in the system. Click Pay Frequency dropdown option and select the Pay Frequency. [](https://support.myezcare.com/uploads/images/gallery/2023-10/nnWimage.png) # Visit Report A Visit Report is a digital record summarizing a caregiver's visit to a patient's home. It includes essential data such as date, time, tasks performed, patient information, payor information and billed amount for the Visit.**Scheduling >> Visit Report**
The user can view the Visit Report of the patient in this screen. The filter options helps to get the data of the Visit report accurately. [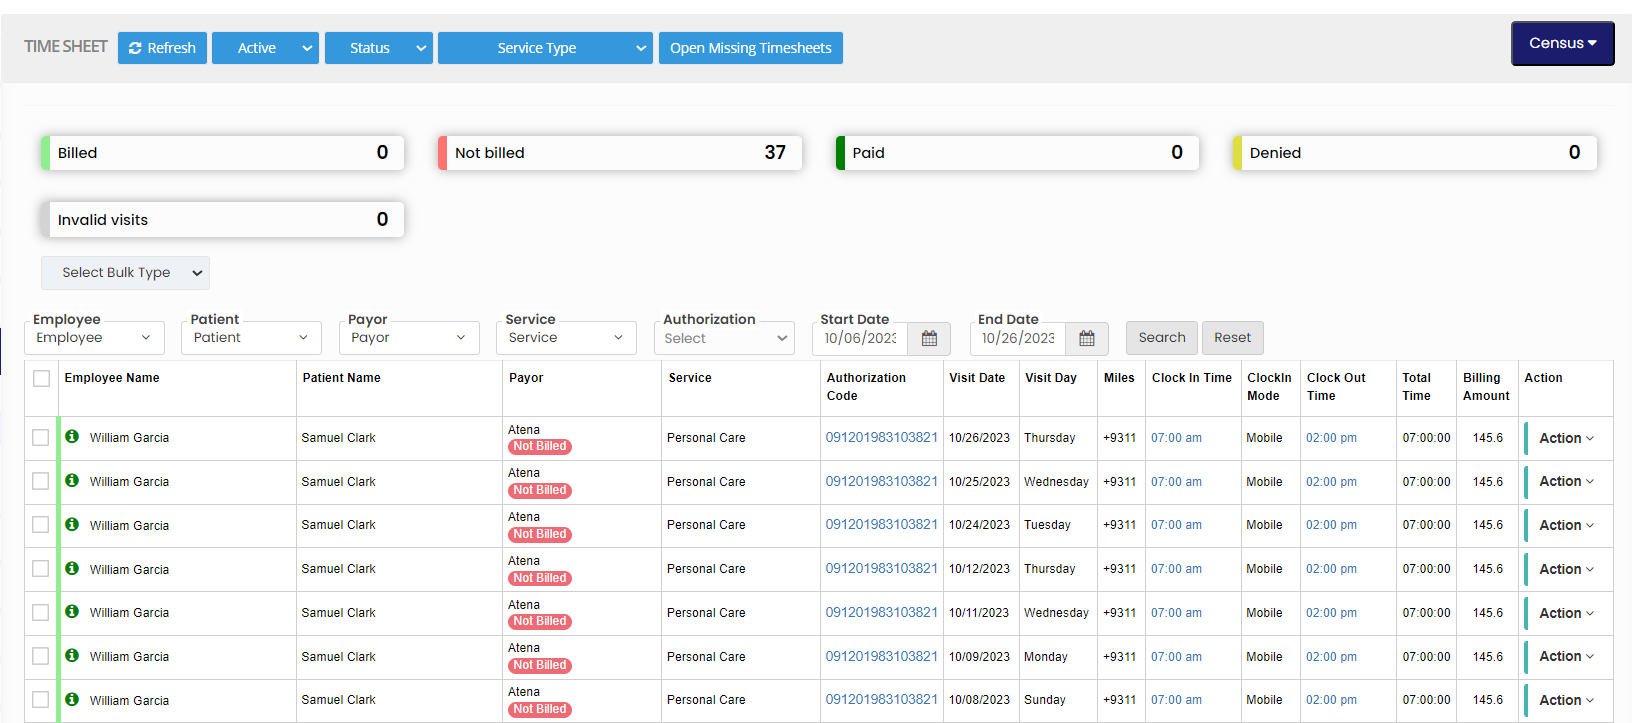](https://support.myezcare.com/uploads/images/gallery/2023-10/nCJimage.png) ### Bulk Update Timesheet The user can Bulk update the Care Type, Authorization code and Payor of the patient using the option Select Bulk Type. [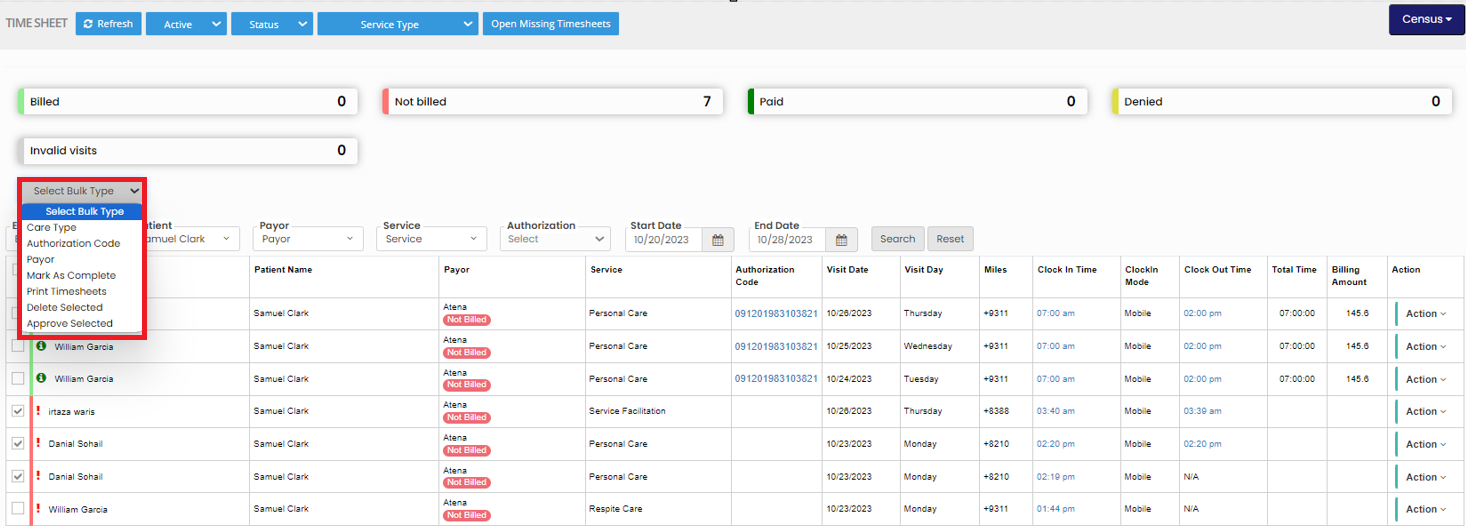](https://support.myezcare.com/uploads/images/gallery/2023-10/leeimage.png) The Timesheet can also be filtered by the Status of the Visits like Pending, Approved, Rejected, Complete and Incomplete by using the option Status. [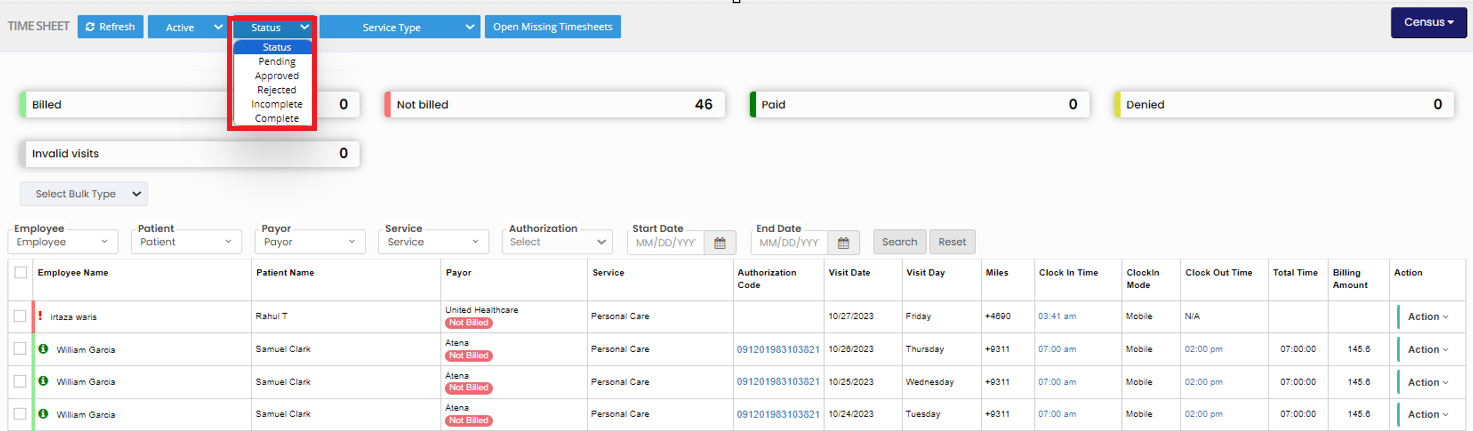](https://support.myezcare.com/uploads/images/gallery/2023-10/pjiimage.png) ### Open Missing Timesheet**Scheduling >> Visit Report**
The Missing Timesheet for the Visits can be added to the Timesheet by using the option Open Missing Timesheet option. [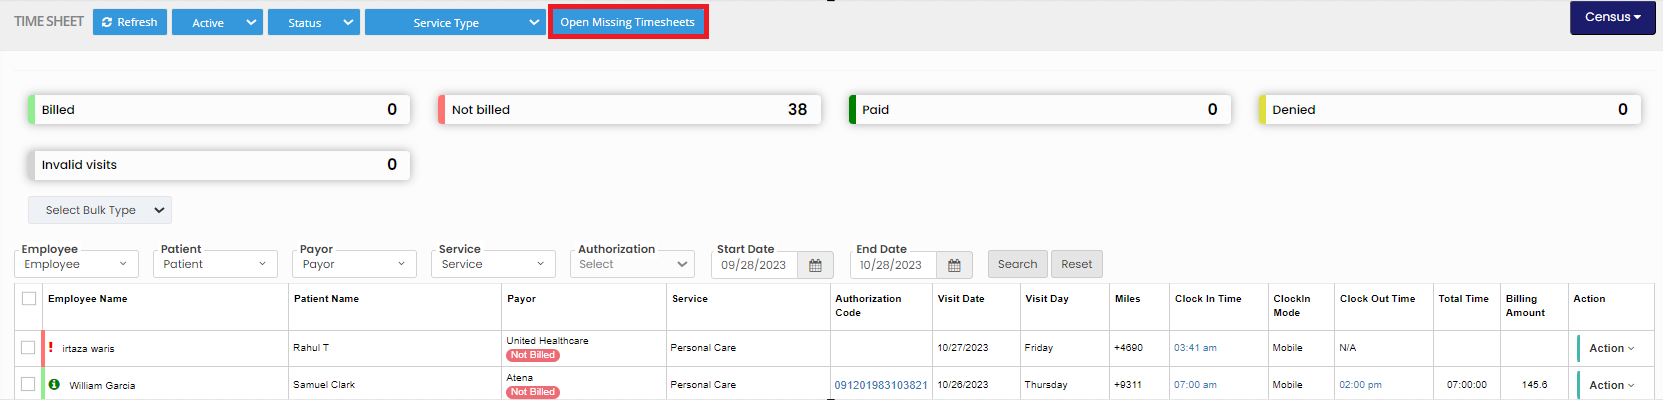](https://support.myezcare.com/uploads/images/gallery/2023-10/H6uimage.png) The following popup appears, update the Employee Name, Patient Name, Start Date, End Date and Click Search option. The list of missing Timesheet appears. [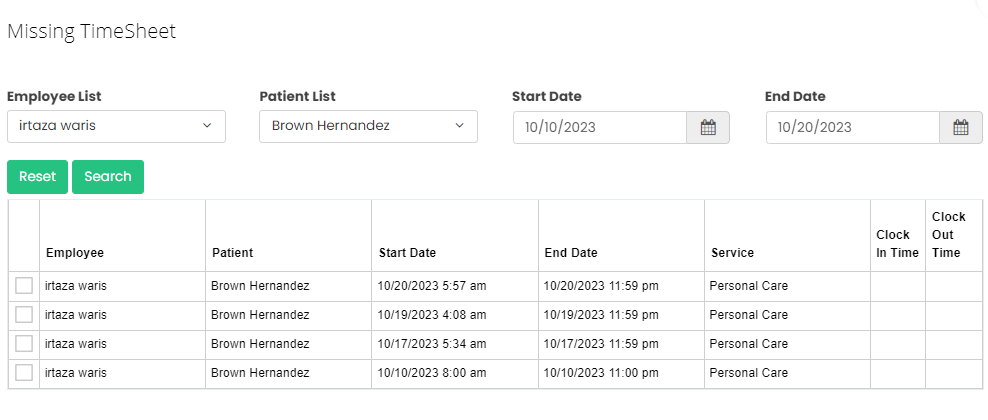](https://support.myezcare.com/uploads/images/gallery/2023-10/SPGimage.png) Now, check the check box of the Timesheet and click Add Missing Timesheet option. [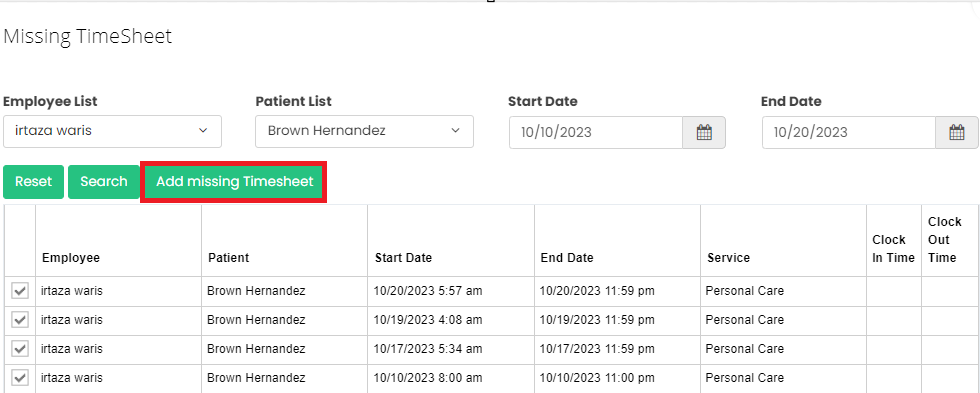](https://support.myezcare.com/uploads/images/gallery/2023-10/lFPimage.png) The Timesheet gets added in the List of Timesheet and we can edit the Timesheet with the required information. [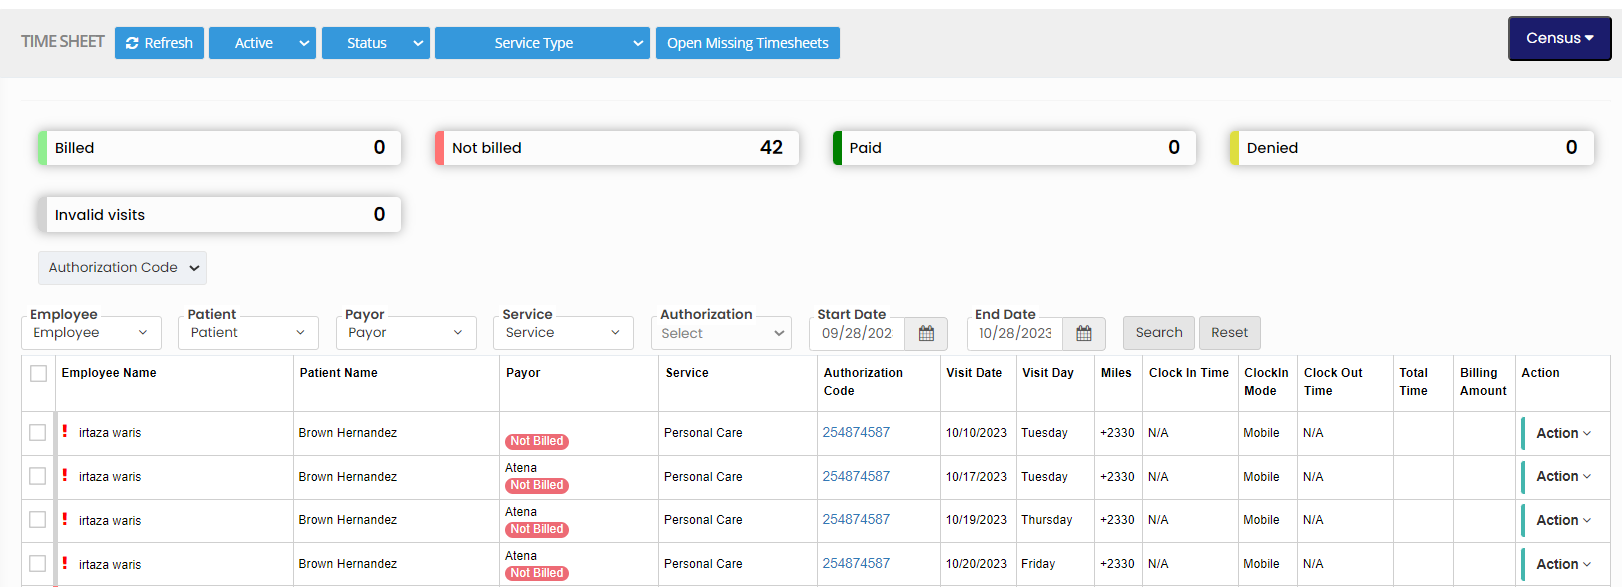](https://support.myezcare.com/uploads/images/gallery/2023-10/4vgimage.png) ### Edit Timesheet**Scheduling >> Visit Report**
Click Action button on the right side of the Visit. The popup shows the actions that can be done in the Visit Report, click Edit Timesheet option to change the information in the Visit Report. [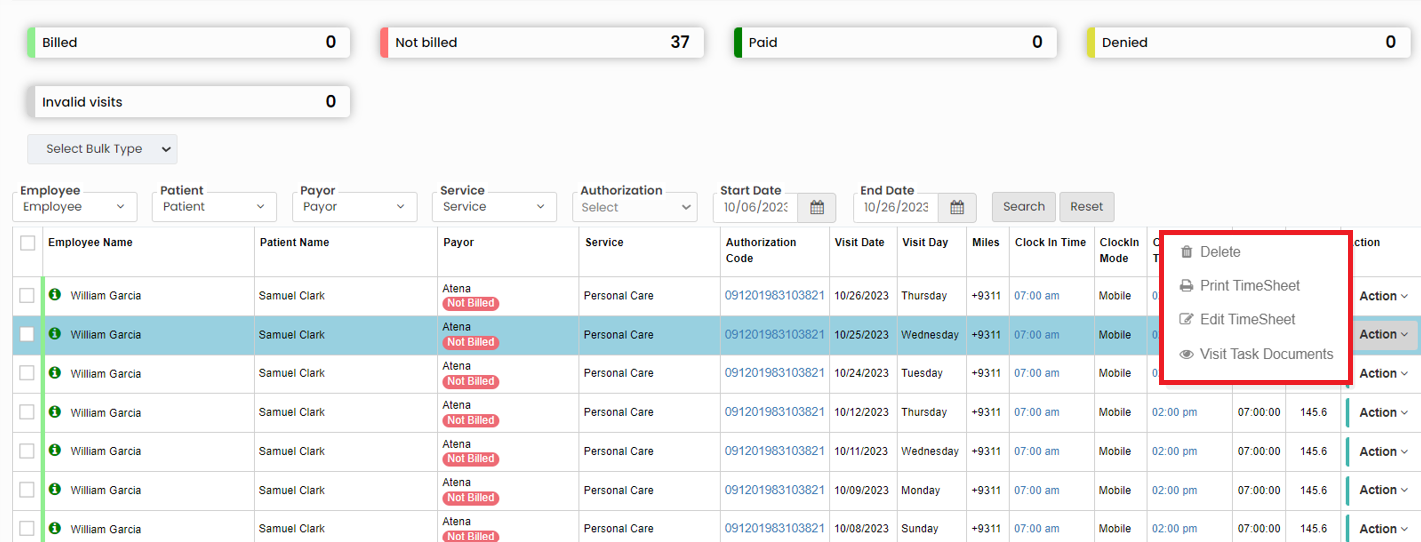](https://support.myezcare.com/uploads/images/gallery/2023-10/Wo1image.png) The following screen appears, click Edit option and update the required information. [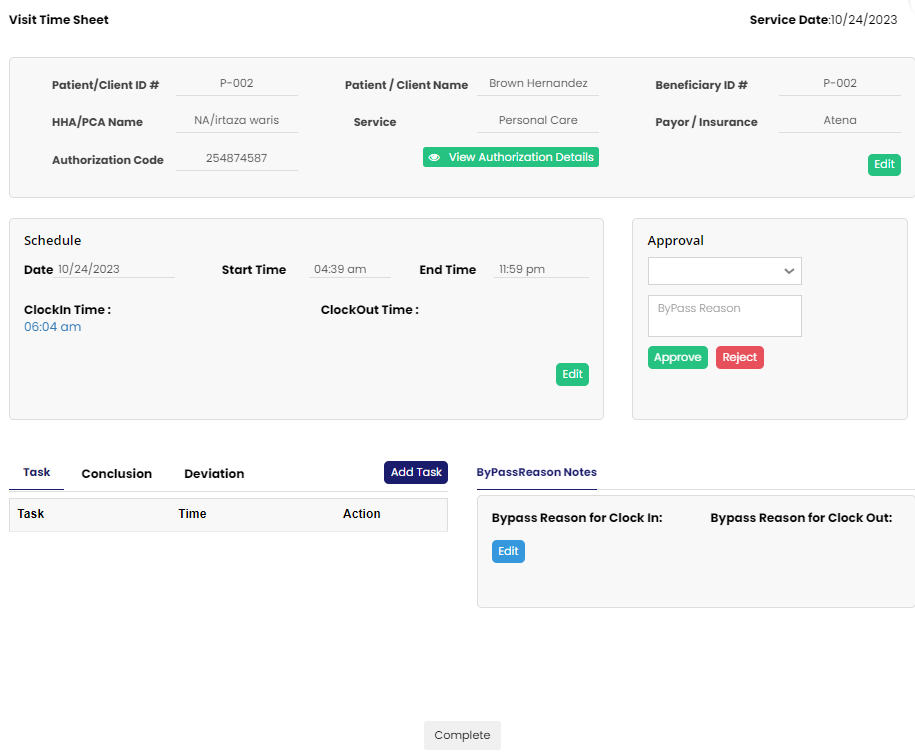](https://support.myezcare.com/uploads/images/gallery/2023-10/oK5image.png) Click Add Task option and check the Visit Task Details from the list and click Save option. [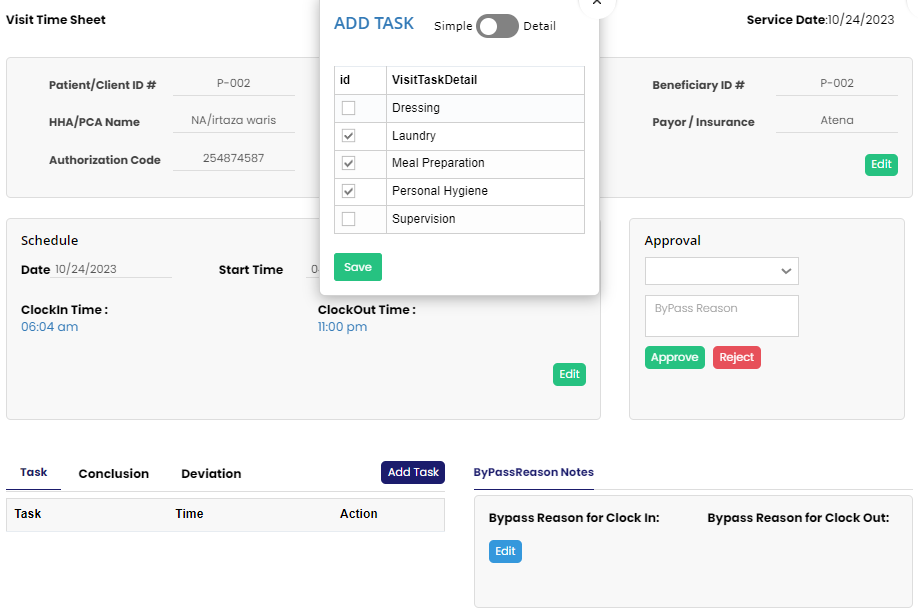](https://support.myezcare.com/uploads/images/gallery/2023-10/4yHimage.png) After updating the required details click the option Complete at the bottom of the Timesheet. [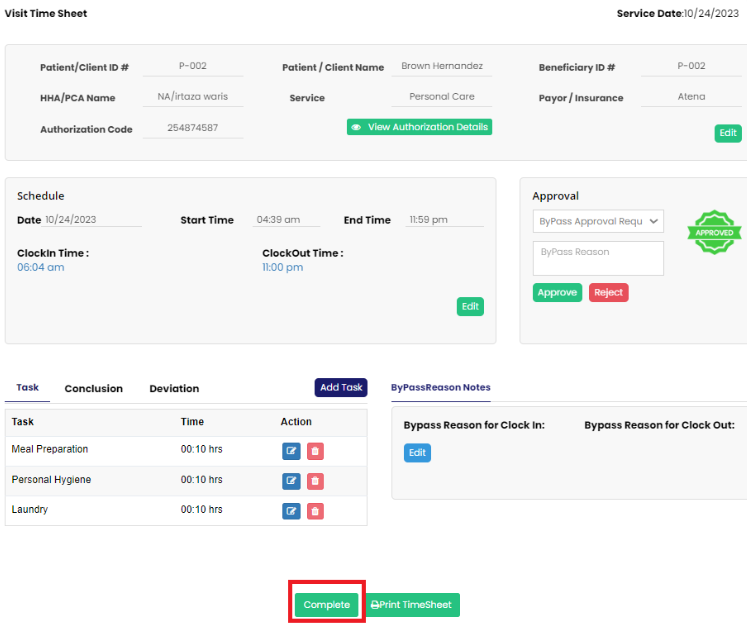](https://support.myezcare.com/uploads/images/gallery/2023-10/5S7image.png) After completing the Timesheet, Select the Timesheet using the check box and click Select Bulk Type dropdown. Now click Approve Selected option to Approve the Timesheet for Billing. [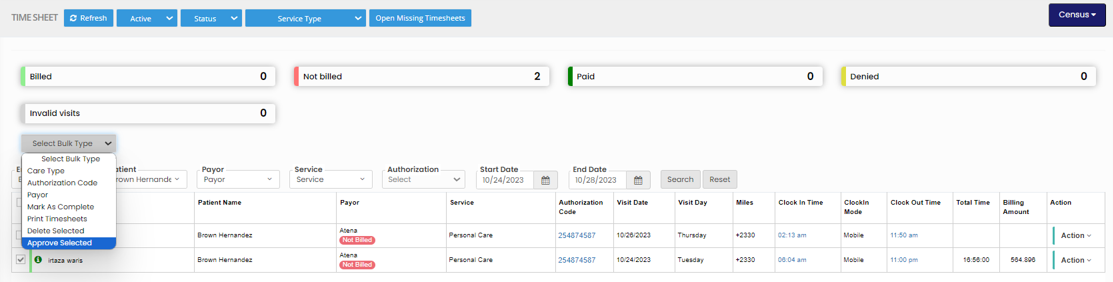](https://support.myezcare.com/uploads/images/gallery/2023-10/mjBimage.png) The following screen appears, click Approve option to Approve the Visits. [](https://support.myezcare.com/uploads/images/gallery/2023-10/Smnimage.png) ### Delete Timesheet**Scheduling >> Visit Report**
Click Action button on the right side of the Visit. The popup shows the actions that can be done in the Visit Report, click Delete option. [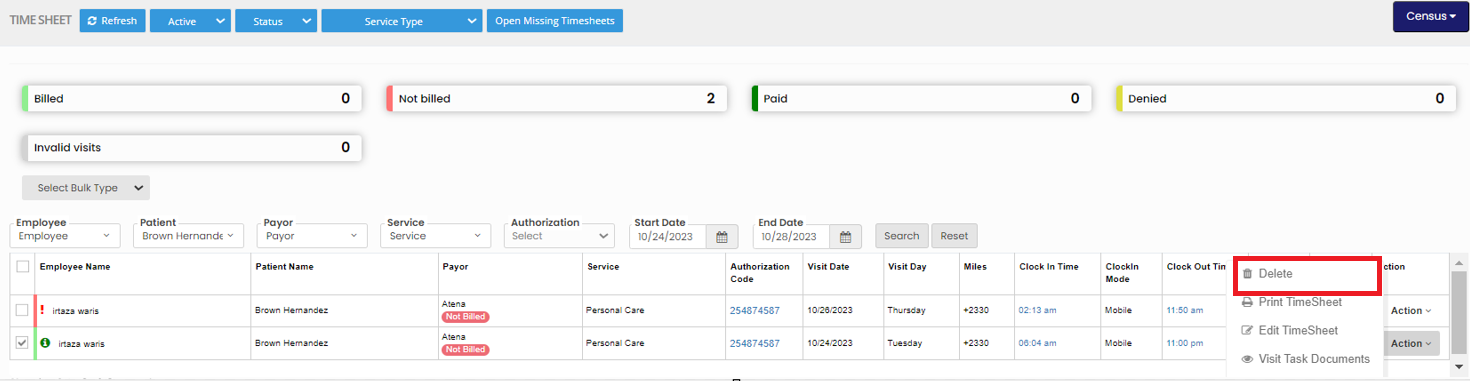](https://support.myezcare.com/uploads/images/gallery/2023-10/J55image.png) For deleting Bulk Timesheet, select the Timesheet using the checkbox and click Select Bulk Type. The list of option appears, click Delete Selection option. [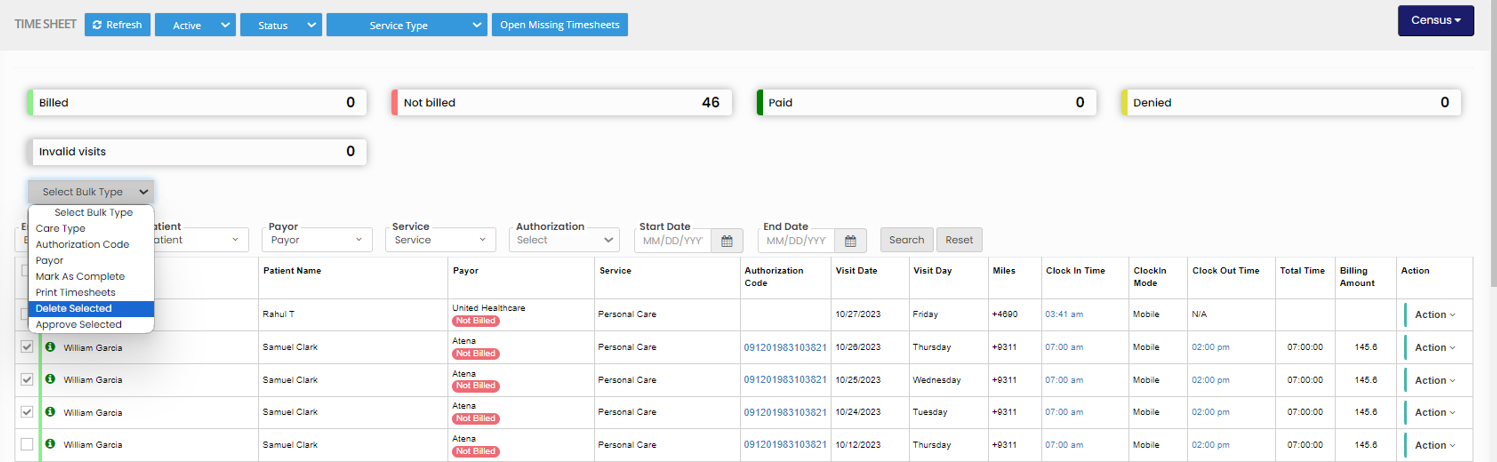](https://support.myezcare.com/uploads/images/gallery/2023-10/hJ2image.png) The deleted Timesheet can be viewed under the Deleted Timesheet list. [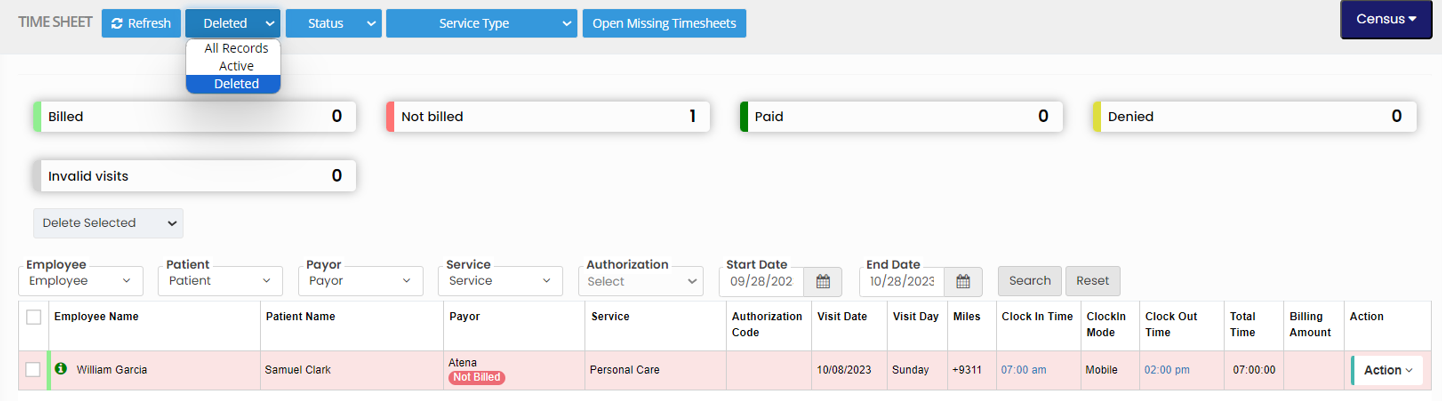](https://support.myezcare.com/uploads/images/gallery/2023-10/sycimage.png) ### Census Option**Scheduling >> Visit Report**
The number of Timesheet depending upon the status of the Timesheet can be viewed by using the option Census. Click Census option and select the option By Timesheet. [](https://support.myezcare.com/uploads/images/gallery/2023-10/bQQimage.png) The number of Completed Timesheet, Incomplete Timesheet, Approval Approved Timesheet, Approval Pending Timesheet and Approval Rejected Timesheet can be viewed in the system. [](https://support.myezcare.com/uploads/images/gallery/2023-10/quBimage.png) The number of Visits depending upon the status of the visit can be viewed by using the option By Billing under Census. The number of Billed visits, Paid visits, Not Billed visit, Denied visit and Invalid visits can easily viewed in the system. [](https://support.myezcare.com/uploads/images/gallery/2023-10/iIlimage.png) # Bulk Timesheet A Bulk Timesheet option is used to create multiple Timesheets for the patients in the system. The missed timesheet can be created by using this option. #### Create Bulk Timesheet**Timesheet >> Bulk Timesheet**
[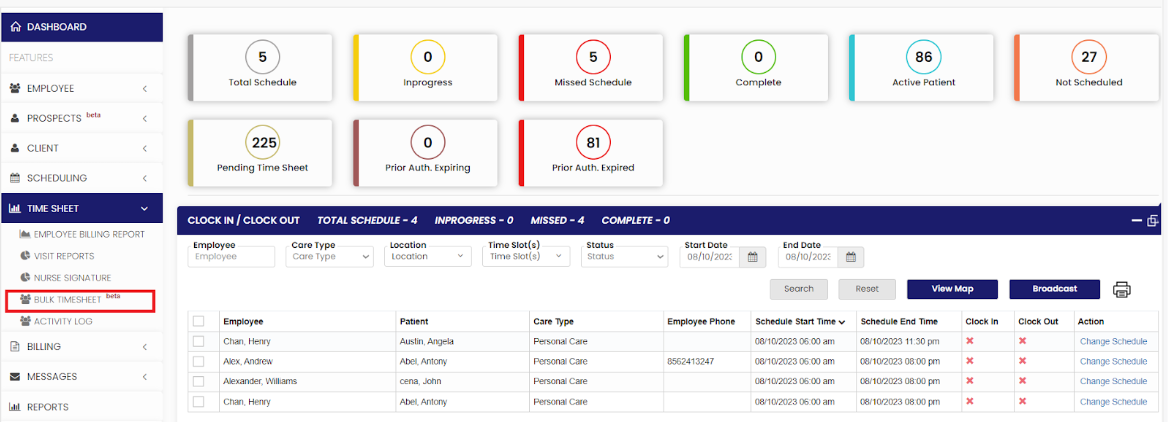](https://support.myezcare.com/uploads/images/gallery/2023-10/oHcimage.png) Select the Employee Name, Patient Name, Care Type, Type of Timesheet, From Date, To Date and Click Search. [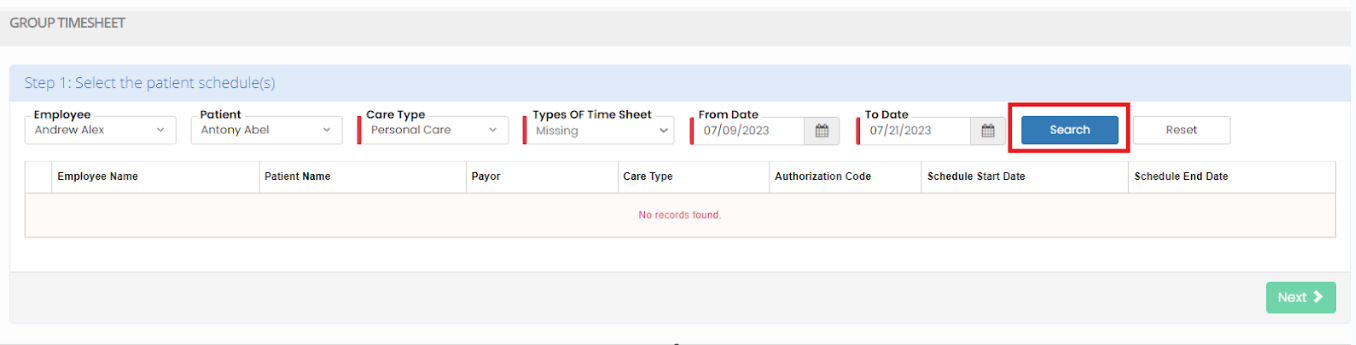](https://support.myezcare.com/uploads/images/gallery/2023-10/ubEimage.png) The required details will appear on the screen, now select the checkbox and Click Next option. [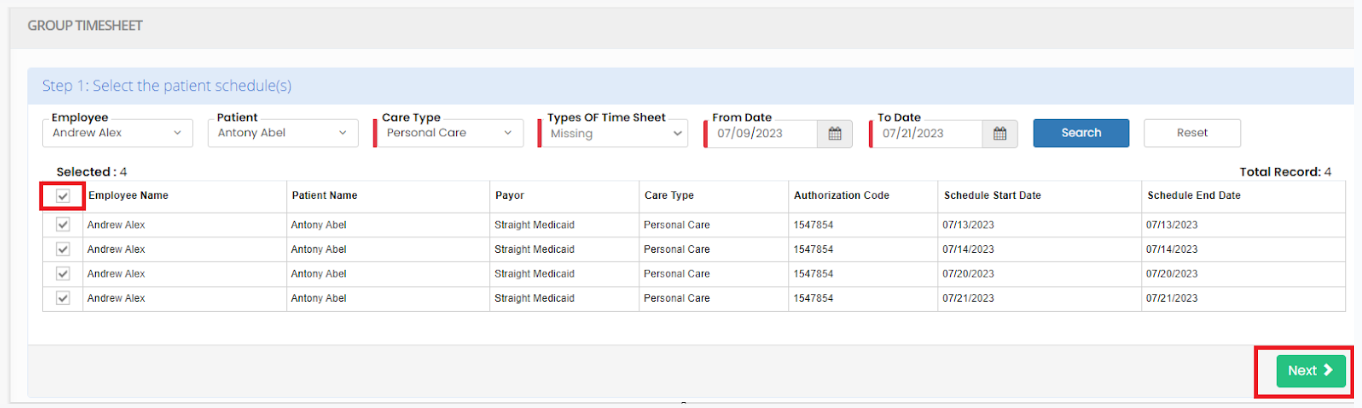](https://support.myezcare.com/uploads/images/gallery/2023-10/Eteimage.png) Verify the Clock-in time and Clock-out time and then Click Next option. If the user wants to change the timing , then update the required time and click Next option. [](https://support.myezcare.com/uploads/images/gallery/2023-10/bweimage.png) Select the Visit Task Details from the list and Click Next option. [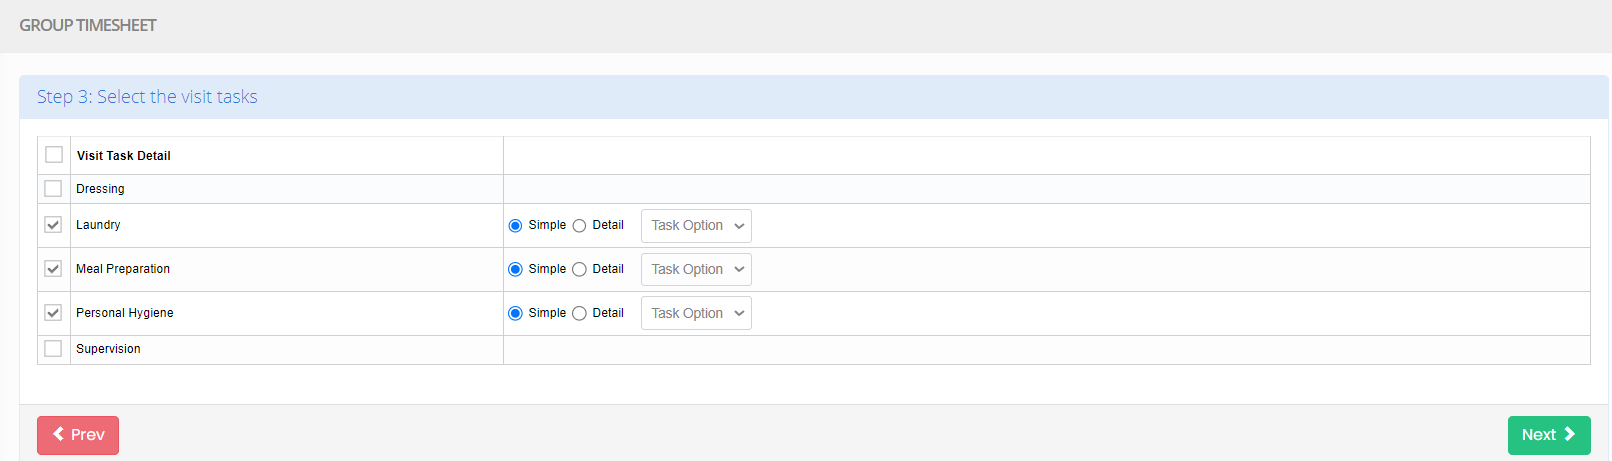](https://support.myezcare.com/uploads/images/gallery/2023-10/teZimage.png) Now review the Timesheet and Click Complete option. The missing Timesheet is now added to the Visit Report. [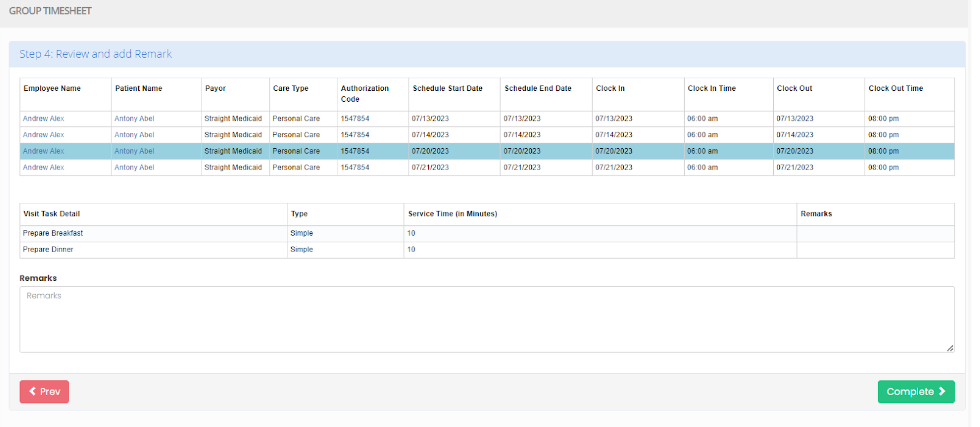](https://support.myezcare.com/uploads/images/gallery/2023-10/unOimage.png) # Activity Log The Activity Log contains information regarding the Activity performed by the patient for a particular Month. ### Adding Activity Log**Timesheet >> Activity Log**
Select the Month and the Patient Name for adding the Activity Log for the Patient. [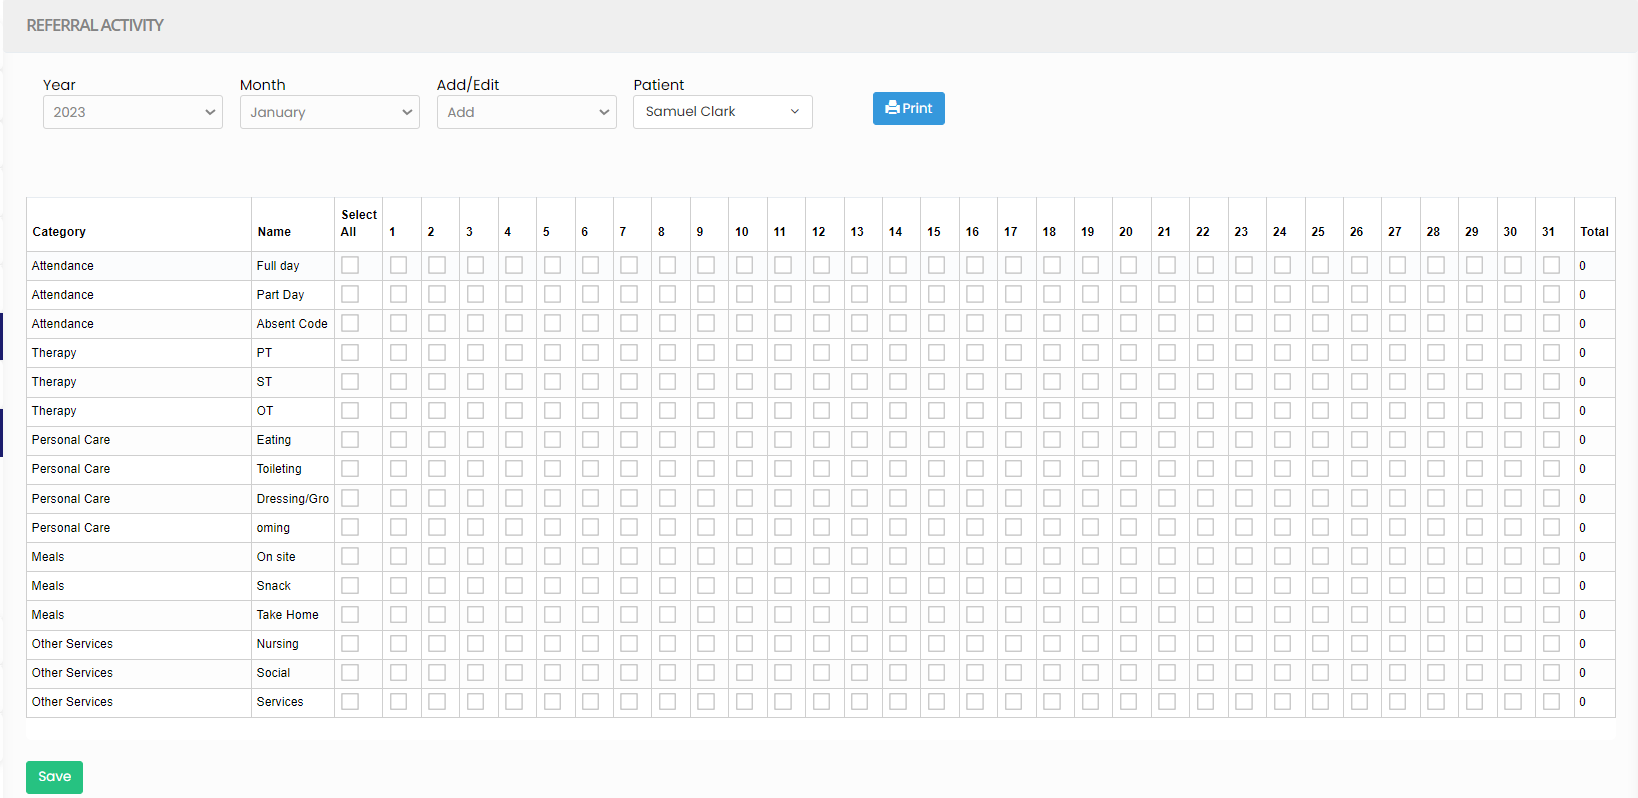](https://support.myezcare.com/uploads/images/gallery/2023-10/9nUimage.png) The user can check the box on each day for the activity's performed by the patient and click Save option. [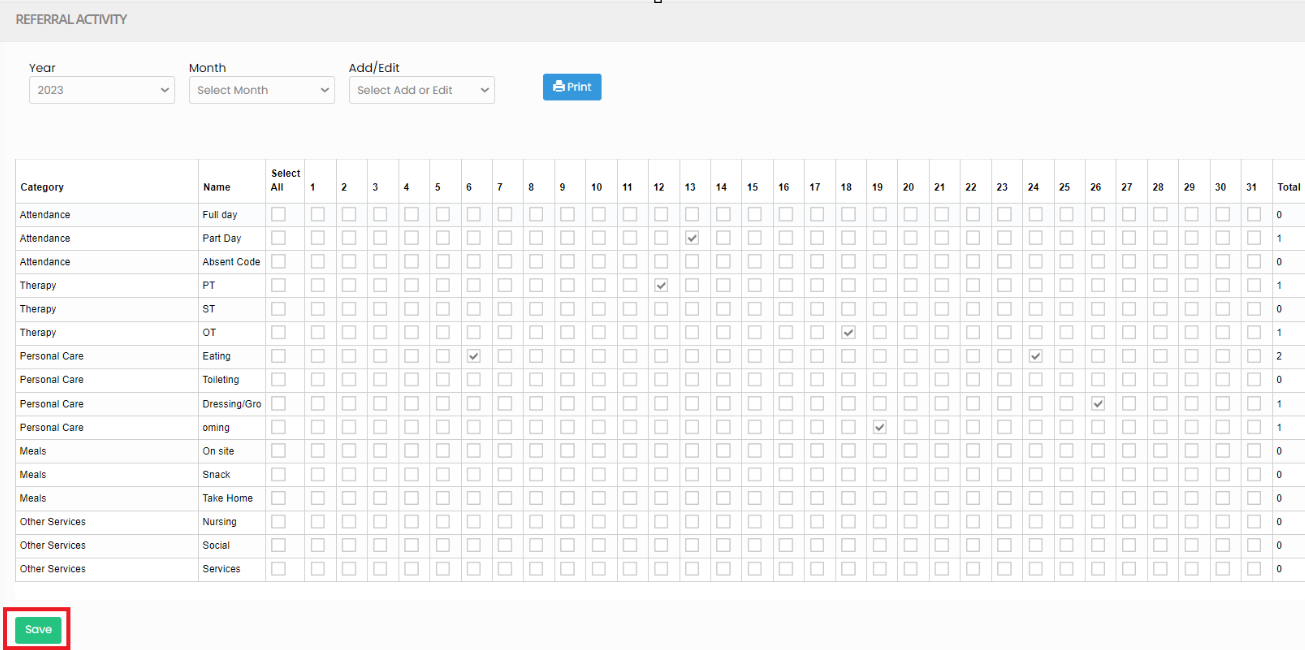](https://support.myezcare.com/uploads/images/gallery/2023-10/jbGimage.png) # Billing Billing refers to the process of invoicing and charging for medical services provided to patients in their homes. It involves documenting the care, submitting claims to insurance companies and collecting payments for the services rendered by the caregiver to the patient. # Manage Claims The Manage Claims option includes data like Processed Claims, Rejected, Acknowledged and Transmitted claims in the system. ### View Claim Status**Billing >> Manage Claims**
The user can view the claim status by using the option Manage Claims. [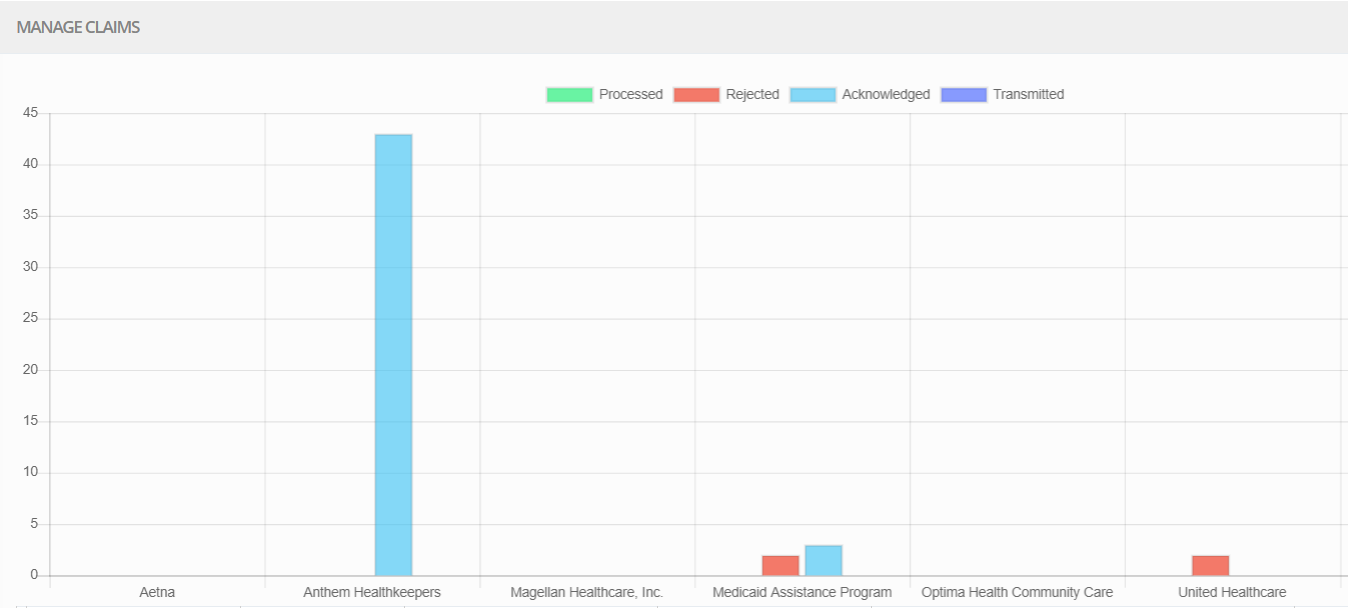](https://support.myezcare.com/uploads/images/gallery/2023-10/uRPimage.png) For searching the Batch Status, update the Batch ID, Patient Name, Payor, Start Date and End Date and click Search option. [](https://support.myezcare.com/uploads/images/gallery/2023-10/nJ7image.png) # Billing Claims Billing claims are formal documents submitted to insurance companies and seeking reimbursement for medical services delivered to patients in their homes. These claims detail the services provided, associated costs, and ensure proper compensation for home-based services. ### Adding Batch for Billing**Billing >> Billing Claims**
To bill the visits in the Timesheet, the user has to create Batches for the Timesheet and submit them to the insurance company for payment. [](https://support.myezcare.com/uploads/images/gallery/2023-10/up1image.png) Click +Add Batch option on the top right side of the screen. Select the Batch Type as Initial Submission, Select the Payor, Service code, Start Date, End Date and Click Search option. Now a popup will appear with the details of the Timesheet, check the box and Click Create Batch option for adding a Batch. [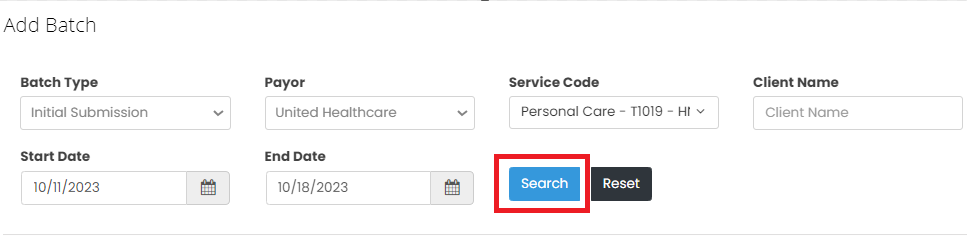](https://support.myezcare.com/uploads/images/gallery/2023-10/n94image.png) The Batch is created with initial submission. Now under Actions Click the Submit Claim option. [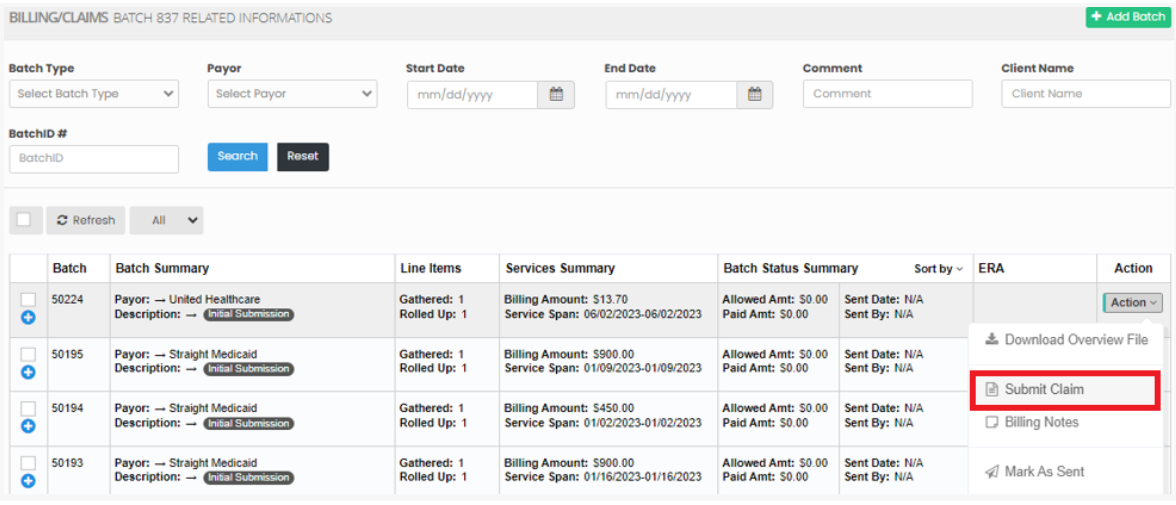](https://support.myezcare.com/uploads/images/gallery/2023-10/r7iimage.png) Once the Batch is submitted, a green color mark appears on the Batch number to indicate that the Batch is submitted. [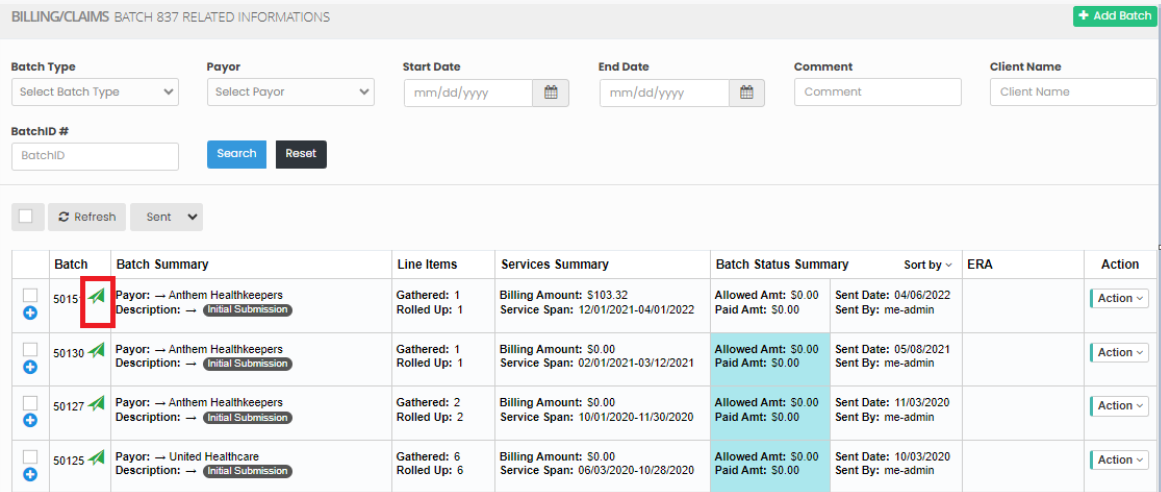](https://support.myezcare.com/uploads/images/gallery/2023-10/lgEimage.png) ### Resubmission of Batches**Billing >> Billing Claims**
For Resubmission of Claims follow these steps: - Select the Batch by using the check box. - Click Bulk Action - Mark As option in the screen. - Select Replacement option. [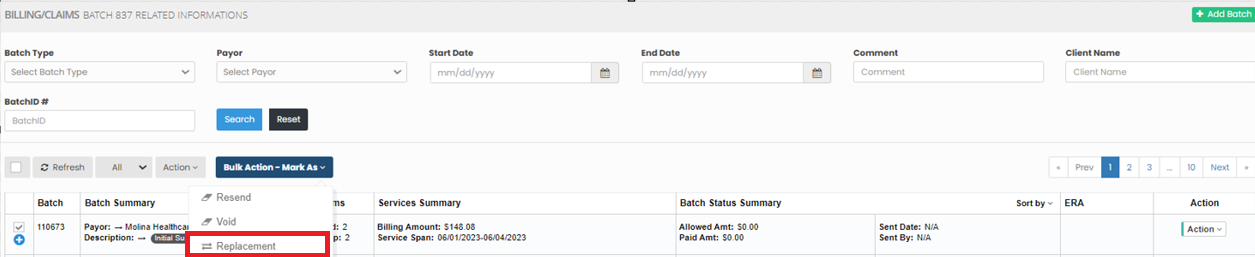](https://support.myezcare.com/uploads/images/gallery/2023-10/1gUimage.png) Now click Add Batch option and Select the Batch Type as Adjustment (Void/Replace)Submission and update the Payor Name, Start Date, End Date and Click Search option. [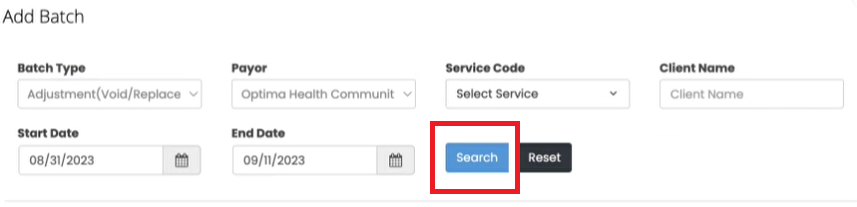](https://support.myezcare.com/uploads/images/gallery/2023-10/NSdimage.png) The following screen appears with the Line item. Select the line item and click create Batch option. [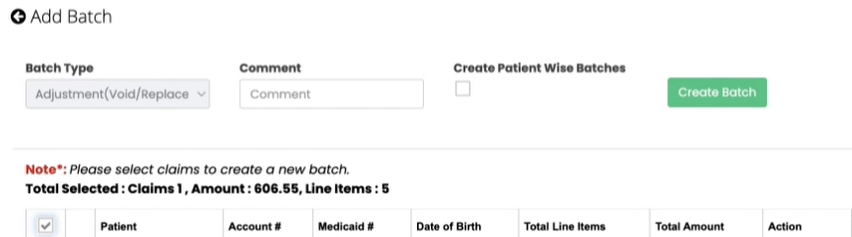](https://support.myezcare.com/uploads/images/gallery/2023-10/enDimage.png) The Batch has been created for Adjustment (Void / Replace)Submission. Select the check box and click Submit claim option. [](https://support.myezcare.com/uploads/images/gallery/2023-10/UhKimage.png) [](https://support.myezcare.com/uploads/images/gallery/2023-10/RGsimage.png) # Reconcile Payments / ERA, Reconcile 835/ EOB and EDI File Log ### Reconcile Payments / ERA Reconcile payments refers to the process of comparing received payments from insurance providers and patients against the billed charges for services provided. This ensures accuracy, identifies discrepancies, and helps resolve outstanding balances, contributing to the financial stability of the home health care agency. Electronic Remittance Advice, which is an electronic document that provides detailed information about payment and denial of claims. **Get Latest ERA****Billing >> Reconcile Payments / ERA**
Click the option Latest ERA. The following screen appears, click Get Latest ERA option. The latest ERA details will be displayed on the screen. [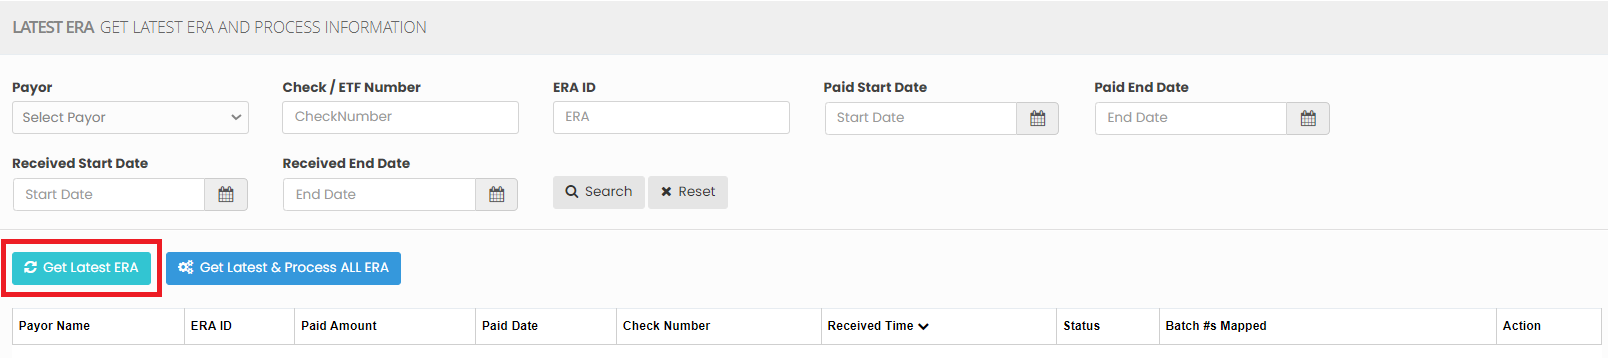](https://support.myezcare.com/uploads/images/gallery/2023-10/tVeimage.png) ### Reconcile 835/ EOB Reconcile 835/ EOB helps home healthcare providers to verify that payments and denials on the EOB are consistent with the ERA, ensuring accurate financial management and claims processing.**Billing >> Reconcile 835/EOB**
Update the required fields and click Search option. The details will appear on the screen with Patient name and Billed amount. [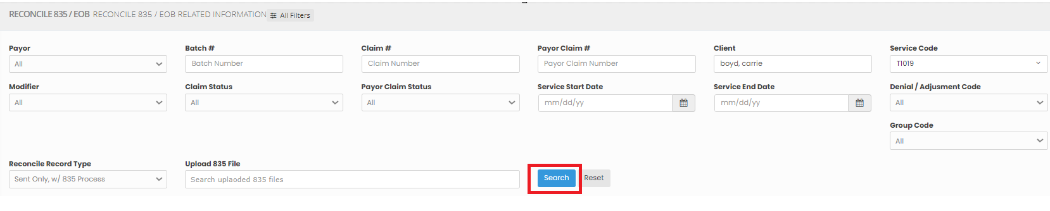](https://support.myezcare.com/uploads/images/gallery/2023-10/ty0image.png) ### EDI File Log An EDI (Electronic Data Interchange) file log is a record of digital interactions between healthcare providers, payers, and agencies. It tracks the exchange of patient data, claims, and billing information, ensuring compliance with industry standards and facilitating efficient communication for better patient care and reimbursement.**Billing >> EDI File Log**
The list of EDI File logs information is displayed in the screen. Enter the File Name, File type and click Search option to view the required EDI File. [](https://support.myezcare.com/uploads/images/gallery/2023-10/B4Dimage.png) # Download 837 File **Download 837 File** **Step 1:** Go to Billing >> Billing claims module **Step 2:** Select the Batch and Click "Submit Claim” option. **Step3:** Click “Yes Continue” option **Step 4:** Click the option “Download” to download the 837 File. # Messages Messages refer to the critical communication exchanged between healthcare caregivers and patients. These messages convey vital information about the patient's condition, treatment plans, medication schedules, and any changes in their health status. Effective messaging is essential for coordinating and delivering high-quality care in a home setting. # Received Messages, Sent Messages ### Received Messages The Internal Messages Notifications received in the system can be viewed under Received Messages.**Messages >> Received Messages**
The user can view the Internal received messages in this screen. [](https://support.myezcare.com/uploads/images/gallery/2023-10/lD6image.png) ### Sent Messages Sent messages are communications from patients, caregivers or family members. They relay critical information, updates, instructions, and reminders, enhancing patient care and ensuring effective communication while adhering to privacy regulations.**Messages >> Sent Messages**
The Sent Internal Message can be viewed in the system by using the option Sent Message. [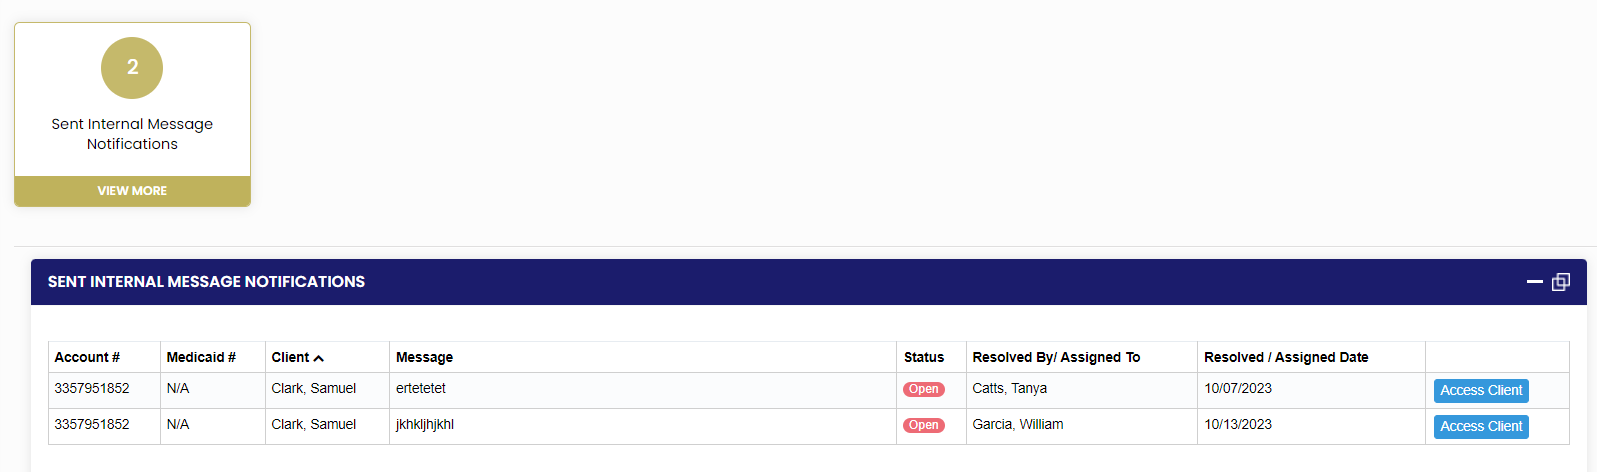](https://support.myezcare.com/uploads/images/gallery/2023-10/lWuimage.png) # Group SMS and Broadcast Notification ### Group SMS A group SMS refers to a text messaging service that allows the user to send messages simultaneously to multiple caregivers. It facilitates efficient communication and coordination among healthcare teams, ensuring timely updates, appointment reminders, and critical information. **Sending Group SMS****Messages >> Group SMS**
Step 1: The user can select the group of Employees from the list to send the messages in this field. Step 2: Enter the Text message to be sent to the Employees. Step3: Click send SMS Button to send the messages to employees. [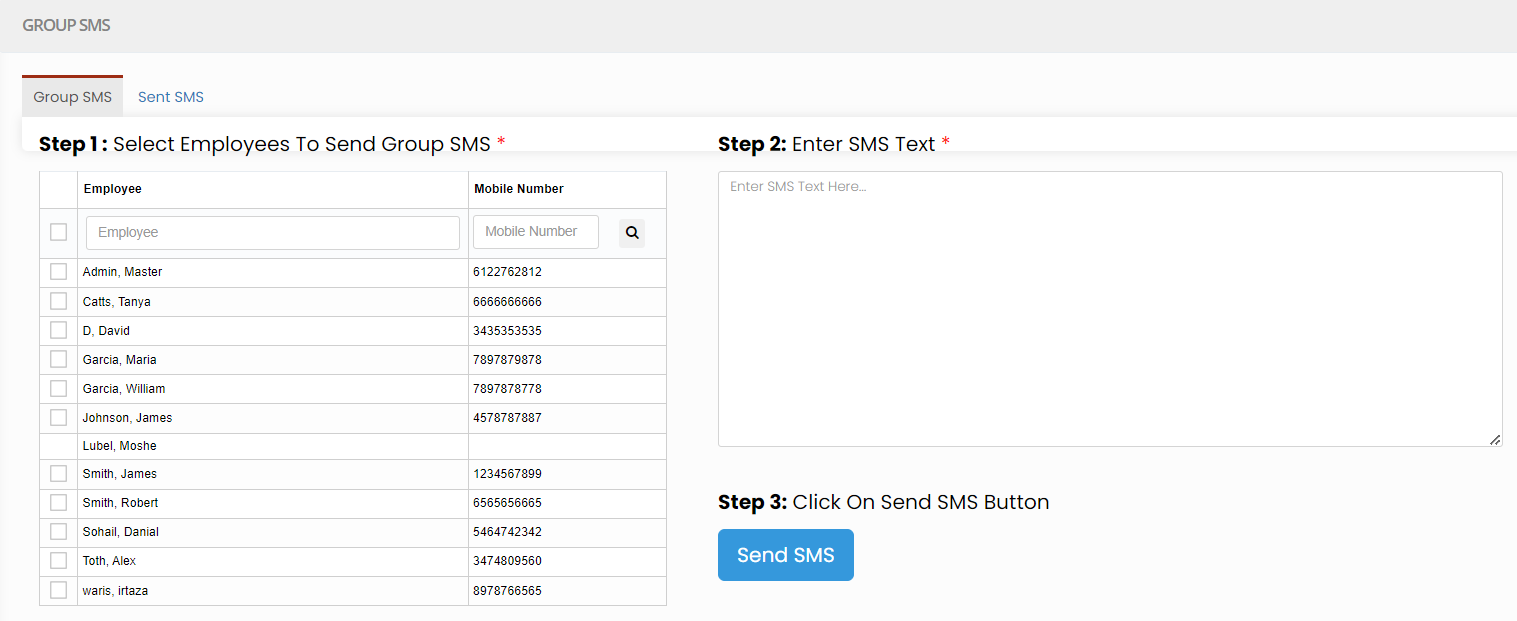](https://support.myezcare.com/uploads/images/gallery/2023-10/QLEimage.png) **Sent SMS****Messages >> Group SMS**
The sent SMS can be viewed in the system by using the option Sent SMS. [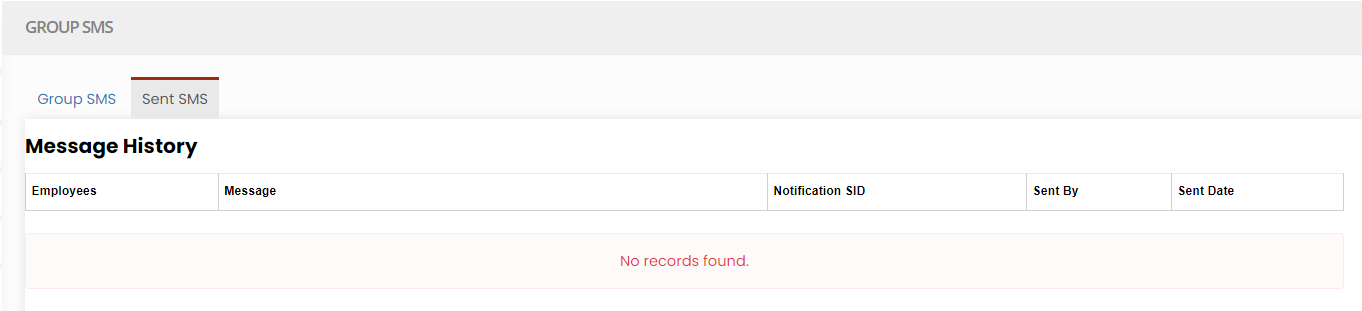](https://support.myezcare.com/uploads/images/gallery/2023-10/nM1image.png) ### Broadcast Notification A broadcast notification refers to alerts to all relevant caregivers, medical professionals, and patients simultaneously. It ensures that everyone involved in a patient's care is promptly informed about critical events, changes in treatment plans, or emergencies, facilitating coordinated and efficient care delivery. **Sending Broadcast Notification****Messages >> Broadcast Notifications**
To send Broadcast Notification follow these steps: - Step 1: Select Employee from list to send Broadcast Notification. - Step 2: Enter Broadcast Notifications text. - Step 3: Click the Send Notification Button. [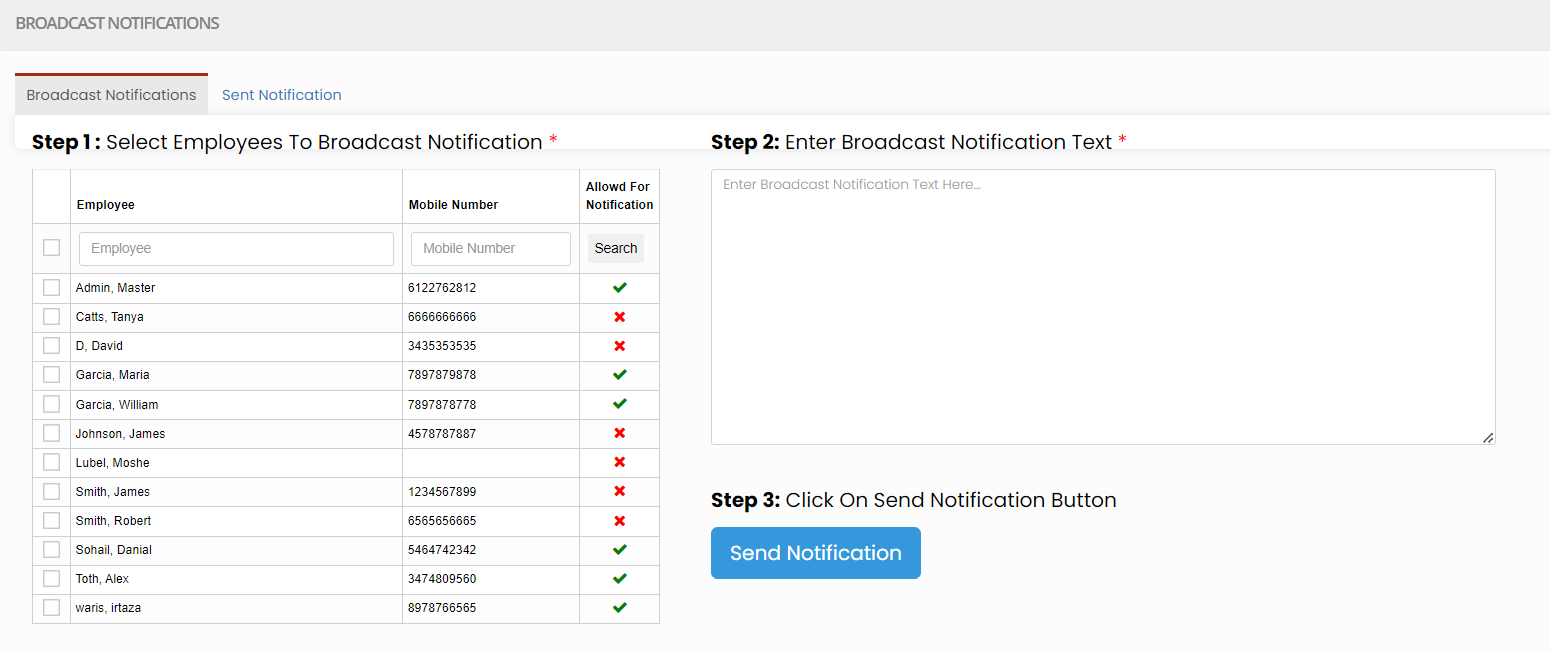](https://support.myezcare.com/uploads/images/gallery/2023-10/iiNimage.png) **Sent Notifications****Messages >> Broadcast Notifications**
The sent notifications can be viewed in Sent Notification screen. [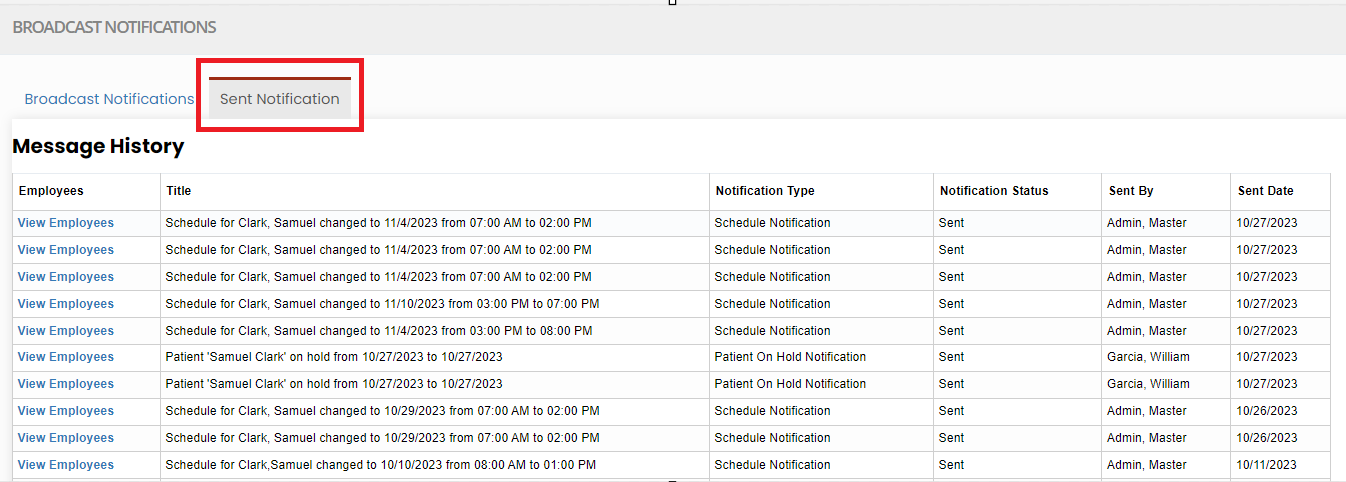](https://support.myezcare.com/uploads/images/gallery/2023-10/7bVimage.png) # Reports The Employee Clock-in and Clock-out visit reports, patient visit report and other reports related to home care can be viewed in the system. # Employee Reports, Patient Reports and Other Reports #### Employee Reports The Employee Clock-in and Clock-out Report, Employee visit hours, Employee visit hours summary and Employee Status Report can be viewed under Employee Reports in the system. [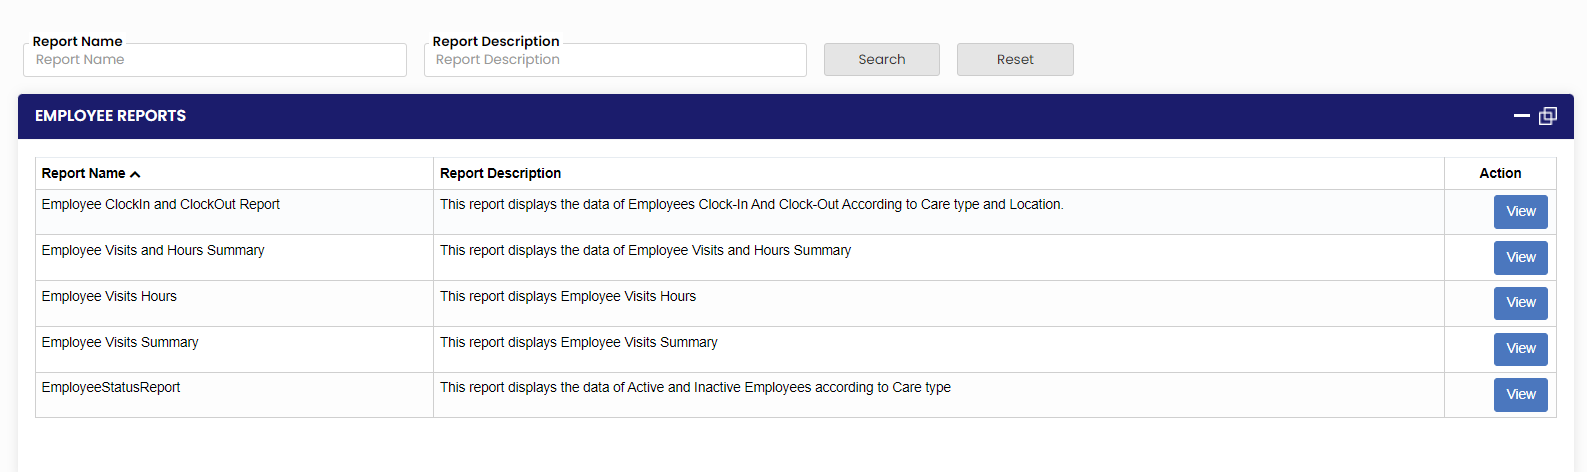](https://support.myezcare.com/uploads/images/gallery/2023-10/yfximage.png) #### Patient Reports The List of Active patient report, Medication Log report, Schedule report etc. and be viewed under Patient Reports in the system. [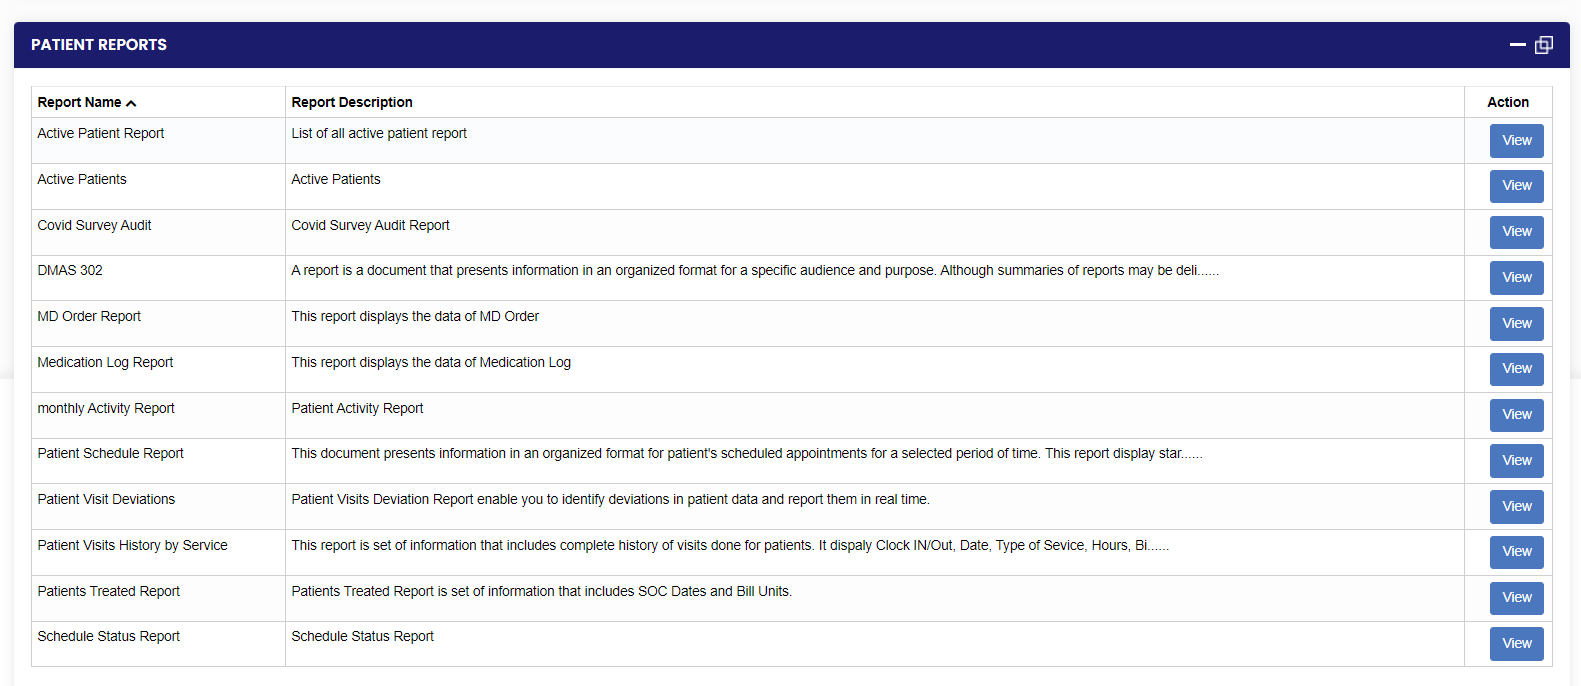](https://support.myezcare.com/uploads/images/gallery/2023-10/nZPimage.png) #### Other Reports The Bulk Timesheet Report, Weekly Timesheet report, Revenue Summary Report, Prior Authorization Expiring Report etc. can be viewed under Other Reports in the system. [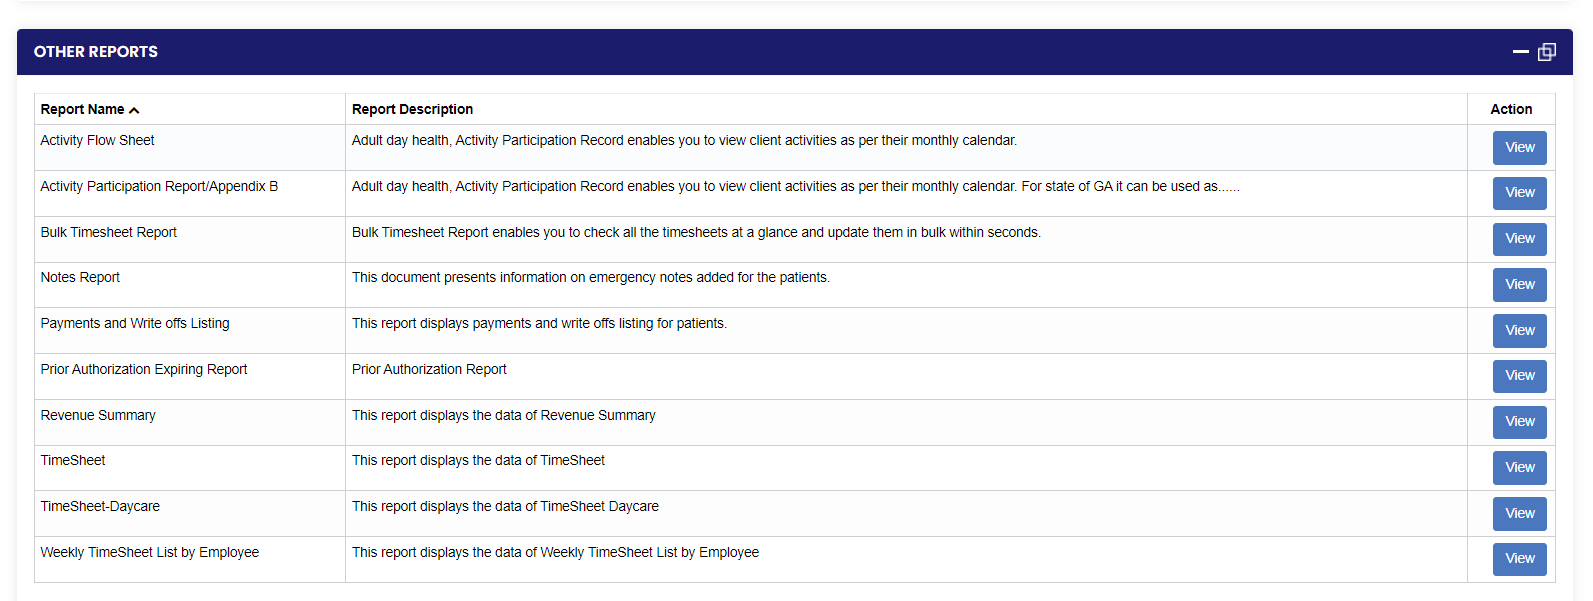](https://support.myezcare.com/uploads/images/gallery/2023-10/7p1image.png) # Attendance Attendance refers to the presence and active involvement of a caregiver who provides essential medical, personal, or support services to a patient within their own residence. # Clock-in-out, Calendar Clock-in and clock-out refers to the process of recording the exact time when a staff starts and ends their work. An attendance calendar is a record-keeping system used to track and document the presence and hours worked by healthcare professionals, such as nurses and caregivers. ### Clock-in-out**Attendance >> clock-in-out**
Select the Facility House from the list and click Clock-in option. Also at the end of the shift time, click Clock-out option. [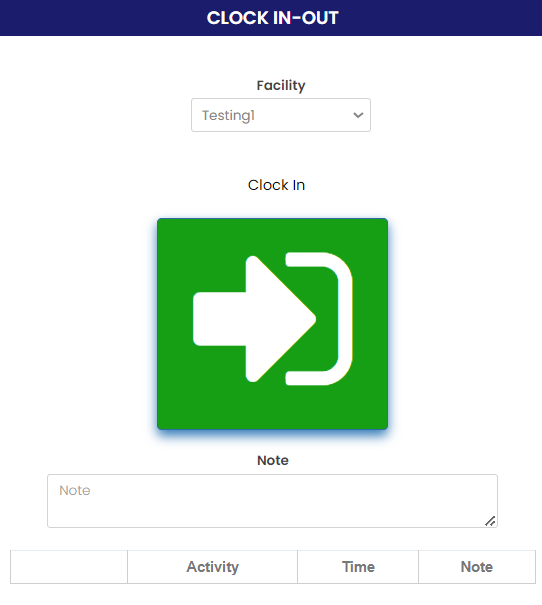](https://support.myezcare.com/uploads/images/gallery/2023-11/hynimage.png) ### Calendar**Attendance >> Calendar**
The user can view the Calendar option for the Employees Attendance. Select the Employee from the list to view the Calendar. [](https://support.myezcare.com/uploads/images/gallery/2023-11/U8zimage.png)